 Subitem Support
 Subitem Support
Subitem support works by specifying if an item is a subitem of another item on the Inventory Item Admin page. In order to use subitems each item - master item and each of the subitems - must be set up as a separate inventory item. The master item acts as the 'display master' and is used for displaying item information.
Once master and subitems are configured, you specify that a subitem is a subitem by associating it with a parent item. This functionality is configured in the Inventory Item Form on the Other page. In the image below the Item is Web Connection T-Shirt (Medium/Black) which is a subitem of Web Connection T-Shirt:
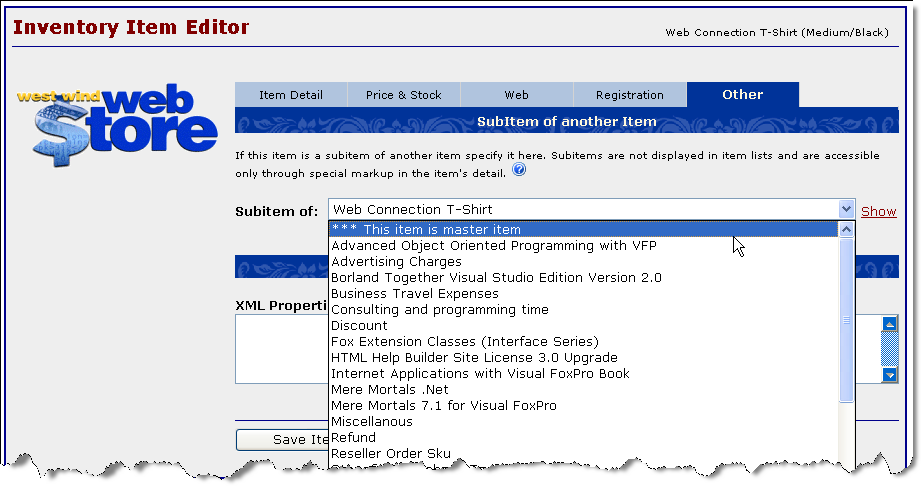
Any subitem must set its parent item. When a subitem is accessed via Sku in the store the parent item is actualy displayed, so all product information should be entered on the parent item.
Internally this process sets the IsSubitem flag and the ParentSku property which are used to filter items as needed. The IsParentSku flag prevents subitems from displaying in item display lists. So in the example above you would only see Web Connection T-Shirt, but not the size and color specific subitems. When the Web Connection T-Shirt is selected it should show all the subitems.
To display subitems you have to do a little bit of extra work when for the item display by embedding a little bit of extra HTML into the page that allows the Web Store to detect subitem selection. There are two different approaches available:
SubItemSku
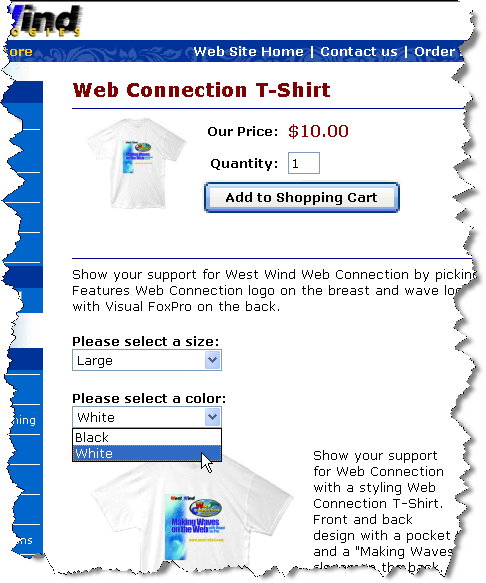
This mechanism is useful when each subitem has a distinct description and the number of subitems is reasonably short to be selected off a single list. For example if you sizes and color for an item like a T-Shirt the subitems will generally be around 10 items or so which can be easily picked out of a single list.The idea with this approach is that you can present a list of the subitems and let the user select a single item, with a value of the selected Sku. The Web Store can automatically generate this list for you automatically using the <%= InsertSubItemList() %> tag in your detail description.
So assume we have an item called AA_SHIRT and subitems AA_SHIRT_MED_BLACK, AA_SHIRT_LG_BLACK, AA_SHIRT_XLG_BLACK, AA_SHIRT_MED_WHITE. We can embed these subitems into the AA_SHIRT Long Description field like this:
Syntax:
<b>Select a color and size:</b>
<select name="SubItemSku_Items">
<option value="AA_SHIRT_MED_BLACK">Web Connection T-Shirt (Medium/Black)
<option value="AA_SHIRT_LG_BLACK">Web Connection T-Shirt (Large/Black)
<option value="AA_SHIRT_XLG_BLACK">Web Connection T-Shirt (X-Large/Black)
<option value="AA_SHIRT_MED_WHITE">Web Connection T-Shirt (Medium/White)
</select>
which yields:

Each of these SKUs in the option VALUE attributes must exist. When you select one of these items the selected SKU is used instead of the main sku of the item currently selected. The name of the <SELECT> field must start with SubItemSku_. This is the trigger that the store uses to pick up the alternate SKU that overrides the default sku.
<select name="SubItemSku_Items">
Since it's common that you want to display all child items you can also automatically generate a list of all child items automatically with:
<%= InsertSubItemList() %>
For example in your HTML:
Select a color and size:
<%= InsertSubItemList() %>
This code is equivalent for the manually created HTML above. This has the added advantage that the subitem list checks stock and doesn't include items that are sold out. This feature requires that you configure each subitem with a parent Sku on the Item Configuration form.
SubItemPostFix
The above approach works well if you have only a few subitems and they are somewhat distinctive to be picked out of a list. If you list of subitems gets too long however, the list gets hard to read and navigate. In this case it's often easier to break out options into separate lists. In the example above you might break out the selection lists into Colors and Sizes.This mechanism allows you to specify sub categories by using a postfix value that is appended to the base SKU in the order of selections made. This works best if you require multiple selections and the selections can be built into a new SKU string.
For example assume you have an item SKU of "AA_TSHIRT":
<b>Please select a size:</b>
<select name="SubItemPostFix_Sizes">
<option value="_MED">Medium
<option value="_LG">Large
<option value="_XLG">X-Large
</select>

<b>Please select a color:</b>
<select name="subitemPostFix_Color">
<option value="_BLACK">Black
<option value="_WHITE">White
</select>
If you now select Large and White, the sku selection for this item would become:
AA_TSHIRT_LG_WHITE
In other words the the SKU and the SubItemPostFix selections are simply concatenated into a new SKU. The sku must exist in your inventory. The order is of the items is important. If the SKU is AA_TSHIRT_XGE_BLACK the size must preceed color in order for this scheme to work.
Managing SubItems on the Admin Forms
The Inventory Item form supports easy access toSee also
Custom Fields for Item Display Pages
Comment or report problem with topic