 The Item Display and Add Page - Item.aspx
 The Item Display and Add Page - Item.aspx
The item display page provides the primary display mechanism for inventory items in the store. Although the ItemList.aspx page provides some product detail especially in the Abstract or Form display modes this page provides the full view of the item. You'll likely also use this page as a direct order link from your Web site (or other places) to order online. So in a way this is one of the most important pages of the store.
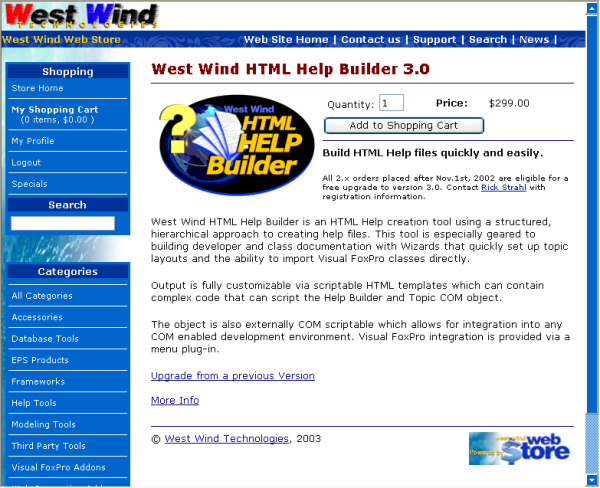
This page holds the item quantity and price information as well as a display of the long content. The content here comes directly from the wws_items table and is only HTML formatted. You can embed HTML data into the product descriptions. The product image is part of the page (not of the item description) and automatically determines whether it displays or not depending on whether the image is specified. It will however display a broken link if the image doesn't exist. The image is stored in the ItemImages folder or a folder relative thereof.
In the VS.Net designer this form looks a little foreign:
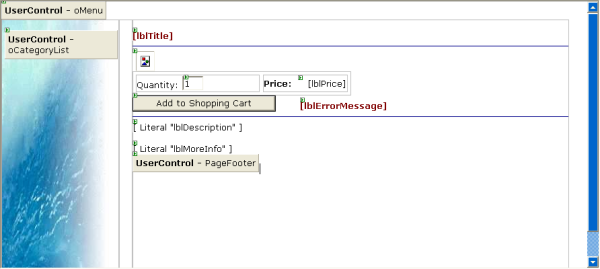
as a literal controls are the real holder of data. The literal controls receive the content from the lDescript field.
Most of the item display is handled via code behind the page, because a lot of the controls require some logic to decide what to render. So rather than DataBinding directly the form is hand bound to the handful of controls that are there. The code to do this is in the DisplayItem method:
private void DisplayItem()
{
	// *** Allow item disply from URL query string
	string Qty = Request.QueryString["qty"];
	if (Qty != null)
		this.txtQty.Value = Qty;
	else
		this.txtQty.Value = "1";

	// *** If Action=Add was used force to Button_Click
	if (Request.QueryString["Action"] == "Add")
	{
		this.btnSubmit_Click(this,null);
		return;
	}

	// Put user code to initialize the page here
	this.IvtItem = WebStoreFactory.GetbusItem();

	string lcSku = Request.QueryString["Sku"];
	if (lcSku == null)
	{
		// *** Can't display an item without a sku
		Server.Transfer("default.aspx");
		return;
	}

	// *** Retrieve the inventory item for checking stock and binding
	if (!this.IvtItem.GetItemBySku(lcSku))
	{
		MessageDisplay.DisplayMessage("Invalid Item","The item you selected is no longer available. " +
					                    "If you typed the Url in manually make sure the SKU is typed correctly.");
		return;
	}

	this.rowItem = this.IvtItem.GetTypedDataRow(false);

	// *** We'll bind in code here because we need to fix up a few things
	this.lblTitle.Text = rowItem.Descript;

	// *** Force HTML linebreaks into the field text
	this.lblDescription.Text = wwUtils.DisplayMemo( rowItem.Ldescript );

	// *** Display price as Currency
	this.lblPrice.Text = rowItem.Price.ToString("C");

	// *** Don't allow adding if stock is out
	if ( rowItem.Physical  && rowItem.Stock < 1)
	{
		this.btnSubmit.Enabled=false;
		this.btnSubmit.Text = "Out of Stock";
	}


	// *** Must handle images if not present
	if (!wwUtils.Empty( rowItem.Image ) )
		this.imgProduct.ImageUrl = "itemimages/" + rowItem.Image;
	else
		this.imgProduct.Visible = false;

	if (rowItem.Url != null)
		this.lblMoreInfo.Text = "<a href='" + rowItem.Url + "'>More Info</a>";

}
As you can see the code performs a bunch of conditional checks to set up the page. Normally using wwWebForm.BindData() can provide much quicker and easier databinding, but since there are so many things to check and only a few fields are bound it's more efficient to bind manually to the data in code.
Adding an item to the Shopping Cart
The page also handles all adding of items to the Shopping cart. You can obviously click the Add Item button on this form to add items to the cart but it also provides a URL based interface to do the same thing. This is actually what the ItemList.aspx page uses to add items to the shopping cart for example:http://localhost/wwWebstore/item.aspx?sku=WWHELP30&Action=Add
This approach allows you to also provide links right out of your application that force your item to order directly into the Shopping Cart to take customers just one step closer to actually buying a product from you <g>.
To save an item a lot of things need to happen, but most of this logic is abstracted away in the business object which does all the hard work. The front end code looks something like this:
private void btnSubmit_Click(object sender, System.EventArgs e)
{
	// *** Add this lineitem
	string lcQty = this.txtQty.Value;
	if (wwUtils.Empty(lcQty)) {
		// *** Just exit
		Response.Redirect("ShoppingCart.aspx");
		return;
	}
	int Qty = 0;
	try
	{
		Qty = Int32.Parse(lcQty);
	}
	catch
	{
		this.DisplayItem();
		this.lblErrorMessage.Text = "Invalid quantity entered";
	 }

	// *** Try to reuse previously created Invoice Pk
	int InvPk;
	object Temp =  Session["InvPk"];
	if (Temp == null)
	{
		busInvoice Invoice = WebStoreFactory.GetbusInvoice();
		InvPk = Invoice.CreateNewId();
		Session["InvPk"] = InvPk;
	}
	else
		InvPk = (int) Temp;

	// *** Create a new lineitem and have it set with the properties
	// *** from the matching inventory item. Override looks up Ivt item and sets
	// *** default properties on the object
	busTLineItem TLine = WebStoreFactory.GetbusTLineItem();
	if (!TLine.New(InvPk,Request.QueryString["Sku"],Qty) )
	{
		this.DisplayItem();
		this.lblErrorMessage.Text = TLine.ErrorMessage;
		return;
	}

	// *** Deal with special 'tag' in the text based on the Type field
	string ExtraType = (string) TLine.DataRow["Type"];
	if (!wwUtils.Empty(ExtraType) )
	{
		ExtraType = ExtraType.Trim().ToLower();

		// *** Retrieve all items that have the type's prefix
		// *** and write it into the Properties field and ExtraText string
		for (int x=0; x < Request.Form.Count; x++)
		{
			string Key = Request.Form.Keys[x];
			string Value = Request.Form[x];
			if (Value.Length < ExtraType.Length)
				continue;

			if (Key.ToLower().Substring(0,ExtraType.Length) == ExtraType)
			{
				TLine.SetProperty(Key,Value);
				TLine.DataRow["ExtraText"] = TLine.DataRow["ExtraText"] + "<br>" +
							                    Key.Replace(ExtraType,"") + ":" + Value;
			}
		}
	}

	// *** Manually force item to calc totals stored in table
	TLine.CalculateItemTotal();

	if (!TLine.Save() )
	{
		this.DisplayItem();
		this.lblErrorMessage.Visible = true;
		this.lblErrorMessage.Text = TLine.ErrorMessage;
		return;
	}

	// *** Use a Redirect here to allow proper refresh of the shopping cart
	// *** Transfer would work but hte URL would be screwy if REFRESH is used
	Response.Redirect("ShoppingCart.aspx");
	// Server.Transfer("ShoppingCart.aspx");
}
The Web Store's Shopping Cart is really a virtual thing. Items are always written to a temporary LineItems table on the back end. This temporary table is really the only permanent record of the order process. The customer is linked to this 'temporary' invoice if you will by way of a customer id (CustPk) and Invoice Id (InvPk) stored as Session Variables. An invoice doesn't exist at this point in time. A customer profile may exist if the user chose to already save profile, but this is not required. The invoice and customer info is not actually written until later in the order process.
Notice that this is a fairly disconnected model where we create a new lineitem individual and simply save it rather than attaching it to an invoice. The idea is that it's more efficient at this point to simply add a new item write it to disk and let the following display code in the ShoppingCart deal with setting up the relationship between the invoice and the lineitem.
The overriden New() method of the LineItem object provides the logic to actually add a new lineitem simply by providing a Sku, quantity and Invoice Pk. The invoice PK is required to make sure that the item can be found later when we look it up in the shopping cart. The invoice Pk is generated once and then saved in a Session variable which is carried through the whole order, so although we create new invoice objects throughout this process we keep reusing this single Invoice PK throughout the whole process.
If all goes well we have a new item in the wws_tLineItems table and we can redirect to the ShoppingCart.aspx page. Note that we redirect here rather than simply transferring to it. I'm not a big fan of Redirects but it makes good sense here because you do not want people to press refresh and add another item. Redirect causes the Address to be properly updated in the browsers Address bar so if the user refreshes she refreshes the ShoppingCart page not the Item add page.
Here's the business object code for the busLineItem.New() method that performs the actual add that retrieves the inventory item, checks stock then creates a new item and writes it to disk:
public virtual bool New(int InvPk,string Sku, int Qty)
{
	busItem Item = WebStoreFactory.GetbusItem();
	if ( !Item.GetItemBySku(Sku) )
	{
		this.SetError(Item.ErrorMessage);
		return false;
	}
	if ( !Item.CheckStock(Qty) )
	{
		this.SetError("There isn't enough stock for this item.");
		return false;
	}

	if (!this.New())
		return false;

	DataRow LineItem = this.DataRow;
	DataRow ivt = Item.DataRow;

	// *** Pick up the Inventory Information
	LineItem["Sku"] = Sku.ToUpper();
	LineItem["Qty"] = Qty;
	LineItem["Descript"] = ivt["Descript"];
	LineItem["Price"] = ivt["Price"];
	LineItem["Weight"] = ivt["Weight"];
	LineItem["Type"] = ivt["Type"];
	LineItem["regauto"] = ivt["regauto"];
	LineItem["InvPk"] = InvPk;

	return true;
}
As you can see the business object code is also very straight forward using more highlevel business object methods such as Item.CheckStock(Qty) to perform the stock check. The whole idea in this mechanism is to delegate responsibility for business level logic to the appropriate objects that are doing all the hard work. This reduces code in the individual objects to fairly highlevel code that is easily read and debugged if necessary.
Notice also that here I'm using the DataRow directly rather than using the GetTypedRow() method to get a typed instance. The reason is simple: There's little to gain by using a typed interface here, since we're simply moving values from one DataRow to another and this can occur without casting. This demonstrates how you can use either typed or untyped DataRows.
Voila, we've now added items to the Shopping Cart. Now comes probably the most involved part of the application: Displaying and managing the shopping cart.

Comment or report problem with topic