 Confirming the order - Confirm.aspx
 Confirming the order - Confirm.aspx
All the hard work is behind us. Now we just need one final form that display the summary of the order and confirms the order for the customer via email. Here's what the confirmation page looks like:
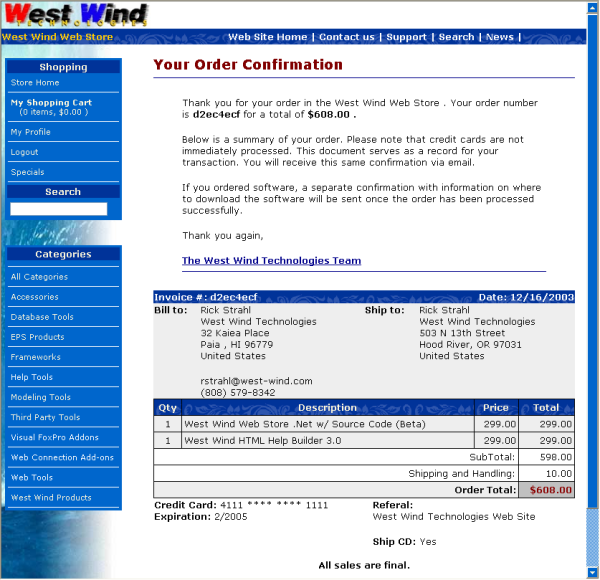
There's nothing really exciting on this form - the logic here is once again very similar to the OrderForm page, but here we're also displaying the customer information on the form in addition to the Invoice.HtmlLineItems() generated list of lineitems and totals.
private void Page_Load(object sender, System.EventArgs e)
{
	this.Invoice = WebStoreFactory.GetbusInvoice();

	InvPk = Session["InvPk"];
	if (InvPk == null)
	{
		Response.Redirect("Shoppingcart.aspx");
		return;
	}

	// *** Load the invoice and total so we can display it
	if (!Invoice.Load((int) InvPk))
	{
		Response.Redirect("ShoppingCart.aspx");
		return;
	}
	Invoice.InvoiceTotal();

	// *** Throw away the key
	Session.Remove("InvPk");

}
This code simply loads up the invoice from the existing InvPk stored in the Session object. Since the invoice now is a 'real' invoice that has both lineitems and a customer record loading the invoice is indeed as easy as calling Invoice.Load(InvPk). Once the invoice is loaded we can now throw away the Invoice key as we are done with this invoice...
Most of the work of this page happens in the ASPX page. This page uses old style ASP classic style tags to embed the fields for the customer information. For example, here is the top part of the Confirmation page:
<!--  Start Confirmation Display --->
<blockquote>
   <p>Thank you for your order in the
      <%= Westwind.WebStore.App.Configuration.StoreName %>
      . Your order number is <b>
         <%= Invoice.DataRow["InvNo"] %>
      </b>for a total of <b>
         <%= String.Format("{0:c}",(decimal) Invoice.DataRow["InvTotal"]) %>
         .</b></p>
The same works with the customer object for the Bill To and Ship To: addresses:
   <td valign="top">
      <b>Bill to:</b>
   </td>
   <td valign="top">

      <%= Westwind.Tools.wwUtils.DisplayMemo( Invoice.GetAddress() ) %>
      <br>
      <p></p>
      <%= Invoice.Customer.DataRow["Email"] %>
      <br>
      <%= Invoice.Customer.DataRow["Phone"] %>
   </td>
   <% if ( (string) Invoice.DataRow["ShipName"] != "" ||
            (string) Invoice.DataRow["ShipCompany"] != "" ) { %>
   <td valign="top">
      <b>Ship to:</b>
   </td>
   <td valign="top">
   <%= Westwind.Tools.wwUtils.DisplayMemo( Invoice.GetAddress(true) ) %>
   </td>
   <% }
   else { %>
   <td colspan="2"> </td>
   <% }  %>
Note the use of conditional script code in this script page. ASP.Net pages are really just a program that looks like an HTML document, so you can embed things like if statemetns and FOR loops right into the HTML. Usually I don't think this such a good idea, but in some cases especially in read only situations like this it much easier to get the code into the page using markup tags. Additionally markup tags are also more efficient because as I mentioned these pages are actually turned into raw source code, while controls are always another layer of indirection (not that it matters on this form). The moral of this story is: It's certainly OK to use old style ASP tags when makes things easier.
Emailing the Customer
In addition to displaying the form in the browser I also want to send a confirmation message to the user. Since we already are generating the HTML for this why not simply capture the HTML and use that for the confirmation message?The following code does this with a few quirks of stripping out some of the generated HTML and adding a stylesheet to make things look like on the HTML page. The end result looks like this:
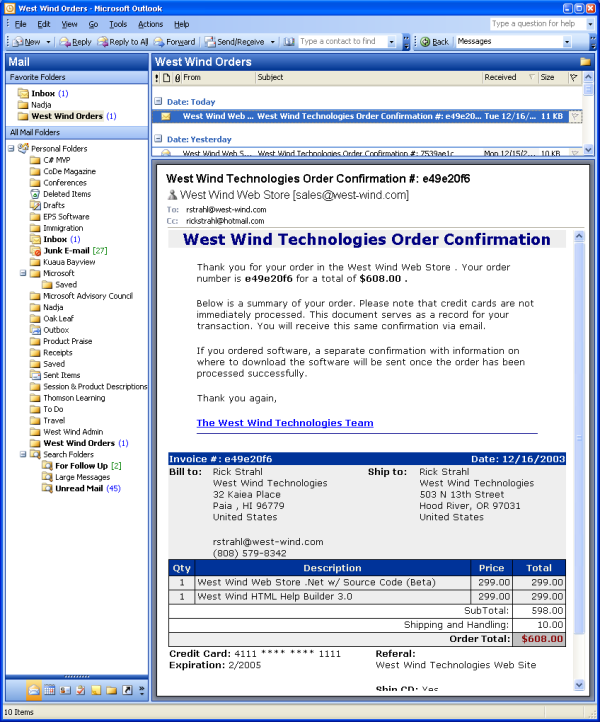
Notice that the emailed form looks a little different. It doesn't include the logo and it doesn't include the Web Store sidebar like the browser based confirmation page. You can of course link to images on the Web by using external Urls, but it's nicer to not have any external content to avoid the image blocking that most email clients impose these days.
The code to capture the HTML output involves overriding the Page.Render() method and capturing the output from the page into a string, sending the original output and modifying the captured output and fixing it up for email display. Here's the code:
protected override void Render(HtmlTextWriter writer)
{
	// *** Write the HTML into this string builder
	StringBuilder sb = new StringBuilder();
	HtmlTextWriter hWriter = new HtmlTextWriter(new StringWriter(sb));

	// *** Let ASP.Net render the page to the Writer
	base.Render(hWriter);

	// *** retrieve into a a string
	string PageResult = sb.ToString();

	// *** Write it back to the server
	writer.Write(PageResult);

	// *** Now strip out confirmation part
	string Confirmation = wwUtils.ExtractString(PageResult,
        "<!--  Start Confirmation Display --->",
        "<!-- End Confirmation Display --->",false);

	if (wwUtils.Empty(Confirmation))
		return;

	// *** Add the header into the page
	Confirmation = string.Format("<h2>{0} Order Confirmation</h2>\r\n{1}",App.Configuration.CompanyName,Confirmation);

	// Now create a full HTML doc and add styles required for email (no stylesheet)
	sb = new StringBuilder();
	sb.Append("<html>");
	sb.Append(@"
<head>
<style>
body
{
FONT-FAMILY: Verdana;
FONT-SIZE: 10pt;
FONT-WEIGHT: normal;
MARGIN-TOP: 0pt;
PADDING-TOP: 0pt
}
... more CSS tags
</style>
</head>
");
	sb.Append("<body>");
	sb.Append(Confirmation);

	WebStoreUtils.SendEmail(App.Configuration.CompanyName + " Order Confirmation #: " + (string) Invoice.DataRow["InvNo"],
				            sb.ToString(),
							(string) Invoice.Customer.DataRow["Email"]);

}
This is a useful technique for capturing page output before it gets sent to the client. You can use this technique for inserting content into the HTML for example, or alternately strip things out. In this case we simply take the output from the page and send it as is back to the client with writer.Write() with the content we've captured. The base Render() method handles the actual output generation to the provided TextWriter. We're stepping in and capturing this output here, but still pass it straight out.
The result is that we have a string that contains all the Page output which can now be manipulated. The actual HTML page contains a couple of markers that mark the beginning and end of the text we want to use for our email confirmation and we use the wwUtils.ExtractString() method to extract the text between these markers. This is the base content we want to send.
But we also need to add a few things. Add a new header and add an HTML header that includes the CSS tags required that normally are loaded from the CSS style sheet which won't be available in the email. To do this we simply fix up the beginning and end of the string.
When we're done a call to the SendEmail method sends the confirmation email. SendEmail is a wrapper routine in WebtoreUtils that pulls out the email configuration information from the Configuration object and sends email using the wwSMTP component.
And that my friends is the end of the order process...

Comment or report problem with topic