This document describes the steps to install and
configure Subversion, create a new repository and then walks through the basic steps required to set
up local Visual Studio projects using Tortoise SVN.
This isn’t meant to be an all comprehensive tutorial on
Subversion, but rather a quick step by step of the essential things to
install and configure to get up and running. For more detail you can use the
excellent Subversion and Tortoise SVN documentation.
Introduction for Subversion
Subversion is an open source control repository tool.
It is widely used by many open source projects and increasingly by many
large development teams in general. It’s fast and efficient, small and easy
to install and because it’s open source – it’s also free. Subversion is file
based and keeps it repository in a simple directory structure that can be
copied and backed up easily.
Subversion can be graphically accessed via Tortoise SVN
which is an Explorer Shell Extension that provides access to most of
Subversion’s command line interface through Explorer Context menus and
overlay icons for files under source control. This actually is very powerful
as it lets you use familiar Explorer as your source code browser and more
importantly because it very easily lets you see source control files in
relation to the actual directory structure and what is and isn’t under
source control.
Subversion subscribes to the Copy Modify Merge
philosophy of source control which means that files are never locked and
nobody usually ‘owns’ a file. Rather Subversion manages changes by merging
source files with any changes made and only notifies you of conflicts if
there are changes that cannot be merged (ie. changes to the same line of
code typically).
Coming from a background of using integrated security
in Visual Studio I at first had my doubts about the merge approach. However,
I’m finding that it allows considerably smoother development as you don’t
have to worry about constant checkout/checkin scenarios and simply work on
your code. You can go out and check in all changes using Tortoise SVN. Not
having source control inside of Visual Studio may sound like blasphemy if
you’ve used it before and I was skeptical about that as well when I started
out. But I find I really don’t miss the integration with VS. More importantly
I don’t miss the problems that go with integrated source control in Visual
Studio with the provider manager often getting confused especially in
complex project and shared project scenarios. Subversion has actually made
many scenarios that used to royally suck in Visual Studio much easier.
Also because Subversion is basically a file system
tracking mechanism it is essentially tool agnostic. In fact I use Subversion
now with my .NET projects as well as with my FoxPro projects – the process
is no different which is great for consistency and making sure I use Source
Control more consistently for all of my development regardless of tool
choice.
First step is to install Subversion. You should
download Subversion and Tortoise SVN and install both.
Get Subversion from here:
http://subversion.tigris.org/
Get Tortoise SVN from here:
http://tortoisesvn.tigris.org/
If you want Visual Studio Integration, check out
VisualSVN ($49) or the free Ankh tool:
http://www.VisualSvn.com/
http://ankhsvn.tigris.org/
Start by installing Subversion, followed by
installation of Tortoise SVN. Tortoise works as a front end UI to Subversion
and both need to be compatible so you should always install the latest
version of each.
Configuration
for Tortoise SVN
Before doing anything else I suggest that you make one
small configuration change in Tortoise SVN, changing the name of the local
svn repositories from .svn to _svn.
Make sure Tortoise SVN is installed and then go into
Explorer and right click anywhere on a file or folder and
go to TortoiseSVN | Settings and check the use _svn instead of .svn
checkbox on the General tab:
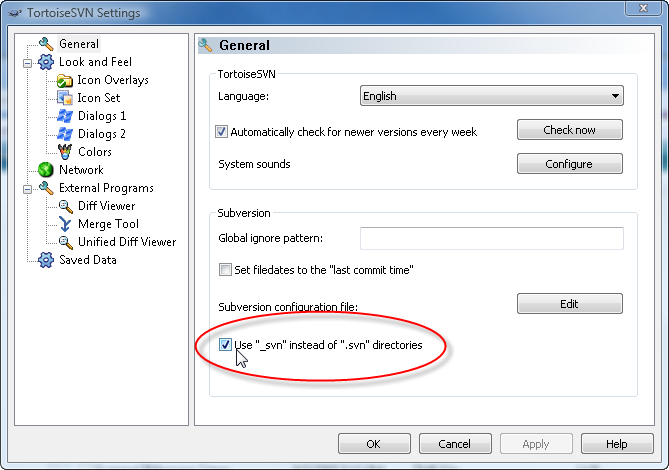
Visual Studio has issues with folders that start with a
period so it’s best to use the _svn prefix, especially if you decide later
on to use a tool that integrates with Visual Studio.
Create a new
Repository with Tortoise SVN
Next I’ll walk you through the process of creating a
new repository and then adding a Solution with a couple of projects to it.
If you are not setting up a new project and just are
accessing a Subversion repository just skip ahead to the
Creating a local Copy section.
You’re ready to create a new repository. The repository
is a storage location on disk where all the versioned data is stored - think
of it as the 'database' for version info. The repository can be stored on
your local machine or a remote server where it can be accessed either
through the Subversion Daemon service or through Http via an Apache module
(separate install). The key is that
you need to be able to create the repository on that machine. I'll use
Tortoise SVN to create as it's the easiest way to do this without digging
into command line tools.
To create a repository, create a main folder for your
main Subversion repository. I prefer to use a top level folder so it’s easy
to find and backup. So choose something like d:\subversion and:
·
Create Folder d:\subversion
·
Right Click | TortoiseSVN | Create Repository
here
·
Set up permissions for this this repository
To do the latter you need to configure
d:\subversion\conf\svnserve.conf and password.
In SvnServe.conf:
[general]
# anon-access = read
auth-access = write
password-db = passwd
realm = SummaLp
This enables only authenticated access to the
repository and provides write access for authenticated users.
Next edit the password file (password) and add any
names you want to allow as key value pairs. For example:
[users]
ricks = wonkiewind
billp = haggard
Setting up to
run Subversion as a Service
Once the repository is created the next step is to make
accessible remotely. Subversion comes with a built-in Daemon server that can
serve your repository data over a TCP/IP connection (port 3690 by default).
Alternately you can use Apache and an Apache module to connect to the
repository over HTTP.
I’ll only describe how to use the TCP/IP Daemon service
here (for now). The service is provided by SvnServe.exe in the BIN directory
of the Subversion installation. While you can run the Exe explicitly to
start the server you’ll want to install it as a service. To do this you can
run the following (I suggest putting it in a batch file) (all on one line!)
sc create svn binpath= "\"c:\program
files\subversion\bin\svnserve.exe\"
--service -rd:\subversion" displayname= "Subversion
Server"
depend= Tcpip start= auto
You should ensure that the paths in this command line
match your installation and repository paths. Also note the spaces in the
command line! They are not optional – I had trouble getting things to work
until the spaces were added.
If you want to use a different port add –listen-port=nn
for the port id. Check for other options in the documentation.
Next you need to start the service through the Service
Manager or from the command prompt:
sc start svn
Check the
Repository
Your next step is to make sure the repository is
working. Easiest way to do this is fire up TortoiseSVN from anywhere and try
to connect to your IP address or host name. Simply open explorer and right
click then choose TortoiseSVN | RepoBrowser. Type in svn://<youripaddress|hostname>/
and you should land at your repository.
Open up the repository by double clicking and ensure
you don’t get an error message – if you do the repository is not accessible.
If you opened the repository from a local machine this should definitely
work. If it doesn’t make sure your repository and the path specified in for
the service start up match!
If you’re remotely connecting and you have a failure
make sure that your firewall is not blocking the port selected (3690 by default unless
you explicitly specified something else in the service command line).
And voila you are now set up for source control.
The next step is to actually add Visual Studio projects
to source control. As mentioned Tortoise SVN doesn’t use any Visual Studio
integration and so source control is managed at the directory and file
level. Basically any file or directory can be added to source control which
means you can use Subversion with any type of tool that has files related to
it.
The first thing to do is decide on how to layout the
repository. If you have many projects it’s probably a good idea to have a
layout that groups things nicely. I like to use:
Repository
-- ProjectGroup1 (ie. Solution level or group of
Solutions leve)
----Project
----Project
----Project
----Project
--ProjectGroup2
----Project
----Project
But that’s entirely up to you. I like the Project Group
type folder so it can be used to hold Solution files and as a ‘header’
folder that serves as a grouping for the subprojects. Otherwise it’s too
easy to end up with a deep mess of project level folders.
So given a starting folder structure of:
Root
-- SummaLp
---- SummaLpManager
---- SummaLpBusiness
---- SupportAssemblies
let's see how to add this structure to a
Subversion repository.
Creating a new
Top Level Folder
Creating projects is a little bit convoluted IMHO with
Tortoise, because while you can easily import content into SVN on the
server, the Import option doesn’t automatically check out the content locally. You
also can’t immediately Checkout after you’ve imported because Tortoise will
not allow you to overwrite existing files that are not under source control.
So – it took me a while to find a way that didn't
involve importing first, then deleting or renaming the local path and then
doing a Checkout which feels like a lot of steps to go through for the
simple task of creating a new folder in the repository.
But there's an easier way although it's not quite
intuitive either:
-
Create a new folder in the repository
-
Find the folder to your project in Explorer
-
Use Tortoise to CheckOut the newly created
repository folder
-
Add Files from Explorer with Tortoise
-
Commit Changes
So let's do it step by step. Assume the top level folder is SummaLp as shown in the screen
shots:
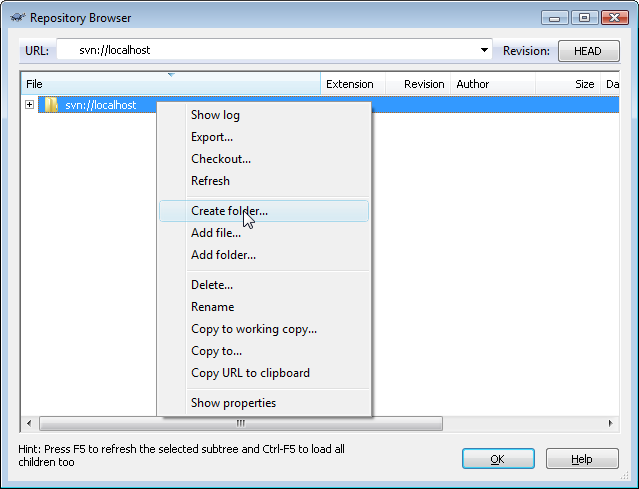
·
Go into TortoiseSVN and select Repo Browser
(right click Tortoise | Repo Browser)
·
Use the
Create Folder option to create a new top level folder just beneath the
main repository (I’ll name it SummaLp).
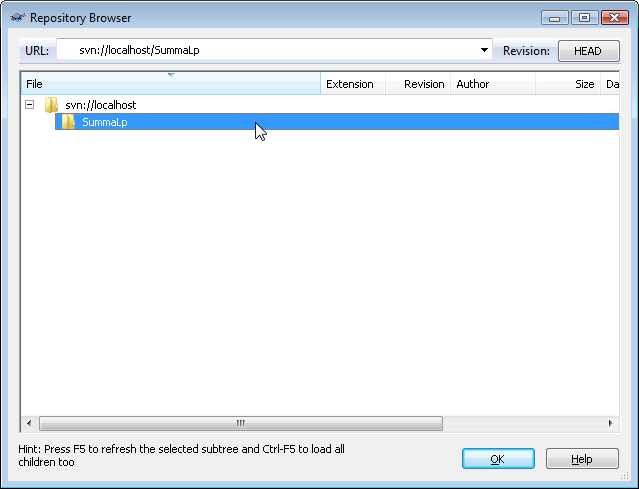
·
Go back to Explorer and goto or create your
project SummaLp Folder
·
Right click on the folder and select CheckOut
·
Select the top level folder in the repository
and point at the corresponding local path
·
This basically puts the root folder under
source control so you can now add individual files or other folders more
easily. Nothing’s really checked out yet – this only marks the folder for
being able watched by Subversion.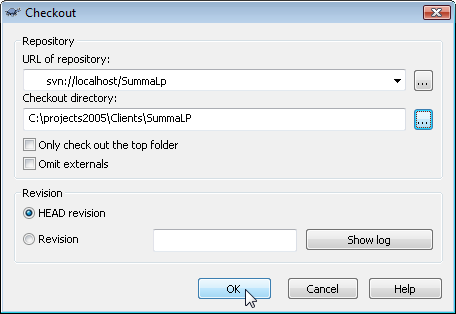
·
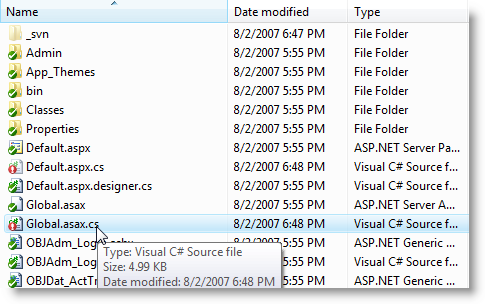
Go back to Explorer and check the folder – it
should have a green icon with it now.

·
But don’t just start importing everything
below in one pop – it’ll be much easier to create folders in the repository
first
then add the individual files once the folder is under source
control.
·
Select one of the project folders and
basically follow that same routine:
·
Go into Tortoise and browse to your
repository.
·
Create a folder with the project name below
the SummaLp folder (SummaLpManager)
·
Go into Explorer and CheckOut into the
corresponding folder
·
This puts the project folder under source
control
·
Select files and folders, right click and add
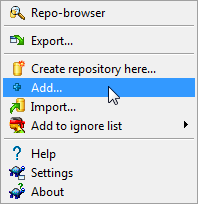
·
Be selective and if necessary add files
individually rather than full subfolders. You’ll want to skip over things
like the obj folder and notes and log files etc. for example.
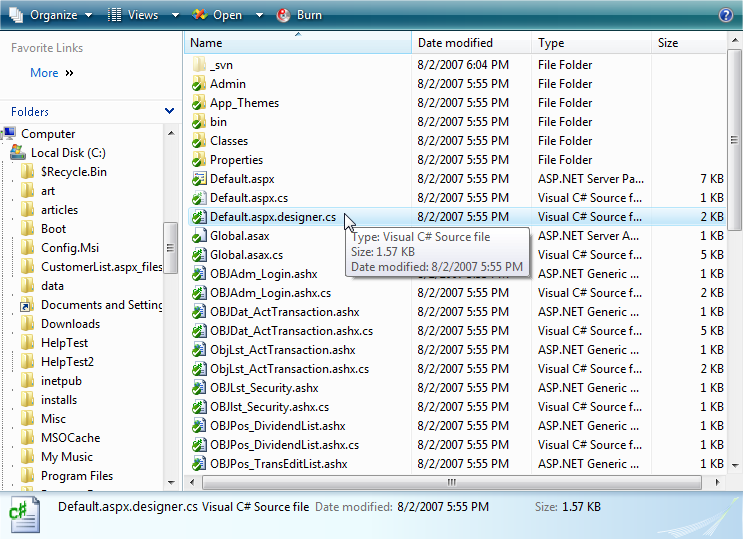
·
Once you’ve done this you’ll see a directory
full of files with + signs next to them. This means the files have been
added to the local store but not synched with the server.
·
To sync with the server right click and
select SVN Commit on the project folder
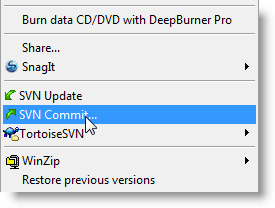
·
This basically tries to synch all the local
changes to the server and in this case copies the files to the server into
the repository.
·
Once you’ve done this your local copy should
now show as up to date
·
Your repository now holds the same set of
files
·
Your repository should now look like this:
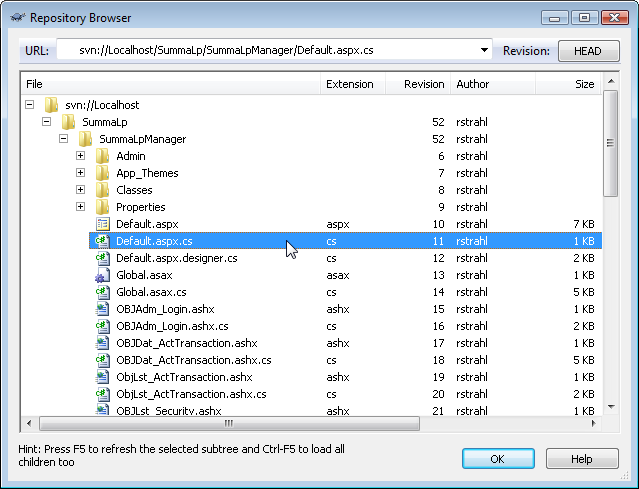
·
You then repeat this process for each of the
other project folders.
·
You’ll also want to add the Solution file to
source control. Just Add and Commit if it wasn’t among the files you already
checked in.
And there you have it. A repository is set up and ready
for use.
The key thing to remember when creating new branches
and adding new files in the repository is:
·
Create Folder in Repository first
·
Checkout just the Folder to your local folder
·
Add Files with Tortoise in Explorer
·
Commit changes
Creating a Local Copy from the
Repository
What I’ve described above is a bit of work but it only
needs to happen once when the repository is first created. If you are
developer who’s simply connecting to get the latest revision for a local
copy down to a local machine for working the process is much easier.
In this case:
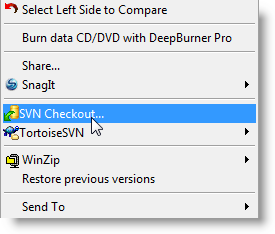
·
Pick a directory where you would like to
create the local copy
·
Right click and choose CheckOut
·
Pick the repository and ProjectGroup Folder
and the local folder that will receive the result. In the example above I
could choose SummaLp (the top level folder) and Checkout and it brings down
the entire project and the Solution file ready to go.
You’re now set up for source control. Remember that
Subversion uses Copy-Modify-Merge style, which means that files are never
locked and you can freely change source files.
You can simply edit files and Subversion will keep
track of the changes for you. You can use Tortoise SVN in explorer any time
to see any changes that have been made to files. Any changed files will show
with as a red warning icon which means you’ve made changes to the file that
haven’t been updated onto the server.
The red icons appear next to files as well as folders.
If there’s a folder that has unsubmitted changes that folder will
recursively show the red icon. Note that the red icon does not tell you
whether the file has been changed by anybody else! It only tells you that
you have changed the file and need to commit it.
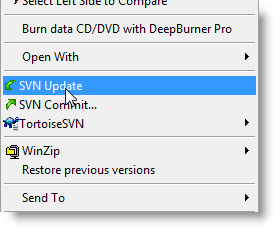
To update your changes to the Subversion server you use
the Commit option to synch with the server.
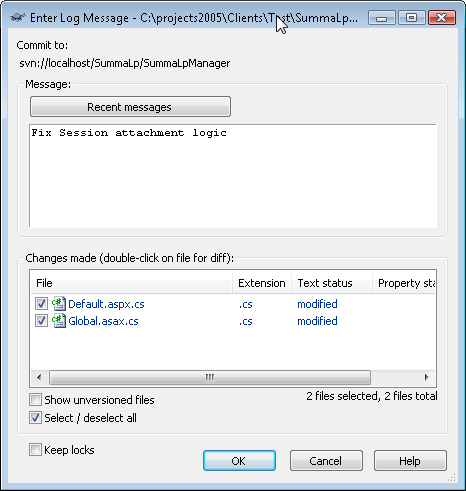
You’ll get a dialog that let’s you quickly see all the
files that are going to be updated by the commit. You can also selectively
unselect files which is useful if you have one or two files that you might
not usually update like say web.config/app.config or your project file if
you have special build steps.
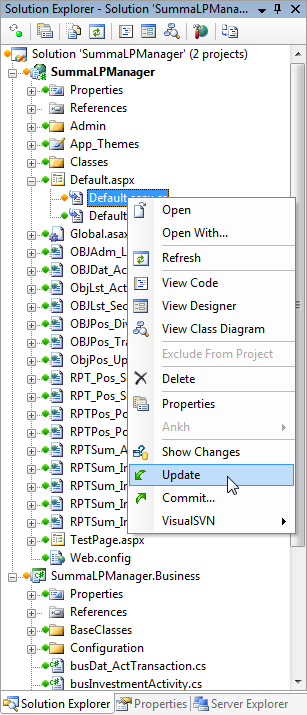
You commit updates your changes to the server, but in
order to receive changes that other users have made and have committed to
the server repository you need to explicitly call Update either on an
individual file or a directory.
Update will get the latest changes and automatically
merge any changes from the server with your code. There’s no update warning
or notification unless there’s a conflict and a change that cannot be
automatically merged.
If you need to see differences you can check the
repository against your local copy and compare. There are two options that
are useful: Check for Modifications and Diff both of which let you know that
things have changed.
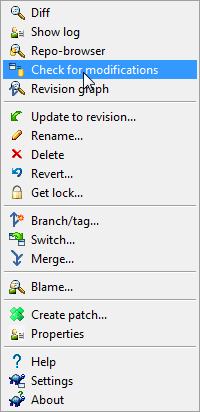
Check for modifications shows you all files that are
different between local and remote. The Diff tool shows a side by side view
of the differences between your local copy and the server copy.
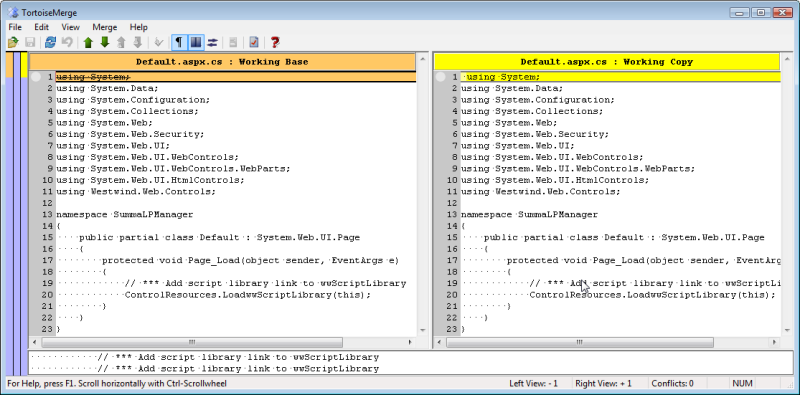
The tool above is the default diff tool, but you can also specify a custom
diff tool like Beyond Compare for example.
There’s really not much to say about Visual Studio
support because using Subversion and Tortoise don’t work inside of Visual
Studio. When you’re dealing with projects and solutions you might want to
carefully consider whether project and solution settings affect other users.
If your local paths are not the same as the projects in the repository for
example, you may have to check out the project and solution files and leave
them checked out permanently.
For Web applications often the web.config file might
require some careful consideration if there are machine specific settings in
the file. For example, if you’re running IIS 7 and you download a project
that’s was created with IIS 6 the project file will be changed potentially
to point at system module and handler references in different locations. Or
you may have a connection string pointing to a different server than the
original web.config file. Here too the solution is to download the file
originally and then keep the file checked out locally and remember not to
update it.
Visual SVN
If you prefer to have Visual Studio integration for
source control you can check out VisualSvn (http://www.visualsvn.com/)
which provides integration with TortoiseSVN directly from within Visual
Studio. Visual SVN works with your existing Subversion folders so it doesn’t
use Visual Studio version control provider (a good thing IMHO). Rather it
talks to the TortoiseSVN APIs and gets its data directly from the file
store. I haven’t used Visual SVN for long but so far it looks nice, although
I’ve gotten so used to using Explorer for source control it doesn’t help
significantly to have the integration.
One thing that’s definitely easier is creation of new
projects – you can just use Add to Subversion and VSVN will take care of
creating the branch and checking out the files for you.
It’s definitely nice to see the status of files right
in the IDE and it’s also nice if you frequently add new files to the system
as VSVN knows about Visual Studio file associations and automatically adds
all related files.
This tool isn’t free but it's cheap – it costs $49 per
user which is worth it if you think you need the Visual Studio integration.
There are several other add-ins available including
Ankh, but I had a number of issues with it so I didn’t spend much time with
it. Visual SVN seems smooth and unobtrusive and feels more like an extension
of Tortoise SVN that works inside of Visual studio which is great.
Subversive Development
Subversion has been a great boon for me. How can it not
be with such a subversive name? I’ve teetered back and forth between using
source control and not using it in the past, because I’ve had my share of
problems with various Visual Studio source control providers. I’ve used
several different tools on projects and in my own work but most of the
problems seem to originate not with the tools but within Visual Studio
itself. The end result was that I’d use source control for a while and then
give up because it got in the way.
Since I started working with Subversion I’ve had no
complaints about problems or compatibility in projects even when using
projects across multiple source control repositories, and that’s as it
should be. I now use source control on every project even if it’s purely
local and for myself. Source control should be an unobtrusive tool that
helps you be more productive and not get in your way and Subversion fits
that bill nicely for me.
In this article I’ve only covered the basics of getting
up and running. Subversion supports all of the advanced features you’d
expect of a top notch source control system. If you need that functionality
it’s there for you. But if you’re just getting started stick with the basics
until you get familiar with Subversion and how it works – even the basic
features take you a long way towards source code security and proper sharing
between multiple developers.
There’s much more functionality to cover and if you
want to find out more you can read through the very comprehensive and even
very readable Subversion and Tortoise documentation. Check it out and get
Subversive yourself.
Getting
started with Subversion