|
Integrating PayPal Payments
into E-Commerce Applications with ASP.NET
By Rick Strahl
www.west-wind.com
rstrahl@west-wind.com
Last Update:
February 10, 2009
What's covered:
Related Resources:
E-Commerce applications require mechanisms for payment.
Although more commonly than not e-Commerce sites will use full credit card
processing gateways, giving PayPal as an additional option of payment provides
additional payment options for your customers, especially those that don’t want
to pay by credit card over the Internet. If you run a Web shop that uses direct
credit card processing and want to integrate PayPal seamlessly, you’ll find that
using PayPal as a processing service is not as straight forward as using a
payment gateway. In this article I describe how you can minimize the external
PayPal interaction and work the PayPal payment into the order processing
workflow to provide a seamless interface using ASP.NET and C#. However, the
principles used here should be applicable to any Web programming environment.
Payment processing on the Web is a big market and there a
myriad of services and providers that allow you to process credit cards and bank
cards over Internet connections. Most of these services are using credit card
processing that automates the process of credit card validation. These providers
usually provider either HTML or API based interfaces to process credit cards.
HTML based interfaces provide you with a URL your application can redirect to on
the provider’s site, which then handles the actual payment processing. API based
interfaces allow your application talk directly to the provider’s services so
that the payment processing can be integrated into your own application.
If you’re running your own E-Commerce applications you
generally will want to use an API so the payment processing can be directly
integrated into your own application. This makes sure the user of your app sees
a consistent Web interface – as far as the user is concerned they are never
leaving your site, but rather your Web backend is making the remote calls
against the payment processing service and simply returning the success or
failure of the request. HTML based payment interfaces generally look
unprofessional as the user is whisked off to some other site for payment
processing. Using external HTML processing often also requires you to handle
inventory and order management through the payment provider which can be hassle
especially if your e-commerce app already handles this. Still HTML based
interface are popular because they can often be driven from non-data driven site
and thus mitigate all the order management to the processing provider’s servers
which can be beneficial for small sites.
Why PayPal?
On my own Web Site’s
West Wind Web Store I use API based processing with Authorize.NET to perform
most
payment processing. This works great is fast and provides an integrated
mechanism that provides seamless integration. We sell our software products
online and from time to time there are those customers that are still squeamish
about using their credit cards online – often customers from Europe – that would
rather use an alternate payment mechanism. So a while back I looked at
integrating PayPal into my store software.
PayPal may not be the first choice for order processing in
a custom e-Commerce application, but it does provide another payment option for
your customers. Some customers (at least in my business) are notoriously
difficult in finding the ‘right’ payment mechanism and PayPal has been the
answer for me in a number of cases, which is why I eventually sat down and
integrated it into my Web Store application.
I've actually been surprised how many orders I
get in my store through PayPal. When I originally hooked this up a few months
back I thought of it more of a novelty and another bullet item for the store
software, but there are quite a few people left in this world who don't trust
the Internet (or the vendors for that matter) with their credit cards. PayPal is
nice in that respect in that they provide the ability to keep the credit card
from any vendor at all - now you just have to worry that PayPal stays safe and
honest.
On the merchant front too I've found a lot of
people actually using the PayPal functionality as their main payment mechanism
instead of merchant services. A lot of small operations or personal sites don't
want to deal with merchant services it seems. I can't blame them - most merchant
providers or at least the 'resellers' are crooks trying to make a quick buck of
the unsuspecting vendor. Getting set up also takes some amount of paperwork and
often can take weeks. Luckily that seems to be changing somewhat with better and
more consistent gateway services appearing with reasonable prices (my experience
with
MerchantPlus and
Authorize.Net has been a real joy actually). Still, with PayPal you hit the
ground running as soon as you have configured your account and provided a bank
account.
On the downside, PayPal is a purely Web based
interface. If you need to integrate payment processing into a non-Browser based
application, PayPal is not an option since PayPal works exclusively through the
Web browser interface. So if your business also takes phone orders and has an
offline POS system, PayPal will be a hassle as you'd have to enter orders on the
Web. PayPal also has rather high sales percentages that are generally much
higher than merchant accounts (unless you are super high risk). Be sure you do
the math. A little time up front may save you a lot of money in the long run -
percentages are what often make or break your sales margins.
PayPal acts as a middle man between the buyer and seller so
that the seller never has to expose his payment information to the seller
directly. Instead the buyer registers his credit card or bank account with
PayPal and maps his account to an email address and then uses PayPal to make
purchases. The advantage here is that the seller never gets the buyers payment
information and therefore can’t abuse it (accidentally or otherwise) in any way..
So what do you need to accept payments? The nice thing
about PayPal is that it’s easy to sign up to accept payments. If you already
have a PayPal account you use for buying things online, then you are already set
up to also receive payments. All you need to have a bank account so payments can
be deposited into it. That’s it!
How PayPal works
PayPal is not a payment gateway and they don’t provide a
direct API interface to their service, except for very large/high volume
customers. Rather, like the HTML based services I mentioned earlier, the buyer
has to go to the PayPal site, login and accept the payment request. However,
this process can be automated to some extent by configuring PayPal to return to
specific URLs in case of success or failure and providing a callback
confirmation Url that allows you to verify that PayPal processed a payment on
your behalf. This configuration is done via POST data or QueryStrings passed to
the PayPal pages.
In my Web Store I want PayPal to process only my final
order amount. PayPal supports a number of order and inventory management
features, but in an e-Commerce site scenario such as mine, all of this handled
by my own Web application – all I want PayPal to do is process the final order
amount.
As you might expect from this description this process is fairly involved if you
want to completely integrate the payment into the application. The process goes
like this:
- User picks items in our store Web site
- User fills out order info and goes to our store’s
order page
- We provide the order total
- User accepts the order of multiple items and final
amount
- User selects PayPal as payment
- User gets redirected to the PayPal site
- PayPal site takes user through the payment process
- On Success PayPal redirects back to our order
confirmation page
- On Failure PayPal redirects back to our order form
(redisplays order info)
- Finally we need to confirm to PayPal that we want to
process this order
and PayPal confirms to us that the order went through.
Figure 1 shows the general flow of the process.

Figure 1: The process of integrating a PayPal
payment involves several pages and HTTP POST backs.
This process looks pretty complicated and while there is
quite a bit of back and forth, it’s a pretty straight forward once you
understand the flow. You need 2 pages on your site to make this work right:
Order Page
This form is the jumping off and return point and in my
example it’s called OrderForm.aspx. This page needs some internal logic to
redirect to PayPal if PayPal is selected as payment. I’ll provide you with a
helper class that makes this a snap by simply setting a few properties. The same
OrderForm.aspx also serves as the return page from PayPal on completion. When
you redirect to PayPal, you provide URLs for success and cancelled operations,
and these URLs point back to this page with special querystring parameters (for
example: OrderForm.aspx?PayPal=Success). I like to use a single page here to
keep the PayPal specific logic in one place, but you can also use separate
pages.
Unlike credit card processing it’s somewhat difficult to
keep PayPal logic inside of a business object, since this interaction relies on
the HTTP mechanisms and Page callback, so some of the routing logic ends up
embedded as part of your Web UI layer (ASPX code behind). The helper class
abstracts most of the internal knowledge but some ‘operational’ code still
squeaks into the ASP.NET page.
For my Web Store application it also makes more sense to
return to this page in order to complete the order process. The OrderForm can
simply pick up right where it left off before redirecting to PayPal. In short,
it makes PayPal integration easy with minimal changes to the existing
processing.
It’s important that you understand that the return from
PayPal does not guarantee that the order went through! It’s easy to spoof the
return URL you sent to PayPal since it’s visible on the querystring (or if you
POST in the POST buffer). Therefore a user could simply type the Confirmation
Url in directly and you should not confirm the order at this point. You can
manually check for orders on the PayPal site or wait for PayPal’s confirmation
emails etc. all of which let you know for sure that the order was processed in a
‘manual’ way.
Instant Payment Notification Callback Page
To automate this process, PayPal can optionally ping you
back at another URL with order completion information. This is where the second
IPN Confirmation page shown in Figure 1 comes in. It uses a mechanism called
Instant Payment Notification (IPN) which is essentially a Web based callback
mechanism that calls a pre-configured URL on your site. IPN must be enabled on
the PayPal site and when enabled IPN sends a confirmation to you at this URL
after the order was processed. PayPal then expects a return from you within a
certain timeframe (a few minutes) and return a response to you to confirm your
that the customer has paid. To do this you have to POST the data back to PayPal
by echoing back all the form data that PayPal sends to you.
IPN is optional, but it’s a requirement if you need to
confirm your orders immediately with your customers. For example on the West
Wind site we confirm new software purchases by sending an email with download
URLs to get the software almost immediately. For credit card transactions we
send the email immediately as part of the Confirmation.aspx page. When the order
is verified and complete, email confirmations are sent. For PayPal orders
however we cannot do this through the Confirmation page, so rather the
confirmation page just displays the completion notice. The IPN return page then
is then used to send the final email confirmations for emailing the download
links.
A walk through of the process
Let’s take look at the Web Store and the process you go
through when you pay with PayPal using the mechanism described above. The
process starts out on the Order Form of the main Web Store application. The
shopping cart is managed by my e-Commerce application and the Order Form is the
final step in the order process. A previous form has already collected customer
information so the page shown in Figure 2 only collects the payment
information plus any informational pieces from the customer.

Figure 2: The first step in the store is to make
order arrangements as usual. In this case customer info was captured on a
previous form and this page confirms the order totals. The $627.90 total will
get send to PayPal.
For PayPal processing the customer selects the PayPal
payment method and clicks on Place Your Order to proceed. For normal credit card
processing this page would go ahead and contact the CC processor directly then
confirm the order. This process is linear and happens all on a single page
request.
But for PayPal, we’ll need to intercept the request, go off
to PayPal and return back to this page after PayPal has taken the customer’s
money. The OrderForm.aspx page intercepts the straight order process and instead
redirects to PayPal using the code like this:
// *** Handle
PayPal Processing seperately from ProcessCard() since it requires
// *** passing off
to another page on the PayPal Site.
// *** This
request will return to this page Cancel or Success querystring
if
(this.txtCCType.Text ==
"PP" && !this.PayPalReturnRequest)
this.HandlePayPalRedirection();
The if block checks for PayPal Payments and a flag that
makes sure that we actually want to redirect rather than handle a return from a
PayPal page. If so, HandlePayPalRedirection is called and performs the
redirection by building up a URL that gets sent to PayPal. The method also
stores several of the current form’s input values to a Session object – this is
so that when we return from PayPal to this page the data the user just typed in
can be filled back in. In other words we’re saving the relevant state of this
form, and we’ll restore it when we return. The redirection process starts off
like this:
// Redirects the current request to the
PayPal site by passing a querystring.
/// PayPal then should return to this page
with ?PayPal=Cancel or ?PayPal=Success
/// This routine stores all the form vars so
they can be restored later
///
</summary>
private
void HandlePayPalRedirection()
{
DataRowContainers.wws_invoiceRow rowInv = this.Invoice.GetTypedDataRow();
// *** Set a flag so we know we redirected to minimize
spoofing
Session["PayPal_Redirected"]
= "True";
// *** Save the Notes and Types so we can restore them
later
Session["PayPal_Notes"]
= this.txtNotes.Text;
Session["PayPal_HeardFrom"]
= this.txtHeardFrom.Text;
Session["PayPal_ToolUsed"]
= this.txtToolUsed.Text;
PayPalHelper PayPal =
new PayPalHelper();
PayPal.PayPalBaseUrl =
App.Configuration.CCPayPalUrl;
PayPal.AccountEmail =
App.Configuration.CCPayPalEmail;
PayPal.LogoUrl =
"https://www.west-wind.com/images/wwtoollogo_text.gif";
PayPal.Amount =
rowInv.Invtotal;
PayPal.InvoiceNo =
rowInv.Invno;
PayPal.BuyerEmail =
this.Invoice.Customer.GetTypedDataRow().Email;
PayPal.ItemName =
App.Configuration.StoreName + " Invoice #"
+ rowInv.Invno;
PayPal.SuccessUrl =Request.Url
+ "?PayPal=Success";
PayPal.CancelUrl =
Request.Url + "?PayPal=Cancel";
Response.Redirect(PayPal.GetSubmitUrl());
return;
}
Notice the use of the PayPalHelper class which I’ll
describe a little later. This reusable class provides a simple interface to
perform some parsing tasks. In this case, the GetSubmitUrl() method is
used to create a string that returns a fully qualified PayPal URL that takes
your customer to the PayPal site with your account selected.
The URL generated looks something like this:
https://www.paypal.com/cgi-bin/webscr?cmd=_xclick&business=YourEmail@YourCompany.com
&email=CustomerEmail@Company.com &amount=310.96&image_url=https://www.west-wind.com/images/wwtoollogo_text.gif&item_name=West
Wind Web Store Invoice #8d5c9631&invoice=8d5c9631&return=https://www.west-wind.com/wwWebStore/OrderForm.aspx?PayPal=Success&cancel_return=https://www.west-wind.com/wwWebStore/OrderForm.aspx?PayPal=Cancel
Actually the content needs to be UrlEncoded, which is also
handled by the above class. The GetSubmitUrl() method is pretty simple –
it does little more than take the various property values set on the class and
builds the query string from it.
public
string GetSubmitUrl()
{
StringBuilder url =
new StringBuilder();
url.Append(
this.PayPalBaseUrl +
"cmd=_xclick&business="+
HttpUtility.UrlEncode( AccountEmail ) );
if( BuyerEmail !=
null && BuyerEmail !=
"" )
url.AppendFormat(
"&email={0}", HttpUtility.UrlEncode(
BuyerEmail ) );
if (Amount != 0.00M)
url.AppendFormat("&amount={0:f2}",
Amount);
if( LogoUrl !=
null && LogoUrl != "" )
url.AppendFormat(
"&image_url={0}", HttpUtility.UrlEncode(
LogoUrl ) );
if( ItemName !=
null && ItemName != "" )
url.AppendFormat(
"&item_name={0}", HttpUtility.UrlEncode(
ItemName ) );
if( InvoiceNo !=
null && InvoiceNo !=
"" )
url.AppendFormat(
"&invoice={0}", HttpUtility.UrlEncode(
InvoiceNo ) );
if( SuccessUrl !=
null && SuccessUrl !=
"" )
url.AppendFormat(
"&return={0}", HttpUtility.UrlEncode(
SuccessUrl ) );
if( CancelUrl !=
null && CancelUrl !=
"" )
url.AppendFormat(
"&cancel_return={0}",
HttpUtility.UrlEncode( CancelUrl ) );
return url.ToString();
}
The result from this method is then used in a
Response.Redirect() that sends the customer off to PayPal’s server. In
Figure 2 you can see the transition. Notice that the redirection took you to a
semi-custom page that has all of our order information and our company account
info in it.

Figure 2: The first PayPal page prompts the user
to login. Notice that all of our order information we passed is displayed on
this form.
PayPal SandBox Note:
I’m testing transactions here in
real time – actually I just used a $.50 amount and futzed the display above. You
can also use the PayPal SandBox which is a simulated environment that runs
against simulated accounts you can set up. There are a few minor differences in
the way the forms display mainly due to differences in the way my test accounts
are set up (which is why I use the real account). Why do you want to use the
SandBox? Well, for testing you probably don’t want to charge real accounts. More
importantly, t’s difficult to test PayPal transactions if you don’t have two
separate accounts since PayPal wisely doesn’t allow to send money to yourself
<g>. You can set up a SandBox account from the PayPal Developer Network through
the Merchant Tools page on your account.
At this point the user enters his password or if he doesn’t
have a PayPal account yet, he can create a new one at this point as well.
Clicking the Continue button brings up the PayPal order confirmation page.

Figure 3: the PayPal order confirmation reviews
the final payment status and let’s your customer confirm the payment.
Once you click the Pay button a final confirmation page is
displayed that confirms the actual payment having been made. This is the last
page in the batch and clicking the continue button on the form shown in Figure 4
returns you back to the main application.

Figure 4: The final PayPal Confirmation page
confirms the actual payment. The Continue link takes you back to the original
site.
The return click uses the Success return URL that we
provided as part of that long query string shown earlier. In this case this page
returns to the following URL:
https://www.west-wind.com/wwStore/orderform.aspx?PayPal=Success
The West Wind Web Store then checks for the PayPal
querystring value and based on it handles the processing of this order. Remember
that when we originally sent off this request to PayPal we saved some
information about the order form – the field values that were entered for the
various form controls. We captured them to Session variables and now we simply
retrieve them and reassign them to the appropriate controls to make the form
appear very much like the form we left before we went off to PayPal.
The Page_Load() for the form contains a small block
like this:
if
(Request.QueryString["PayPal"] !=
null)
this.HandlePayPalReturn();
The HandlePayPalReturn() method then performs the
page reconstruction by restoring the saved values from the session back into the
form and then simulating a button click operation. In short, we’re restoring the
state of the page to what it was prior to going off to PayPal and then clicking
the button to make it behave just like a normal, local order process.
///
<summary>
/// Handles the return processing from a
PayPal Request.
/// Looks at the PayPal Querystring variable
///
</summary>
private
void HandlePayPalReturn()
{
string Result = Request.QueryString["PayPal"];
string Redir = (string)
Session["PayPal_Redirected"];
// *** Only do this if we are redirected!
if (Redir != null && Redir ==
"True")
{
Session.Remove("PayPal_Redirected");
// *** Set flag so we know not to go TO PayPal again
this.PayPalReturnRequest =
true;
// *** Retrieve saved Page content
this.txtNotes.Text = (string)
Session["PayPal_Notes"];
this.txtHeardFrom.Text = (string)
Session["PayPal_HeardFrom"];
this.txtToolUsed.Text = (string)
Session["PayPal_ToolUsed"];
if (Result ==
"Cancel")
{
// *** Redisplay
the order page with an error message
this.ShowError("PayPal
Payment Processing Failed");
}
else
{
// *** We returned successfully - simulate button
click to save this.txtCCType.Text
= "PP";
// Payment type to PayPal
if (!App.Configuration.CCPayPalAllowAutoConfirmation)
// Leave a visible note and cause not to Auto-Ship
this.txtOrderCode.Text
= "PayPal";
// *** Simulate a button click
this.btnSubmit_Click(this,EventArgs.Empty);
}
}
}
Notice the PayPal_Redirected Session variable which
was set in HandlePayPalRedirection(). This flag allows to insure that this page
was actually fired from a real PayPal request. Since we’re storing this value
server side we can minimize spoofing attempts fired without actually initiating
an order. Once we know that we are on a redirection we can remove the flag. We
also set an internal flag – PayPalReturnRequest to true, so that any code that
follows this method call knows that we processed this order. Specifically we
want to make sure that we don’t process credit cards in addition to PayPal, and
more importantly that we redirect back to PayPal again.
The rest of the code deals with restoring the various text
boxes with the saved values from the Session object. I would recommend if you
have more than a few values that you use an object to store in the Session
rather than single values, but since I only had 6 values including the flags I
didn’t bother. Using an object will make assignments and retrieval easier as it
preserves type information of the fields plus it keeps the Session object more
tidy.
Finally if all goes well we call the btnSubmit_Click()
event handler method to essentially imitate a form submission. So now we know
that we’ve successfully processed a PayPal payment and we can act accordingly.
Remember I say we ‘know’ – really we’re assuming at this point because we
haven’t verified that the PayPal indeed retrieved payment.
btnSubmit_Click() only has one hook to PayPal in it, which
is the check for PayPal redirection mentioned earlier:
if
(this.txtCCType.Text ==
"PP" && !this.PayPalReturnRequest)
this.HandlePayPalRedirection();
This time around the this.PayPalReturnRequest flag will be
true and we’ll skip right past the redirection and proceed with the rest of the
order processing. The business logic of this page is smart enough to know to not
send PayPal orders to credit card processing, but if you needed to you could of
course check either CCType or the PayPalReturnRequest flag to skip over any code
you don’t want fired when processing a PayPal return.
Otherwise the order processing is left completely unchanged
and the end result of this operation is that the order gets processed and the
customer will see an order confirmation page as shown in Figure 5.

Figure 5: The order confirmation page displays the final order content on
our e-Commerce site. Note that at this point you should not confirm any items to
customers!
Remember this page should not disburse any products or
access to services yet. If you recall the return URL from PayPal that is
provided as part of the URL, so it’s easy for anybody to see this URL and simply
type it in even if the PayPal order did not go through.
Note:
You can also POST information to
PayPal, which makes the request a little less prone to spoofing. But POSTing is
significantly more complicated using ASP.NET since an ASP.NET page can’t easily
POST content to another page. Even then it’s much more work to set up POST
variables properly on a page. Rather, it’s better to live with the possible
tempering, but rely on the IPN confirmation or even manual checking on PayPal as
the final evidence that the order went through.
Note that this process has hooked PayPal processing into
the ASPX page with two simple if blocks – one at the end of the Page_Load()
that handles a return request from PayPal:
if
(Request.QueryString["PayPal"] !=
null &&
this.txtCCType.SelectedValue ==
"")
this.HandlePayPalReturn();
and one in the button click that fires the redirection:
if
(this.txtCCType.Text ==
"PP" && !this.PayPalReturnRequest)
this.HandlePayPalRedirection();
All the rest of the code is completely isolated from the
order processing logic. For completeness sake to understand the bigger picture,
I’m providing the complete application specific Page_Load() and
btnSubmit_Click() events of the OrderForm.aspx page here so you can get a
feel for the order processing logic. This code makes extensive use of business
objects so it should be easy to understand the flow:
private
void Page_Load(object
sender, System.EventArgs e)
{
// *** Force the page NOT to cache
WebStoreUtils.ForceReload();
// *** Remove the PayPal button if no PayPal Url is
provided
if (App.Configuration.CCPayPalUrl ==
"")
this.txtCCType.Items.Remove(this.txtCCType.Items.FindByValue("PP"));
this.Invoice = WebStoreFactory.GetbusInvoice();
this.Invoice.TemporaryLineItems =
true;
InvPk = Session["InvPk"];
if (InvPk ==
null)
{
Response.Redirect("Shoppingcart.aspx");
return;
}
CustPk = Session["CustPk"];
if (CustPk ==
null)
{
this.ShowError("<hr>Error
loading customer...");
return;
}
// *** create a new invoice object
if (!Invoice.New(true,(int)
CustPk))
{
this.ShowError("<hr>Error
loading shopping cart invoice...");
return;
}
DataRowContainers.wws_invoiceRow rowInv = Invoice.GetTypedDataRow(false);
// *** Assign exiting Pks to this invoice
rowInv.Pk = (int)
InvPk;
rowInv.Custpk = (int)
CustPk;
if(!Invoice.LoadLineItems((int)
InvPk))
{
this.lblHtmlInvoice.Text =
"<hr>Error loading shopping cart invoice...";
this.txtCC.Text =
"";
return;
}
// *** Retrieve the Shipping Info values
Invoice.ShipInfo = (ShippingInfo)
Session["ShippingInfo"];
Invoice.ShipInfo.UseInvoiceFields = false;
// *** Total out and display the invoice
Invoice.InvoiceTotal();
this.lblHtmlInvoice.Text =
Invoice.HtmlLineItems(0,true);
// *** Check for PayPal responses -
// *** if we have no CC selection and PayPal
QueryString we need to handle it
if (Request.QueryString["PayPal"]
!= null && this.txtCCType.SelectedValue
== "")
this.HandlePayPalReturn();
}
///
<summary>
/// Saves the invoice if all goes well!
///
</summary>
///
<param name="sender"></param>
///
<param name="e"></param>
private
void btnSubmit_Click(object
sender, System.EventArgs e)
{
// *** Unbind the form and display any errors related
to the binding
this.UnbindData();
if (this.bindingErrors
!= null)
{
this.ShowError(
this.bindingErrors.ToHtml());
return;
}
DataRowContainers.wws_invoiceRow rowInv = this.Invoice.GetTypedDataRow(false);
rowInv.Ccexp =
Request.Form["txtCCMonth"] +
"/" + Request.Form["txtCCYear"];
rowInv.Shipdisks =
Invoice.ShipInfo.ShipToCustomer;
if (Invoice.ShipInfo.ShippingMethod !=
"--")
rowInv.Shipby =
Invoice.ShipInfo.ShippingMethod;
// *** Load up the Shipping Address captured
previously
object Temp = Session["ShippingAddressPk"];
if (Temp != null)
{
busShippingAddress
ShipAddress = WebStoreFactory.GetbusShippingAddress();
if ( ShipAddress.Load( (int)
Temp ) )
this.Invoice.UpdateShippingAddress(ShipAddress);
}
if (!this.Invoice.Validate())
{
this.AddValidationErrorsToBindingErrors(this.Invoice.ValidationErrors);
this.ShowError(this.Invoice.ValidationErrors.ToHtml());
return;
}
// *** Handle PayPal Processing seperately from
ProcessCard() since it requires
// *** passing off to another page on the PayPal Site.
// *** This request will return to this page Cancel or
Success querystring
if (this.txtCCType.Text
== "PP" && !this.PayPalReturnRequest)
this.HandlePayPalRedirection();
// *** Optional Credit Card Processing
// *** the method decides whether CC processing
actually takes place
//if (App.Configuration.ccProces
if ( !this.ProcessCreditCard()
)
{
string Error = Invoice.ErrorMessage;
int lnAt = Error.IndexOf(";");
if (lnAt > 0)
Error =
Error.Substring(0,lnAt);
// *** If we have a FAILED transaction pass it through
unprocessed
// *** Otherwise echo error back.
if (rowInv.Ccresult !=
"FAILED")
{
this.ShowError("Credit
Card Processing failed: " + Error);
return;
}
}
// *** Save the invoice by copynig the Temporary
LineItems to the real lineitems
if (!this.Invoice.Save(true))
{
this.ShowError(this.Invoice.ErrorMessage);
return;
}
// *** Clear out the Invoice Session PK so this
invoice is 'history'
Session.Remove("ShoppingCartItems");
Session.Remove("ShoppingCartSubTotal");
Session.Remove("ShippingAddressPk");;
// *** Show the confirmation page
Response.Redirect("Confirmation.aspx");
}
Instant Payment Notification
If you are processing orders only occasionally or you don’t
immediately fulfill orders online you might be done at this point. But remember
that unless you check with PayPal or PayPal notifies you, you have no guarantee
that PayPal actually processed the specified amount. More specifically your
application doesn’t know even if you receive an email from PayPal.
In order for your application to be securely notified of
transactions on the server you need to implement Instant Payment Notification (IPN).
In a nutshell, IPN provides a Web based call back mechanism for your application
to independently receive confirmation from PayPal that a transaction was made to
your account. PayPal POSTs back all the order information too, so you can verify
that the order was actually confirmed for the amount that you originally asked
for (another possible scam – exit the current order and come back in and
transfer money for a different amount. You’d actually get a confirmation but it
won’t be for the right amount!)
Since PayPal calls this URL directly, the URL for this page
is not immediately apparent and therefore more reliable. PayPal also includes
information about the order back to you, so that you can double check that the
important information – Invoice Number and OrderAmount most likely – matches
what you thought you were having the user pay for.
IPN must be explicitly enabled on the PayPal site. The URL
is configured like this: log on to your account, go to Profile | Selling
Preferences | Instant Payment Notifications. Check the enable box and provide a
URL on your site that you want IPN to post to. In the case above I want to have
PayPal post back to my site to a special page called PayPalIPNConfirmation.aspx.
Here’s what a typical IPN POST looks like:
mc_gross=1.04&invoice=f3d2972&address_status=confirmed&
payer_id=LGPXCPBDR6L3L&tax=0.00&address_street=32+Kaiea+Place&
payment_date=01%3A44%3A51+Sep+02%2C+2004+PDT&payment_status=Completed&
address_zip=96779&first_name=Frederik&mc_fee=0.33&
address_name=Frederik+Strahl¬ify_version=1.6&
custom=&payer_status=unverified&business=rstrahl%40west-wind.com&
address_country=United+States&address_city=Paia&
quantity=1&payer_email=rickstrahl%40hotmail.com&
verify_sign=AEXSm3Liw0MGNI363IuRPYv10swA&
payment_type=instant&last_name=Strahl&address_state=HI&
receiver_email=rstrahl%40west-wind.com&payment_fee=0.33&
receiver_id=T2HZ2XA7RCUCL&txn_type=web_accept&
item_name=West+Wind+Web+Store+Invoice+%23f3d2972&
mc_currency=USD&item_number=&payment_gross=1.04
As you can see there’s just about everything that was
originally entered coming back to you plus some PayPal internal stuff. As I
mentioned the things you probably want to look at is the invoice and
payment_gross values which let you quickly validate that what you sent in is
coming back to you.
This IPN POST back page should be a non-visual page ASPX
page (or an HttpHandler) – you can remove all HTML code other than <%@PAGE %>
directive. The code in this page receives what amounts to a POST back from
PayPal that echoes back your order information. The implementation looks
something like this in my Web Store:
public
class PayPalIPNConfirmation :
System.Web.UI.Page
{
protected void
Page_Load(object sender, System.EventArgs
e)
{
PayPalHelper
PayPal = new PayPalHelper();
busInvoice Invoice
= WebStoreFactory.GetbusInvoice();
// *** Reload our invoice and try to match it
// *** a real invoice
string InvoiceNo = Request.Form["invoice"];
if (InvoiceNo !=
"")
{
if (!Invoice.LoadByInvNo(InvoiceNo))
// *** Nothing to do here
return;
else
WebRequestLog.LogCustomMessage(App.Configuration.ConnectionString,
Westwind.Tools.WebRequestLogMessageTypes.ApplicationMessage,
"Invalid PayPal Invoice IPN Invoice Number
received:\r\n" +
Encoding.Default.GetString(Request.BinaryRead(Request.TotalBytes)) );
}
// *** Send the response data back to PayPal for
confirmation
bool Result =
PayPal.IPNPostDataToPayPal(App.Configuration.CCPayPalUrl,
App.Configuration.CCPayPalEmail,
Invoice.GetTypedDataRow().Invtotal);
if (Result)
{
// *** Clear out the order PayPal order code
Invoice.GetTypedDataRow().Ordercode = "";
// *** Confirm the invoice if item is new order
if ( Invoice.CanAutoConfirm() )
Invoice.SendEmailConfirmation();
}
else
{
try
{
WebRequestLog.LogCustomMessage(App.Configuration.ConnectionString,
WebRequestLogMessageTypes.ApplicationMessage,
PayPal.LastResponse);
}
catch {;}
}
}
}
Invoice.SendEmailConfirmation()). If it fails in
anyway the error is logged into an application log..
IPNPostDataToPayPal() method. IPN works by
having PayPal post back all the order information to you in POST format. The IPN
protocol requires that your handler returns all the FORM variables PayPal posts
to you by posting them back to PayPal. In other words we need to echo back all
the POSTed form variables to PayPal, plus add a cmd POST value with a
value _notify-validate to let PayPal know we’re returning an IPN
signature.
Here’s the code in the PayPalHelper class that accomplishes
this:
///
<summary>
/// Posts all form variables received back to
PayPal. This method is used on
/// is used for Payment verification from the
///
</summary>
///
<returns>Empty string on success otherwise the full message from the server</returns>
public
bool IPNPostDataToPayPal(string
PayPalUrl,string PayPalEmail,
decimal OrderAmount)
{
HttpRequest Request = HttpContext.Current.Request;
this.LastResponse =
"";
// *** Make sure our payment goes back to our own
account
string Email = Request.Form["receiver_email"];
if (Email ==
null || Email.Trim().ToLower() != PayPalEmail.ToLower())
{
this.LastResponse =
"Invalid receiver email";
return
false;
}
string Payment = Request.Form["payment_gross"];
if (Payment ==
null)
{
this.LastResponse =
"Order Corrupt: Invalid payment amount.";
return
false;
}
try
{
if (decimal.Parse(Payment,CultureInfo.InvariantCulture.NumberFormat)
!=
OrderAmount)
{ {
this.LastResponse =
"Order Corrupt: Invalid payment amount.";
return
false;
}
}
catch
{
this.LastResponse =
"Invalid order amount returned from PayPal.";
return
false;
}
wwHttp Http = new wwHttp();
Http.AddPostKey("cmd","_notify-validate");
foreach (string
postKey in Request.Form)
Http.AddPostKey(postKey,Request.Form[postKey]);
// *** Retrieve the HTTP result to a string
this.LastResponse = Http.GetUrl(PayPalUrl);
if (this.LastResponse
== "VERIFIED" )
return
true;
return false;
}
This code reads the incoming form vars and echos them back
by looping through the Request.Form collection and simply writing each key back
into the PostBuffer of the HTTP client. The code starts by performing a couple
of validations against the incoming POST data. Specifically we check the PayPal
account we’re receiving to and the order amount to make sure that there isn’t
any sort of spoofing going on (ie. the user decided to place a separate order
possibly with a different order amount). If you need to do additional checks you
can do that too by looking at the Form vars in the PayPalIPNConfirmation.aspx
code.
The code then loops through all of the incoming Form vars
and posts them right back to PayPal. I’m using a wrapper class around the .NET
WebRequest class called wwHttp to simplify the posting process. wwHTTP
automatically URL encodes form variables and returns a plain string result. You
can find this class described and available for download in a previous article
Retrieving HTTP content with .NET article. The class is also provided with
the accompanying source code.
On success PayPal returns a simple value: VERIFIED. Now we
finally have programmatically verified that the order is valid.
Debugging IPN
Testing the IPN verification is not trivial. Keep in mind
that IPN works by having PayPal call back your application at a specific URL.
This means if you’re testing and you want to use the debugger locally you will
have to make sure that you work on a publicly accessible IP address that an
external client (PayPal) can reach. If you sit behind a firewall, proxy or even
an DHCP client it’s not going to work. To make things worse I couldn’t get IPN
to work with the Sandbox – it only worked for me on the live site. The SandBox
account had no IPN configuration options, which means you have to run live
transactions to test/debug IPN. Make sure you place SMALL orders and don’t
accidentally order you most expensive items. The PayPal commission might kill
‘ya <g>…
If you can’t get a public ID to debug, you have to work the
old fashioned way with messages dumped into Trace or Event logs or emailing
yourself status messages from with in the IPN code. IPN is great, but plan on
spending some time debugging this interface ‘half blind’ if you don’t have an
open IP Address...
Configuration Management
Finally, if you integrate PayPal into your applications
you’ll probably want to provide some customization options for the processing,
such as easy ability to turn PayPal processing on and off, set the PayPal Url
(after all you might want to use the SandBox rather than the ‘live’ Url) or
enable and disable IPN confirmations.
In the above code snippets that I have shown you can see
the use of App.Configuration to hold configuration settings. These settings are
stored in a
Configuration Class that I described in a previous article. This class is
handy as it maps properties/fields to entries in a configuration file including
the ability to write out these settings. Figure 6 shows the Credit Card
Processing Configuration Page.
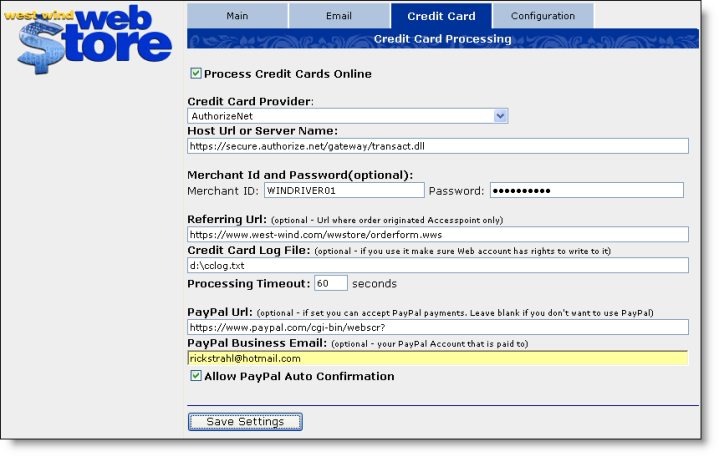
Figure 6 – It’s a good idea to store changeable
values in a configurable format in your application so you don’t have to make
code changes to switch behavior or accounts.
This is very important since it’s very likely you’ll want
to change the above information while debugging for example. Changing the URL in
this fashion is nice and easy and the Configuration class is one easy way to
provide this and other configuration options through code.
Samples
I’ve spent a fair amount of time talking about my custom
implementation in this article, because I think it’s important to keep things in
the perspective of a real application environment. I hope the code shown was not
too specific and easily understandable in the context of the PayPal integration.
I’ve provided a really simple sample project that demonstrates the basic
concepts I’ve described here along with the code to the helper classes
mentioned, which you can run and play around with. Just remember to use small
order amounts, eh? <g> The project contains a very different set of ASPX pages
which are very basic and serve more as a skeleton that you can insert your
application specific code into. You can download the sample code from:
http://www.west-wind.com/presentations/paypalintegration/paypalintegration.zip
Make sure you read the Readme.txt file that accompanies
this project for setup and configuration instructions.
Summary
PayPal may not be the first choice for order processing in
a custom e-Commerce application, but it does provide another payment option for
you customers. In this article I’ve tried to pull together all the pieces you
need to integrate PayPal into your own e-Commerce front ends in a way that is
somewhat seamless. While none of this is new, I didn’t find this information all
in one place so I decided to write this up here for my own reference in the
future as well as for you, eh?
If you have questions or comments about this or related
topics, you can as usual post a message in the
White Papers section of our Message Board.
Related Resources:
|