

 Weblog Home
 Html Help Builder
 West Wind WebSurge
 Anti-Trust Music
Single File Image Uploads with plUpload and Web Connection
April 20, 2015 • about 6 minutes to read
I get a lot of questions about uploading files in regards to Web Connection. Uploading is a thorny problem especially if you need to upload multiple files or if you want to use asynchronous uploads using AJAX rather than submitting files through standard <input type=”file”> elements which suffer from many problems. Using asynchronous upload components allow getting around the 16 meg string limit in FoxPro and Web Connection and they allow you to do the uploads in the background while you can display progress information and keep your UI otherwise active.
Web Connection has had support for plUpload for some time now. There’s a plUpload server handler that allows you to use the plUpload Queue component which is a visual UI component that’s provided by the plUpload library. Web Connection provides a generic plUploadHandler class that can be used on the server side to capture uploaded files.
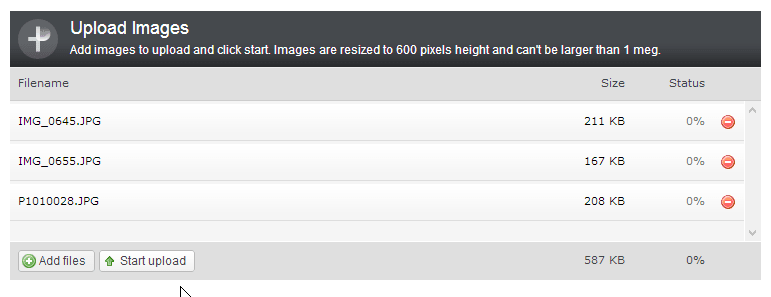
The examples show how to do this using the plUpload Queue component which is bulky UI control. Here’s what the full UI that you can drop on any form looks like:
You can check out this example and the following single file upload example on the Web Connection Samples page:
http://west-wind.com/wconnect/webcontrols/plUploadSample.htm
Single File Uploads
The full component is useful for batch uploads, but sometimes you don’t want or need this rather bulky UI to handle file uploads. For example I recently needed to add image uploads to the West Wind Message Board and in order to do this I really wanted a much simpler UI that simply triggers the image upload from a button:

There’s a simple button that when clicked allows you to pick a single file (although you can also have it pick multiples) and then immediately starts uploading the image to the server. When done the image URL returned is then embedded into the user’s message at the current cursor position.
Let’s see how we can do this using the simpler plUpload base API.
Using the base plUpload API
plUpload includes a number of different upload components but behind it all sits a base uploader API which doesn’t have any UI components associated with it. For my image uploader I don’t want any extraneous UI – I only want to upload the file and provide some basic progress information.
To do this we can use the core plUpload API. Here’s how this works.
Let’s start with the Add Image Dialog HTML which displays the modal dialog above:
<div id="InsertImageDialog" class="dialog" style="display: none; min-width: 320px; width: 80%">
    <div class="dialog-header">Insert Image</div>
    <div class="dialog-content">
        <label>Web Image Url: <small>(external source ie.Flickr,Imgur, DropBox etc.)</small></label>
        <input type="url" id="txtImageLink" style="width: 98%" />

        <button type="button" id="btnImageSelection" class="bigbutton" style="margin-top: 5px;">Insert Web Image</button>

        <div id="container" style="margin-top: 30px;">
                <label>Upload an Image:</label>
                <button  id="btnUploadFile" onclick="return false;" class="bigbutton">Select file to Upload</button>
        </div>
    </div>
</div>
Next we need to add the relevant plUpload script to the page.
<script src="scripts/plUpload/plupload.full.min.js"></script>
Then we need to configure the plUpload Javascript code which can live in a script tag on the bottom of the page or as is the case here inside of a page level JavaScript file.
var uploader = new plupload.Uploader({ browse_button: 'btnUploadFile', // you can pass in id...
url: "ImageUpload.wwt",
runtimes: 'html5,flash,html4',
container: document.getElementById('container'), // ... or DOM Element itself url: "ImageUpload.wwt", chunk_size: '64kb', // Resize (downsize really) images on clientside if we can resize: { width: 1024, height: 768, quality: 85 }, filters: { max_file_size: '4mb', mime_types: [ { title: "Image files", extensions: "jpg,gif,png" } ] }, // Flash settings flash_swf_url: 'scripts/plupload/js/Moxie.swf', init: { PostInit: function () { }, FilesAdded: function (up, files) { // start uploading - we only accept one file uploader.start(); }, UploadProgress: function (up, file) { showStatus("Upload Progress: " + file.percent + "% complete",3000); }, Error: function (up, err) { showStatus("Upload failed: " + err.code + ": " + err.message); },FileUploaded: function(up, file, response) { uploader.removeFile(file); var imageUrl = response.response; if (imageUrl) { markupSelection("<<img src=\"" + imageUrl + "\" />>"); $("#InsertImageDialog").modalDialog("hide"); } }, UploadComplete: function(up, files) { } } }); uploader.init();
The plUpload script code is pretty descriptive so not much explanation is needed. The most important propertie here is the browse_button property which is an id pointing at a button or link that when clicked triggers the image upload and the url property which points at the server target URL that will response to the plUpload file chunks that are sent to the server.
The interesting stuff happens in the event handlers.
Since I’m only dealing with a single file selection, I can use the FilesAdded event to immediately start the file upload under program control. This event fires whenever you select one or more files, and if you use a single button it makes sense to just kick off the upload without further user confirmation.
For progress and error information I use the ww.jquery.js showStatus() function which is a quick and easy way to display status information on a status bar on the bottom of the form.
The most important piece though is the FileUploaded event which is used to actually confirm the file upload and capture the generated filename that the server saved. The function receives the upload component, the individual file object and and HTTP response object. The main thing we’re interested in the response property of the response object which provides a fully qualified image URL that points at the image that the server saved. This value is captured, an <img> tag created and then pasted into the text control at the current cursor position.
Handling the Image plUpload on the Server Side
As mentioned earlier Web Connection includes a plUploadHandler class that makes it pretty straight forward to handle uploads. The class basically works in conjunction with a wwProcess class and handles the plUpload file transfer chunks and puts the files together on the server in small chunks. This makes it possible for example to post files larger than 16 megs to the server as well as the file is sent in small chunks that are progressively appended to a file on the server.
To implement the server side you’ll create two methods:
- A standard wwProcess EndPoint Method
- An OnUploadComplete Event that is fired when the upload is complete
The first is the actual endpoint method that is referenced by the plUpload component. If you look back on the JavaScript configuration you see that it points at ImageUpload.wwt which translates to the following method in my wwThreads Process class:
FUNCTION ImageUpload()

*** Make sure plUploadHandler is loaded
SET PROCEDURE TO plUploadHandler ADDITIVE

LOCAL loUpload as plUploadHandler
loUpload = CREATEOBJECT("plUploadHandler")

*** Upload to temp folder
loUpload.cUploadPath = ADDBS(THIS.oConfig.cHtmlPagePath) + "temp"
IF(!IsDir(loUpload.cUploadPath))
    MD (loUpload.cUploadPath)
ENDIF

BINDEVENT(loUpload,"OnUploadComplete",THIS,"OnImageUploadComplete",1)

*** Constrain the extensions allowed on the server
loUpload.cAllowedExtensions = "jpg,jpeg,png,gif"

*** Process the file or chunk
loUpload.ProcessRequest()

ENDFUNC
This code creates a plUploadHandler component and tells it to store files uploaded in a temp subfolder. This is a temporary folder where files are uploaded to and then discarded before getting copied to a permanent location.
We then need to map the OnUploadComplete event by mapping it to another function OnImageUploadComplete() that will do the post processing and moving of our file. Finally we can specify the file extensions that are allowed for the image and then we’re ready to Process the current request with loUpload.ProcessRequest().
This method is called multiple times for each file uploaded. Files are uploaded in chunks so a 2meg file is broken into many smaller chunks that are sent and processed one at a time. When a file is completed the OnImageUploadComplete event is fired. Here’s what that looks like:
FUNCTION OnImageUploadComplete(lcFilename, loUpload)
LOCAL lcUrl, lcFile

lcUrl = this.ResolveUrl("~/temp/" + lcFileName)

*** Resize the image
lcFile = ADDBS(loUpload.cUploadPath) + lcFileName

*** Delete expired files - only for 10 minutes
DeleteFiles(ADDBS(JUSTPATH(lcFile)) + "*.*",600)

lcNewFile =  SYS(2015) + "." + JUSTEXT(lcFile)
lcNewPath = this.cHtmlPagePath + "PostImages\" + TRANSFORM(YEAR(DATETIME())) + "\"
IF !ISDIR(lcNewPath)
    MD (lcNewPath)
ENDIF

lcFileName = lcNewPath + lcNewFile
*ResizeImage(lcFile,lcFileName,1024,768)
COPY FILE (lcFile) TO (lcFileName)
DELETE FILE (lcFile)

lcUrl = this.ResolveUrl("~/PostImages/" + + TRANSFORM(YEAR(DATETIME())) + "/" + lcNewFile)
lcUrl = "http://" + Request.GetServerName() + lcUrl

*** Write out the response for the client (if any)
*** In this case the URL to the uploaded image
loUpload.WriteCompletionResponse(lcUrl)

ENDFUNC
The handler is passed the original file name (just the filename without a path) and the loUpload component.
For the message board I want to capture the file uploaded, rename it with a random name and then move it a more permanent folder – in this case PostImages/YEAR/. Once the file has been copied the original uploaded file in the temp folder can be deleted.
Finally the OnImageUploadComplete() method has to return the new URL to the client so that the client can link to the image. If you recall in the JavaScript we were sent a response object with a response property. The response property holds whatever we write out into the WriteCompletionResponse(). The most useful thing here almost always is the full URL to the resource that was uploaded if the client allows using that resource in some way. In the client application the URL is used to embed an image link into the user’s message text.
Quite a bit of Code, but easy to do
What’s described above is the entire process involved, which is not entirely trivial. There are a fair amount of moving parts in this code both on the client and on the server, but between plUpload and Web Connection’s plUploadHandler the actual code you have to write is pretty minimal. Most of what you see above is boiler-plate code that you can cut and paste into place and then only customize the actual result handlers when uploads are complete both on the server and client. Although it’s a fair bit of code overall the non boiler-plate code is minimal.