

Creating Multi-threaded .NET components
for COM Interop with Visual FoxPro
By Rick Strahl
www.west-wind.com
rstrahl@west-wind.com
Last Update:
September 14, 2012
Other Links:
Download Examples for this article
Leave a Comment or
Question
Other articles in the series:
1.
Passing objects between FoxPro and
.NET COM Components
2.
Handling .NET Events in FoxPro via COM Interop
3.
Creating multi-threaded components
.NET for COM Interop with Visual FoxPro
This is Article 3 of a 3 part series on COM Interop between .NET and Visual
FoxPro.
Multithreading is a powerful feature that allows you to
asynchronously execute code while continuing to work or provide a responsive
user interface to your application. .NET makes multithreading very easy and in
this installment you’ll see how to create and execute multithreaded components
and communicate with them via events.
In the last installment of this series I introduced the
concept of multithreaded .NET components exposed to COM. In that article I used
a very simple multithreading example, that made a simple email component
asynchronous, running on a separate thread and using events to communicate the
progress back to our Visual FoxPro client application.
The point of the simple example was to demonstrate that
multithreading and events go together like a wave and a surfboard. In order for
multithreaded code to communicate with your client component some mechanism
needs to be applied to let the client application know that a status change has
occurred. In some rare situations you may not need to be notified; a pure call
and forget scenario is actually a common pattern in distributed applications.
But in most situations, especially in user interface scenarios, the calling
application needs to know what’s going on in the background.
So let’s start with typical user interface scenarios. Let’s
create a new component that downloads a file for us in the background and
notifies our application of progress. This is similar to the email example I
showed last time. It’s a good review to make this article self contained, but
I’ll mix things up a little by using an Asynchronous Delegate for the
multithreaded code invocation.
An Asynchronous Http Component
In this article’s accompanying code there’s a class called
wwHttp which is a wrapper around the .NET HttpWebRequest class that is used to
access HTTP content. The class provides a single class interface to Http
interface instead of the multi-object requirements that HttpWebRequest requires.
There are a number of methods that allow you to download (and upload) content to
a Web server.
The method in the class that we’re interested in is
GetUrlBytes(). This method downloads an HTTP response from a URL into an array
of bytes. Why bytes and not a string – in .NET strings cannot contain binary
data as they do in FoxPro so strings are really Unicode strings and Binary data
is raw data that can contain anything. The method takes two parameters – a Url
and a buffer size. It returns a Byte array or a binary response of the
downloaded data. Note that if we want to retrieve binary content we have to
return the data as byte[]. String values cannot contain binary data like Nulls
and upper some ASCII characters so if a string were returned the Http result
would be corrupted. Listing 1 shows what the C# method code does in abbreviated form.
The full source code is available in the code download.
[ComSourceInterfaces( typeof(IwwHttpEvents)
)]
[ClassInterface(ClassInterfaceType.AutoDual)]
[ProgId("DotNetCom.wwHttp")]
public
class wwHttp
{
… properties and events
///
<summary>
///
Fires progress events when receiving data from the server
///
</summary>
public
event ReceiveDataDelegate ReceiveData;
public
delegate void
ReceiveDataDelegate(
object sender,
ReceiveDataEventArgs e);
///
<summary>
///
Fires progress events when using GetUrlEvents() to retrieve a URL.
///
</summary>
public
event ReceiveDataDelegate SendData;
public
byte[] GetUrlBytes(string
Url,
long
BufferSize)
{
HttpWebResponse Response =
this.GetUrlResponse(Url);
BinaryReader HttpResponse =
new BinaryReader(
Response.GetResponseStream());
if (HttpResponse ==
null)
return
null;
if (BufferSize < 1)
BufferSize = 8192;
long lnSize = BufferSize;
if (Response.ContentLength
> 0)
lnSize = this.WebResponse.ContentLength;
else
lnSize = 0;
byte[] Result =
new byte[lnSize];
byte[] lcTemp =
new byte[BufferSize];
ReceiveDataEventArgs EventArguments =
new
ReceiveDataEventArgs();
EventArguments.TotalBytes = (int)lnSize;
lnSize = 1;
int Count = 0;
long TotalBytes = 0;
while (lnSize > 0)
{
if (TotalBytes +
BufferSize >
this.WebResponse.ContentLength)
BufferSize =
this.WebResponse.ContentLength -
TotalBytes;
lnSize = HttpResponse.Read(Result,
(int)
TotalBytes,
(int)
BufferSize);
if (lnSize > 0)
{
Count++;
TotalBytes += lnSize;
// *** Raise an event if hooked up
if (this.ReceiveData !=
null)
{
///
*** Update the event handler
EventArguments.CurrentByteCount =
(int)
TotalBytes;
EventArguments.NumberOfReads = Count;
EventArguments.CurrentChunk = Result;
this.ReceiveData(this,EventArguments);
// *** Check
for cancelled flag
if (EventArguments.Cancel)
{
this.bCancelled
= true;
break;
}
}
Thread.Sleep(10);
// give up timeslice
}
} // while
HttpResponse.Close();
// *** Send Done notification
if (this.ReceiveData
!= null &&
!EventArguments.Cancel)
{
// *** Update the event
handler
EventArguments.Done = true;
// *** If events are
hooked up assume we
// *** might want to read
the last response
// *** NOT THREAD SAFE!
assume 1 instance
this.AsyncHttpResponseBytes
= Result;
this.ReceiveData(this,EventArguments);
}
return Result;
}
// *** result storage when
firing events
public
byte[] AsyncHttpResponseBytes =
null;
}
/// *** Event Interface for
wwHttp class
[InterfaceType(ComInterfaceType.InterfaceIsIDispatch)]
public
interface IwwHttpEvents
{
[DispId(0)]void
ReceiveData(object sender,
ReceiveDataEventArgs e);
[DispId(1)]void
SendData(object sender,
ReceiveDataEventArgs e);
}
The behavior code is not all that important, but pay
attention to the code around the ReceiveData and SendData blocks. If you read
the
last article this should look familiar. ReceiveData and SendData are event
delegates and if set, the code in the GetUrlBytes method fires these events as
data is retrieved. Note the COM Event export attribute on the wwHTTP class:
[ComSourceInterfaces( typeof(IwwHttpEvents)
)]
which points the event interface at the IwwHttpEvents
interface at the bottom of Listing 1. With this code in place you can now call
the GetUrlBytes() method of the .NET COM object and attach to two published
events with the code shown in Listing 2.
SET PROCEDURE TO wwUtils
ADDIT
lcUrl = "http://www.west-wind.com/files/wwIpstuff.zip"
lcFile = "wwiptstuff.zip"
loHttp = CREATEOBJECT("DotNetCom.wwHttp")
loHttpEvents =
CREATEOBJECT("IwwHttpEvents")
EVENTHANDLER(loHttp,loHttpEvents)
lcBinary =
loHttp.GetUrlBytes(lcUrl,4096)
STRTOFILE(lcBinary,lcFile)
GoUrl(lcFile)
DEFINE CLASS IwwHttpEvents
AS session OLEPUBLIC
IMPLEMENTS IwwHttpEvents
IN "DotNetCom.wwHttp"
PROCEDURE
IwwHttpEvents_ReceiveData(
sender AS
VARIANT, e AS
Variant) AS VOID
*** e is autogenerated as a
parm but you can’t use e – it’s an Alias!!!
*** Watch out for this. Eeasiest: Just rename e parm to EventArg
EventArg = e
WAIT WINDOW NOWAIT
"Downloading: " + TRANSFORM( ;
EventArg.CurrentByteCount,"999,999,999")
+;
" of " +;
TRANSFORM(EventArg.TotalBytes,"999,999,999")
ENDPROC
PROCEDURE
IwwHttpEvents_SendData(
sender AS VARIANT, e AS VARIANT) AS VOID
ENDPROC
ENDDEFINE
I’m implementing the Event interface as a separate class
and hooking up code to the ReceiveData event so I can show progress of the
download. An instance of the event object is then bound to the wwHttp object
with the VPF EVENTHANDLER() function. When you run this code now you should see
a wait window while the file is downloaded and saved to disk when the method
call completes. This is still synchronous code.
If you run this synchronous code the file will download
just fine and you will see the Wait Window updating, but the user interface is
blocked – you’re waiting for the download to complete. So let’s make the
GetUrlBytes() operation asynchronous. The Wait Window is populated from the
second paramameter e which contains current and total bytes as well as flags for
Cancel and Done and a CurrentChunk of the data retrieved.
Using an Asynchronous Delegate
In the last article I created a brand new thread to run the
async operation. However, .NET supports a number of ways to run code
asynchronously and in this case an easier way is to use an Asynchronous
Delegate. Delegates in .NET are function pointers that can be used to execute
code as we saw in the last article. When you create a new thread you also use a
delegate to tell the Thread object which method to invoke. To review here’s the
code we used to create a new thread and have it call the parameterless
SendMailWithEvents() method:
ThreadStart delSendMail =
new ThreadStart(this.SendMailWithEvents);
Thread myThread = new
Thread(delSendMail);
myThread.Start();
ThreadStart is a delegate and Thread.Start internally calls
the delegate’s Invoke method once the new thread has been created to start up
the method you specified.
Delegates by themselves allow directly for asynchronous
operation via the BeginInvoke and EndInvoke methods. When using these methods,
.NET runs the method call asynchronously on a .NET Thread Pool thread. .NET
provides a fixed number of Thread Pool threads (25 by default) which are
recycled after they have completed. Thread Pool threads tend to be much more
efficient in startup and tear down as .NET doesn’t have to spin up a new thread
from scratch. Instead threads are returned to the pool and reused whenever a
request completes.
Delegates also provide more flexibility than raw threads
when calling methods. Raw threads can only call methods that take no parameters
and can return no result value. Delegates on the other hand can work with any
method signature and provide an option for a Callback method that is called when
the thread completes processing.
A delegate makes sense in this scenario because we need to
call GetUrlBytes() which takes two parameters. Because of the parameters, we
need to define a custom delegate that matches this signature:
private delegate byte[]
delGetUrlBytes(string Url,int BufferSize);
Next we need a method that we can call from the COM object
to start the Async operation:
public
void GetUrlBytesAsync(string
Url,
int
BufferSize)
{
delGetUrlBytes
AsyncDelegate = new delGetUrlBytes(
this.GetUrlBytes );
IAsyncResult ar =
AsyncDelegate.BeginInvoke(Url,BufferSize,null,null);
}
The code creates a new instance of the delegate and points it at the
GetUrlBytes() method of the class. We then call BeginInvoke() on this method to
start processing. BeginInvoke() takes the same two parameters that GetUrlBytes()
takes, plus two additional parameters: One for a callback method which we don’t
need here and an optional state object. Note that I must capture the result in
an IAsyncResult reference – the return value is significant even if it isn’t
used here as we’re doing a Call and Forget Async call.
I set both of the final
parameters to null. We don’t need a callback in this scenario because we don’t
need to pick up the result value from GetUrlBytes(). If you go back and look at
Listing 1 you can see that the GetUrlBytes method does this for us when events
are firing by setting the AsyncHttpResponseBytes property with the resulting
byte[] array.
Delegates can also pick up
return values, but this process is a little more involved and beyond the scope
of this article. In many cases it’s actually a better choice to provide result
values via specialized events that return the value from the actual async method
code or by storing results as properties on the originating objects.
To avoid requiring a Callback method I opted to write the
Http Response in the GetUrlBytes method to the AsyncHttpResponseBytes property
just before the final event is fired:
// *** Send Done notification
if (this.ReceiveData
!= null &&
!EventArguments.Cancel)
{
// *** Update the event handler
EventArguments.Done = true;
// *** If events are hooked up assume we
// *** might want to read the last response
this.AsyncHttpResponseBytes
= Result;
this.ReceiveData(this,EventArguments);
}
return Result;
In FoxPro then the Event method needs to change just a
touch to pick up the Http response with this code:
IF EventArg.Done
STRTOFILE(sender.AsyncHttpResponseBytes,
"test.txt")
WAIT WINDOW "Done..."
nowait
ENDIF
Notice that I pick up the final result from the sender
object not the EventArg. This is because the AsyncResponseBytes are stored on
the wwHTTP object rather than the EventArg.
Ready to run the code? One more modification: Change the
code you ran before to the async version of GetUrlBytes:
lcBinary = loHttp.GetUrlBytesAsync(lcUrl,4096)
You should now see your cursor return to you immediately
while the download continues in the background and the Wait Window updates the
download progress. You can go on with your own processing while .NET chews on
the download. Cool.
Let’s add the ability to cancel the download which is very
easy. Take another look at Listing 1 and you’ll notice that within that where
loop there’s a check for the Cancel flag of the EventArgument that’s passed to
VFP via the event parameter. Add these two lines to your startup code:
PUBLIC plCancel
plCancel = .f.
ON KEY LABEL ALT+X
plCancel = .t.
and add this line to your ReceiveData method:
EventArg.Cancel =
plCancel
and you’re done. If you run the code again you should now
be able to press Alt-X and immediately stop downloading data. Note that not only
does the event firing stop but the download as well is aborted as the Cancel
flag is carried back into the .NET code.
Putting it together
Using a Wait Window is probably not a good way to display
progress information from an asynchronous operation. Let’s take the above
example and wrap it up into a FoxPro component: A download form that can be used
to download files in the background and display status information and inform
you when the download is complete. Figure 1 shows what this dialog looks like
when complete.
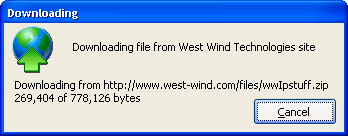
Figure 1 – Multithreaded Download Dialog. This
dialog drives the download of a file through a multithreaded .NET component and
receives events for updating the download status.
This dialog uses two classes: A visual class that holds the
form and a the IwwHttpEvents Interface implementation that receives the inbound
events from the .NET COM object. The form contains an image control, and two
labels plus the cancel button. In addition there are a handful of properties,
cMessage, cHttpResponse, cOutputFileName and cDownloadUrl that can be set and
are used internally to display the dialog display content.
The process starts with the StartDownload implementation as
shown in Listing 3:
* StartDownload
LPARAMETERS
lcUrl, lcMessage
this.Visible
= .t.
IF
!EMPTY(lcMessage)
this.lblMessage.Caption
= lcMessage
this.cMessage =
lcMessage
ELSE
this.lblmessage.Caption
= this.cMessage
ENDIF
this.ldownloadcancelled
= .f.
this.cDownloadurl
= lcUrl
THIS.oHttp
= CREATEOBJECT("DotNetCom.wwHttp")
this.oHttpEvents
= NewObject("IwwHttpEvents",
"wwHttpDownloadDialog.prg")
EVENTHANDLER(this.oHttp,this.oHttpEvents)
*** Bind Interface method to method on form!
BINDEVENT(this.oHttpEvents,
"IwwHttpEvents_ReceiveData",
this,"OnReceiveData")
this.lblDownloadProgress.Caption
=
"Starting download..."
*** Start the download
this.oHttp.GetUrlBytesAsync(
this.cDownloadUrl,this.nDownloadbuffersize)
The process here is very similar to the code used in the
previous example. The only difference is the extra call to BINDEVENT() to bind
the ReceiveData event to this form so that we can handle it inside of this class
instead in the Interface declaration which lies outside of this class domain.
This provides additional encapsulation and keeps the logic self contained. The
other key method in the class is the OnReceiveData method which receives these
events forwarded through BINDEVENT().
* OnRececeiveData
LPARAMETERS sender as Object,
e as DotNetCom.ReceiveDataEventArgs
*** Bug - need to reassign
EventArg = e
this.lblDownloadProgress.Caption
= ;
"Downloading from " + ;
THIS.cdownloadurl +
CHR(13) + ;
ALLTRIM(TRANSFORM(EventArg.CurrentByteCount,;
"999,999,999")) +;
" of " + LTRIM(TRANSFORM(EventArg.TotalBytes,;
"999,999,999")) +;
" bytes"
this.lblDownloadProgress.Refresh()
IF THIS.lDownloadcancelled
EventArg.Cancel = .T.
ENDIF
IF EventArg.Done
this.chttpresponse = ;
this.oHttp.AsyncHttpResponseBytes
IF !EMPTY(THIS.cOutputFileName)
STRTOFILE(this.cHttpResponse,;
this.cOutputFileName)
ENDIF
*** Fire notification event
*** you can BINDEVENT to
this
this.OnDownloadcomplete()
ENDIF
This code is responsible for updating the form display. It
also checks for the cancel flag which can be set at any point by clicking on the
Cancel button. If triggered the cancel setting is returned to the .NET component
which stops downloading and aborts. The CancelDownload method also hides the
form.
When the download is done that there’s a cOutputFilename
property which if set is used to save the download to file. In addition an
internal method OnDownloadComplete is fired to indicate completion. The method
is unimplemented in the form but you can easily bind to it with BINDEVENT.
To call this code from an application you’d write code like
this:
LPARAMETER
lcUrl, lcFile
IF EMPTY(lcUrl)
lcUrl =
"http://www.west-wind.com/files/wwClient.zip"
ENDIF
IF EMPTY(lcFile)
lcFile = "wwclient.zip"
ENDIF
*** Public so it stays alive after this PRG
exits – it’s async after all
PUBLIC
poDownload
poDownload =
NEWOBJECT("wwHttpDownloadDialog",
"wwHttpDownloadDialog.vcx")
poDownload.Width
= 340
poDownload.cOutputFileName =
"wwClient.zip"
poDownload.nDownloadBufferSize
= 8196
poDownload.StartDownload(lcUrl,;
"Downloading file from West
Wind Technologies")
*** Hook up download complete
notification ‘event’
*** Don’t need a class if you
have some place to
*** hook this to – here we
don’t and BINDEVENT
*** requires an object to fire
to
PUBLIC
poNotification
poNotification=CREATEOBJECT("DownloadNotification")
BINDEVENT(poDownload,"OnDownloadComplete",;
poNotification,"OnDownloadComplete")
RETURN
DEFINE CLASS
DownloadNotification
as Custom
FUNCTION
OnDownloadComplete
poDownload.visible
= .f.
RELEASE poDownload
DOEVENTS
MESSAGEBOX("WAKE
UP: Download is complete.")
ENDFUNC
ENDDEFINE
You can now easily download files in the background with
progress and completion information. You can find this example in
wwHttpDownloadDialog.prg.
Same problem different approach: Using a WinForm
The above approach works well, but you can take yet another
approach: Create a Windows Forms interface and have it manage the download
process completely externally from your FoxPro application. One advantage of
this approach is that there’s no FoxPro code firing while the download is
occurring. This reduces overhead and minimizes problems if VFP is busy
processing and can’t capture the events. I’ve included this example for you to
play with in DownloadForm Example in the VS.NET project and the
wwHttpDownload.scx form which shows how both the FoxPro and .NET Winforms
examples work.
Automating a Windows Form
This brings us to the next topic, which is automating a
WinForm through COM. WinForms require special attention. Why bring this up in a
multithreading article? As you’ll see in a minute you’re required to set up
Windows forms on separate threads if you plan on having the form run in the
background interactively.
Fist a few ground rules. .NET cannot create EXE COM
servers. It can be done, but only by implementing the proper COM interfaces
yourself using the raw COM Windows APIs. If you want the gory details you can
find an example on how to do this here:
http://blogs.msdn.com/adioltean/archive/2004/06/18/159479.aspx.
The lack of integrated DCOM COM support in .NET means that
you can’t expose WinForms that are contained in an EXE. If you want to publish
WinForms via COM you MUST create the forms in a separate Class Library DLL.
This is easily done even for a desktop application. Simply create a new Class
Library project and move any of the forms you want use via COM into it.
Everything continues to work just like it does if the forms were part of the
EXE.
Once in a DLL you can publish forms via COM like any other
objects. It’s actually quite easy and works the same as any other object. Slap
on the appropriate COMattributes, add any event interfaces that you want to
expose and off you go. The Download dialog example shows a simple mostly
non-interactive sample of how this works.
However to demonstrate the core features I’m going to use a
different example that demonstrates passing data to and from a WinForm. I’ll use
a Customer Entry form as an example. Figure 2 shows the .NET input form in the
Visual Studio designer.
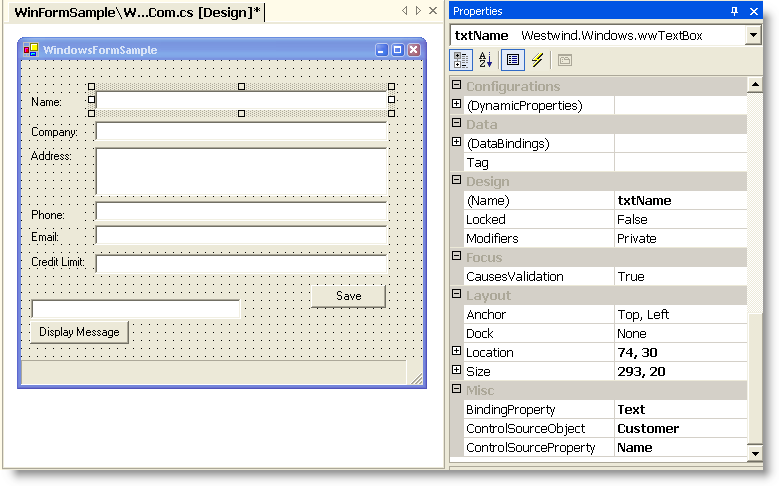
Figure 2 – A WinForm exposed to COM. This form
is exposed via COM and can be passed a Customer Business object that is
displayed, can be edited and read from the FoxPro client code.
The form contains a number of textboxes. To keep things
simple, I used a set of custom controls to databind the controls to a business
object named Customer. Each textbox is bound to one of the fields of the
business object. The Business Object is created in .NET and passed back to
FoxPro, where the values are populated and the object is then passed back to
.NET for databinding. Here’s what the code looks like in Visual FoxPro:
loNet =
CREATEOBJECT(;
'DotNetCom.DotNetComPublisher')
*** Create a Customer Object
Instance
loCustomer = GetCustomer()
loCustomer.Name
= "Rick Strahl"
loCustomer.Company = "West
Wind Technologies"
loCustomer.creditLimit =
9999.99
loCustomer.oAddress.StreetAddress = "32 Kaiea"
loCustomer.oAddress.Phone =
"808 579-8342"
loCustomer.oAddress.Email = "rick@hotmail.com"
PUBLIC
loNetForm
loNetForm =
CREATEOBJECT("DotNetCom.WinformCom")
*** Send customer object back
to WinForm
loNetForm.LoadCustomer(loCustomer)
loNetForm.Show()
&& Show and Bind
The WinForm itself uses the custom controls to databind and
so LoadCustomer is a very simple method:
public
void LoadCustomer(Customer Customer)
{
if (Customer ==
null)
return;
this.Customer =
Customer;
this.BindData();
}
BindData() is a custom databinding method that binds the Customer object members
to the controls. Now if you run this code you’ll see the form filled with the
data passed from FoxPro. You can also go ahead and edit the data in the form.
But there’s a problem… go back to the FoxPro Window and try to type into the
Command Window. Ooops – the cursor is not responding. We’ve basically locked the
FoxPro form’s event loop while we’re on the WinForm. Until you close the
WinForm, FoxPro’s UI is not accessible.
The problem here is that we’re essentially calling the
WinForm modally. The form shows just fine, but there’s no real event loop
running in it, so it’s sharing the Windows message pump with your FoxPro
application, which results in some, shall we say, odd behavior.
This is where the multithreading aspect comes in. In order
to run a WinForm in the background and active while not affecting your Fox
application, you have to run the form on a separate thread and give it its own
event loop. Sounds complicated? Well, it’s not. What we need to do is create the
form on a separate thread. Here’s a Factory class for WinFormCOM that does the
trick:
[ClassInterface(ClassInterfaceType.AutoDual)]
[ProgId("DotNetCom.WinFormComFactory")]
public
class WinFormComFactory
{
WinFormCom Instance = null;
public WinFormCom
RunForm()
{
// Create instance
on this thread so
// we can pass it
back to caller
this.Instance =
new WinFormCom();
System.Threading.Thread t =
new System.Threading.Thread(new
ThreadStart( this.RunThread ) );
// Important!!!
t.ApartmentState = ApartmentState.STA;
t.Start();
return
this.Instance;
}
public
void RunThread()
{
// Show the form
this.Instance.Show();
System.Windows.Forms.Application.Run(this.Instance);
}
}
RunForm() creates a new instance of a form and starts a new
thread that executes the RunThread() method. RunForm() returns the instance of
the form back to caller over COM. The new thread then starts and Show() is
called on the new thread which causes the form’s main UI processing to be tied
to that particular thread. Application.Run() then starts on that thread to start
a separate message pump for this new thread. So now there are two separate UI
threads – the original thread for your FoxPro app, and the new WinForm UI
thread.
Compile and then change the code use this code in Fox to
run the form from:
PUBLIC loNetForm
loNetForm = CREATEOBJECT("DotNetCom.WinformCom")
to:
PUBLIC
loNetForm
loForm =
CREATEOBJECT("DotNetCom.WinFormCom")
loNetForm = loForm.RunForm()
ForceFoxFocus()
Now run the form and you should be able to switch back and
forth between Fox and the WinForm freely and get the user interface to behave
properly. You now have full access to the form. For example, change the Customer
Name on the form, make sure you tab off the field (to force the data to bind
back), then go back into FoxPro and do:
? loNetForm.Customer.Name
and you should now see the changed name as expected.
As you see, using WinForms over COM is a little bit more
complicated than plain objects, but once you understand the Windows Event loop
issue and the workaround it’s easy enough to set this up for any form you need
to run over COM.
Multithreading VFP COM components
So far we’ve looked at multithreading scenarios where we’re
using .NET to do the multithreaded processing. What if you want write your code
with FoxPro instead? You can do that quite easily actually. We’ve covered
everything that you need to make this happen. FoxPro 6 and later supports
multithreaded STA COM servers, so if you want to run multiple VFP COM components
it’s as easy as creating a .NET method that can launch a VFP COM server on a new
thread.
Listing 5 shows a generic .NET COM Launcher that runs a COM
object asynchronously by calling a specific method with a single parameter and
no return value.
[ClassInterface(ClassInterfaceType.AutoDual)]
[ComSourceInterfaces( typeof(IMultiThreadedComLauncherEvents)
)]
[ProgId("DotNetCom.MultiThreadedComLauncher")]
public
class MultiThreadedComLauncher
{
public
string ProgId = "";
public
string Method = "";
public
object Parameter
= null;
public
event ThreadStart ThreadCompleted;
public
void RunMultiThreadedCom(string
ProgId,
string
Method, object Parameter)
{
this.ProgId
= ProgId;
this.Method
= Method;
this.Parameter
= Parameter;
Thread Worker =
new Thread(
new
ThreadStart(this.RunMultiThreadedCom_ThreadMethod)
);
// Important for VFP components!
Worker.ApartmentState
= ApartmentState.STA;
Worker.Start();
}
private
void RunMultiThreadedCom_ThreadMethod()
{
Type ComType =
Type.GetTypeFromProgID(this.ProgId);
object
ComObj = Activator.CreateInstance(ComType);
ComUtils.CallMethod(ComObj,this.Method,this.Parameter);
if (this.ThreadCompleted)
this.ThreadCompleted();
}
}
[InterfaceType(ComInterfaceType.InterfaceIsIDispatch)]
public
interface IMultiThreadedComLauncherEvents
{
[DispId(1)]void
ThreadCompleted();
}
The code creates a new thread and then dynamically launches a COM server using
late COM binding. The private method uses Reflection and the ComUtils function I
introduced in the first article of the series to dynamically call the specified
method with a parameter.
Let’s try this out from VFP by creating a small sample
server shown in Listing 4.
DEFINE CLASS
MultiThreadProcessing ;
as Session OLEPUBLIC
FUNCTION
StartProcessing(lcID)
LOCAL lnX, ltStarted
SET EXCLUSIVE OFF
IF !FILE("MultiThread.dbf")
CREATE TABLE
MultiThread( ID C(25),;
TimeStamp T,Count
I)
USE
ENDIF
USE MultiThread
IN 0 SHARED
ltStarted = DATETIME()
DECLARE INTEGER Sleep
IN WIN32API INTEGER
FOR lnX = 1
TO 100
INSERT INTO
MultiThread ;
(Id,TimeStamp,Count)
values ;
(lcId,DATETIME(),lnX)
DOEVENTS
lnRand =
RAND(-1)
Sleep(100 * lnRand)
ENDFOR
RETURN
ENDDEFINE
This server writes values into a table in a loop. When
running multiple threads we should see values from the different servers which
differentiate themselves by the ID passed in. To create a COM server from the
code add the PRG to a project and compile with:
BUILD MTDLL
multithreadprocessing FROM ;
multithreadprocessing recompile
To test the server use the following code:
o = CREATEOBJECT("DotNetCom.MultiThreadedComLauncher")
? o.RunMultiThreadedCom(
"multithreadprocessing.multithreadprocessing",
"StartProcessing","test1")
o2 = CREATEOBJECT("DotNetCom.MultiThreadedComLauncher")
? o2.RunMultiThreadedCom(
"multithreadprocessing.multithreadprocessing",
"StartProcessing","test1")
o3 = CREATEOBJECT("DotNetCom.MultiThreadedComLauncher")
? o3.RunMultiThreadedCom(
"multithreadprocessing.multithreadprocessing",
"StartProcessing","test1")
When you run this code the method calls immediately return
to you so your Fox code can go on and do any of its own processing, while the
three servers in the background are running on separate threads. The result
MultiThread.dbf table should show mixed up values from all three servers.
This is only a rough example that demonstrates how easy it
is created multi-threaded FoxPro code. One issue you have in this scenario is
that you don’t know when processing is complete. You can either use table based
message that let the Fox instance check for certain values, or you can use
events on the COM server. I implemented a ThreadComplete event along with the
EventHandler class. I’ll leave the exercise of hooking this up for your FoxPro
code to you – based on this articles series you should be an expert at this now,
right? <g>
A few things to watch out for
This is powerful stuff and I hope this article has given
you some ideas of how you can take advantage of this functionality. But be
careful with multithreading – it’s an advanced feature and it’s easy to abuse
this functionality. Use it only if you really have to. Mulithreaded code can
easily lead to very hard to debug errors.
One other thing to watch out for is shutting down your application while threads
are still active. .NET is much more forgiving than native Windows Threads, but
still-running threads can still cause your application to not shut down or in
the worst case scenario crash if you shut it down. You should always build any
multi-threaded code with some mechanism to shut down the multi-threaded code,
ideally via a flag that is frequently checked inside of your multi-threaded
code. As an alternative, .NET also includes methods to forcibly shut down a
thread with Thread.Abort which should also be used with care.
If you are planning on writing multithreaded code be sure
to read an article or two on the subject and especially on thread safety. It’s
an important topic that I’ve glossed over here for the sake of focusing on VFP
specific features and simple examples.
No needle looking for a thread
Multithreading can open up a whole new world of
functionality to your FoxPro applications. You can interact with .NET components
that are multithreaded and you can communicate with them by attaching to events.
You can access WinForms and run them asynchronously so that your FoxPro code and
user interface can interact with them. And finally you can even make your FoxPro
code multithreaded as long as you can do so in the context of a COM component.
This article concludes a long series on COM Interop with
.NET. We’ve covered a lot of ground in these articles and I hope you’ve found
them useful as you work with both with .NET and Visual FoxPro together…
Comments or Questions
|

 If you find this article useful,
consider making a small donation to show your support for this Web site
and its content.
If you find this article useful,
consider making a small donation to show your support for this Web site
and its content.