 Step 1 - Create SQL Server Database
 Step 1 - Create SQL Server Database
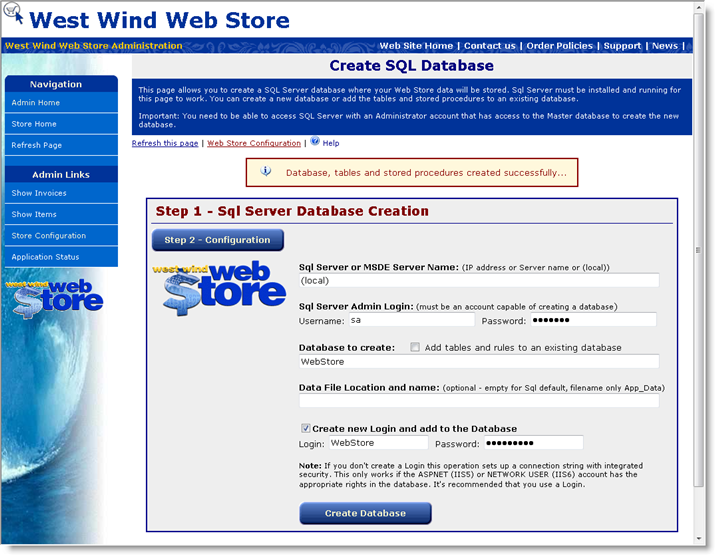
The West Wind Web Store application works with SQL Server or MSDE and you can create the Web Store tables and stored procedures directly through this Web interface. The interface looks like this:
Before you begin
Make sure that you have the following rights and permissions set up for your Sql or MSDE Server:
- Server configured with Sql Server Authentication or Mixed Mode Authentication
- Access to an Administration account with access to the Master database to create a new database
Note for MSDE users
If you're using MSDE it you should use the DB2kMgr utility described below. MSDE installs with Windows Authentication by default, so you will need to switch it into Mixed Mode authentication. For more info see MSDE Configuration.
In this case I use the sa account. Here's what you need to set:
Server Name:
This is the machine that the machine lives on. This can be the local machine (local) or an IPAddress or NetBios name.
Admin Login:
In order to create the database you have to log in as an adminstrative SQL Server account. This can be the sa account as in the example above or any other admin account that has access to the master database and can create new databases.
Database to create:
The name of the database that you want to create or add the Web Store data files to. If you check the Add to Existing Database option the data files are added to an existing database. Note (local) denotes local on the server.
Data File Location:
This is optional and is primarily meant for the Web Hosting situations to allow ISPs to easily store the data in the customers application directories. This allows you to specify where the database you create is stored. If you leave this value blank the Database is created in SQL Server's default data directory.
Create new Login and add to Database
When checked this option tries to create a new Database Login and adds it to the new Database. This allows you to create a username and password that you can then use in the connection string to the database when the application runs. Note the account that is created is flagged as dbo.owner and has full rights to the new database. If this is too loose you have to manually edit the Login information in the database later.
When you've filled in these values click on Create Database. If you're successful you will see a message like the one in the screen shot above. Otherwise an error message will provide info on what went wrong.
If no errors occur the button for Step 2 - Web Store Configuration becomes available.
Manual Configuration
If you want more control over the database creation you can also manually perform the configuration steps using SQL Server Analyzer or using a utility like DBAMGR2K SQL Admin utility that works without the SQL Server Client tools. Basically you need to create a new database and add a Login that will be used to access the application. You can use the wwWebStore.sql script to add the tables and stored procedures from the wwWebStore/Admin directory of your installation.Permissions Required for the User Account
The Web Store requires fairly complete access to the WebStore database, so when you set up an account make sure you do one of the following:- Configure the user as DBA for the database
DBA has full access and this is the easiest to set up but is less secure if your server should get compromised for whatever reason. - Set DataReader/DataWriter access and Configure Stored Procedure access
Reader and Writer access allows access to the database. In addition you need to make sure you allow access to execute the Web Store Stored Procedures. Specifically the ww_NewIDSafe Stored Procedure is required for new ID generation.
See also
MSDE Configuration
Comment or report problem with topic