 Step 2 - Web Store Configuration
 Step 2 - Web Store Configuration
In Step 2 you can customize a rather large number of settings of the Web Store for your particular configuration. You can customize the store through these options first and then continue to customize the ASP.Net HTML templates to fit your exact needs. Here I'll continue to configure the the MauiTouch Web Store.
Tabbed Interface:
This form uses a tabbed interface for its many configuration options. Changing tabs does not cause the form to save or submit the data to the server - all the pages are treated as a single page and submitted only when you press the Save button on the bottom. If errors occur, the problem fields may be hidden on one of the tabbed pages.
These settings are stored in web.config and are editable here for convenience. You can also edit them in the Web.Config file. Several of the keys however are encrypted (ConnectionString all of the passwords) so those values can only be set from this page.
When you save the configuration settings here, the Web application is reloaded because web.config is in fact updated.
Here are the forms along with descriptions of the settings:
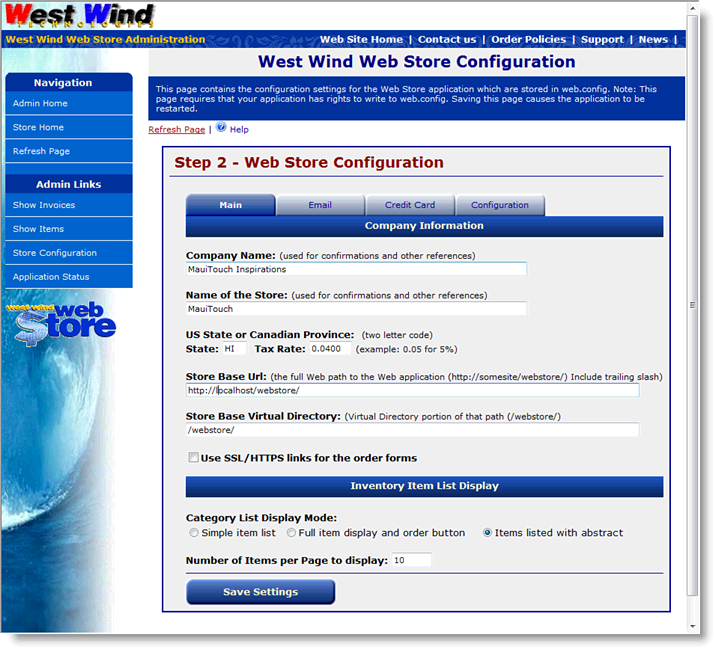
Company Name
This is the name of your company. This value is used in confirmations, copyright notices and any information that points back to the company.
Web Store Name
This name goes on the logo band and is used whenever the store is referenced.
Tax State and Tax Rate
If your state requires sales tax you can set the state and tax rate. Whenever an order is received for that state the tax rate is automatically applied to the subtotal.
Store Base Url
This is the full URL to your Web Store including the trailing backslash. This is used to create relative URLs dynamically. Example:
http://localhost/webstore/Note: this url should match the site you're currently working on (ie. localhost) and then be switched when you upload the site to a live server.
Store Base Virtual
Like the URL the virtual path is used internally to create dynamic URLs. It's just the Web server relative path. Should contain the leading and ending slash. For example:
/webstore/Use SSL/HTTPS links
This option determines whether the link to the Order page runs using SSL. If you do use SSL you will need to have an SSL certificate installed on the server in order for HTTPS to work.
Inventory Category List Display Mode
The Web Store supports displaying category item list display in several different formats. The default mode is to simply display the description with a link to the item. Full Item Display provides most of the full item page in a list view. This display is well suited for stores who just sell a few items or have items with relatively short descriptions. Basic list with abstract displays the same as the basic list but provides the first paragraph or so of the item description in abstract form.
Number of items per page to display
This is the number of items per page that you want to display in the Category Item List page. Good default values for these are 15, 5, 10 respectively.
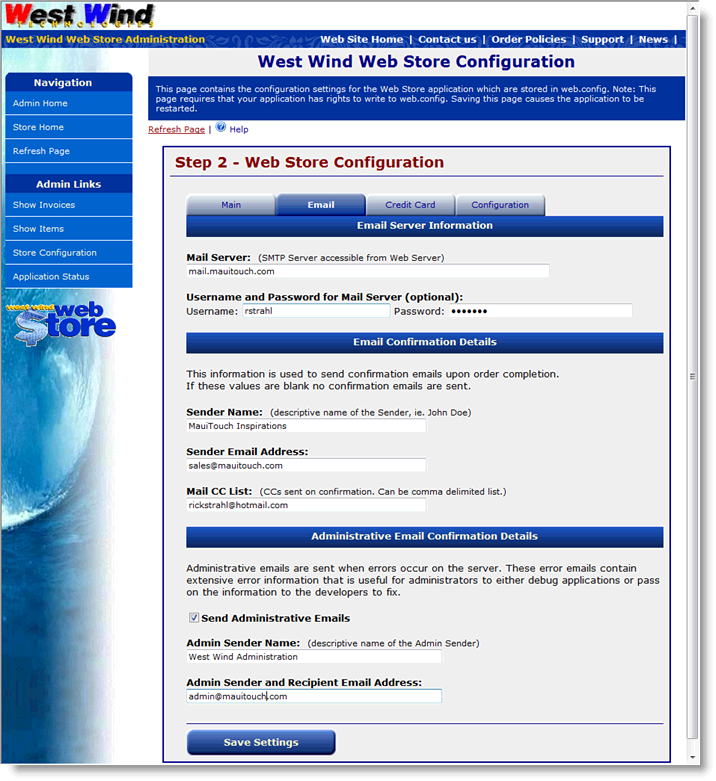
Mail Server and optional login info
This is the mail server IP address or domain name that's optionally used for email confirmations and administrative alerts. Make sure the server you choose is valid for your Web Server and supports relaying for your server's IP address or domain. The username and password are optionally available to let you access mail servers that require you to authenticate.
Note that no error messages are returned if an email error occurs as the email operations occur on a seperate thread asynchronously.
Email Confirmation Information
Email confirmations are sent to customers when an order is completed. These addresses are also used to further communicate with the customer for example for Declined Credit Card Order notifications. The Sender name is the display name of the Sender for example, Rick Strahl or more likely West Wind Web Store or West Wind Technologies. The email address is the return email address. The Mail CC List is a list CC email addresses you can specify to allow you to receive notifications whenever an order occurs. The CC list can be comma delimited.
Administrative Email Details
Administrative emails can be sent on errors in the application occurs. This lets you immediately know when an error occurs. To enable this feature click the Send Administrative Emails and specify a descriptive sender name and email address. Configuring these values smartly is useful as you can filter these messages directly in your email client.
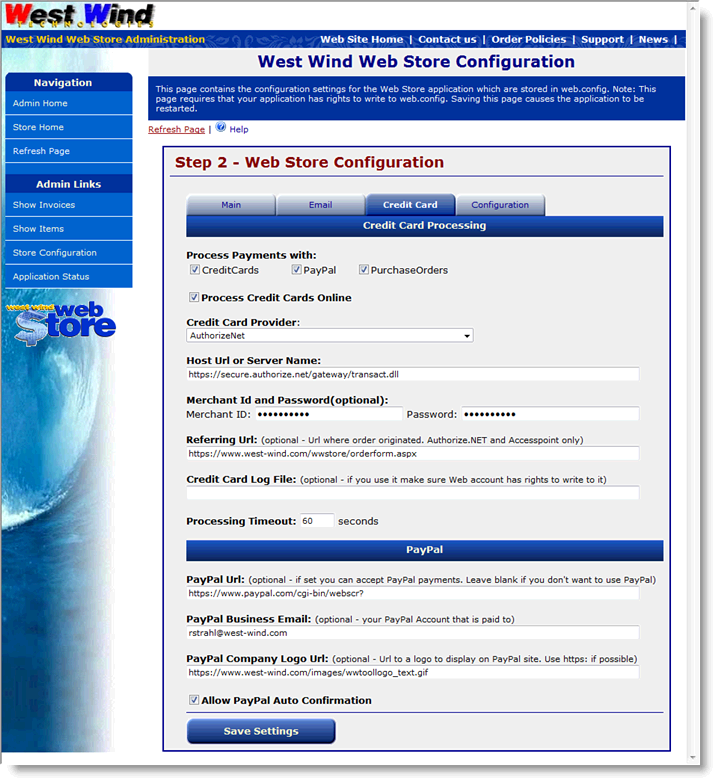
Credit Card Processing
Select whether you want to process credit cards as part of the order process. If this option is not checked Credit Cards are not automatically processed and you have to run them from the ShowInvoices form in the Admin area of the site manually.
Regardless of whether you process online or in admin choose one of the supported providers. Pick the URL or Host server name. Most sites use server names (like test-payflow.verisign.com for example) while some others use http based URL for processing (such as AccessPoint).
Next provide a Merchant Id which is usually your account Id or user Id. Also provide the password for the account here. You can optionally specify a refering URL which is required for AccessPoint only - this is the URL you configure in AccessPoint's configuration
Finally you can specify a file path to a log file that logs every Credit Card transaction and its result. This file is a plain text file, and is optional - if you leave it blank no logging occurs. If you provide a path and file name make sure that the Web application can write to it (ie. the ASPNET or Network Service account) and that it's not in a path that is publicly accessible since this file contains partial CC numbers and names. The log file entries look like this:
12/4/2003 7:04:15 PM - Rick Strahl - 3725 34976 - DECLINED - Unknown Merchant: GTTM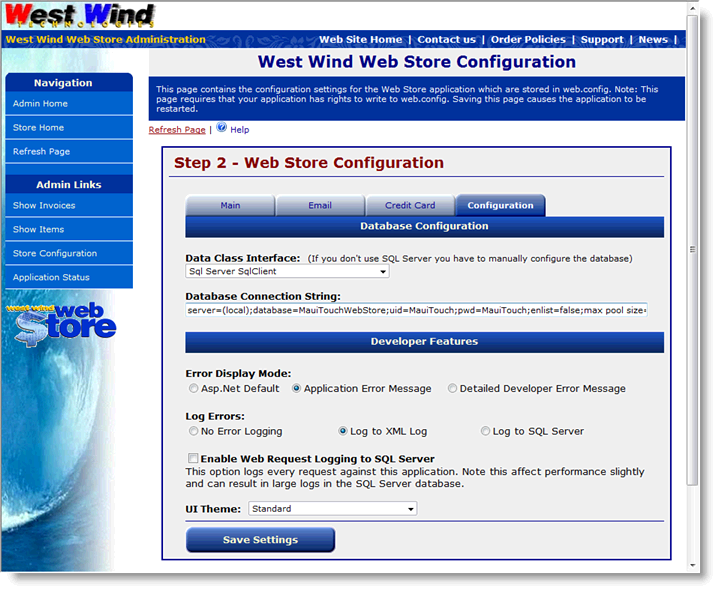
Data Class Interface
This setting determines which backend is used to access the application. The default and only officially shipped interface for the Web Store is Sql Server/MSDE. The other provider listing are provided here merely should you decide to port the data to another database backend. This list is the supported list of Data backends that the wwBusiness class supports.
Unofficial Visual FoxPro Table support
The Store also ships Visual FoxPro data in DBC, but this is not officially supported. The data works and runs, but it has not been extensively tested. You can play with this by copying the data in the in the DataTemplates\Visual FoxPro directory to a new data location. Use the Visual FoxPro OleDb Provider and use a connection like this:Provider=vfpoledb;Data Source=D:\projects\webstoredbfdata\webstore.dbc;Exclusive=false;Nulls=false;
For more info on using VFP datasource please review the Visual FoxPro Databases Topic
Sql Server Connection String
This is the connection string you'll use to connect to SQL Server. For the sample we created previously the connection string would be:
Server=(local);Database=MauiTouchWebStore;uid=UserId;Password=Password;enlist=false;Max Pool Size=5;
Error Display Mode
The option lets your application switch dynamically into different error display modes. While developing you'll likely want to use the ASP.Net default setting which displays detailed error information. When in application mode you can simply display a generic error message. Finally the detailed developer error message can be used when ASP.Net will not display detailed error info due to settings in Web.config. With this option you get most of the information that ASP.Net displays including the callstack, error message and if available the source code of an error.
Note: If Send Admin Emails is enabled all errors are logged and emailed.
Enable Web Request Logging to Sql Server
When enabled causes the application to log every request to the store into a table in the database. This is useful for seeing what's going on in the store as well as giving you an application specific record of the application's hit that you can query and review in detail.
Note:
All of these settings are also available in the web.config file under AppSettings key. We recommend you do not manually edit these setting there but use this page instead.Programmatically these settings are driven through the WebStoreConfig object. To add additional configuration values simply add properties to this 'globally' available static object.
And onwards to Step 3 - Setting up Inventory Categories.

Comment or report problem with topic