 COM Server Configuration
 COM Server Configuration
Web Connection servers can run as EXE based, out of process COM servers. COM servers are more flexible than file servers as the Web Connection connectors can control the lifetime of servers by:
- Explicitly loading servers when the Web Server starts
- Restarting instances if they crash
- Shutting down all instances
- Pausing instances or loading a single instance (for maintenance)
- Live updates of Server Binaries without shutting the Application Pool down
- Provide running totals and runtime information on the Admin panel
For production installations we highly recommend you run using COM servers.
COM and File Mode are operationally mostly interchangeable so you can easily switch between the two, once you've compiled and registered your application, although COM requires some additional setup and configuration. You typically use file mode for development and COM mode for production.
To run in COM Mode:
- Compile your Project (creates a COM EXE)
- Register the COM Component
- Make sure any dependent DLLS are copied to
deployfolder - Test your COM Server from VFP or Powershell to ensure it works
- Allow for live updates of server binaries without shutting down the Web Site
- Switch the Web Application into COM Mode
Compile your Project
The first step to a COM server is to compile your project into an EXE. Web Connection servers are set up as COM Servers in the declaration and when compiled automatically are available as COM object:
DEFINE CLASS wcDemoServer AS WWC_SERVER OLEPUBLIC
COM Compilation requires Administrator Rights
Because COM Registration requires writing to the registry at the
HKEY_LOCAL_MACHINEkey project compilation requires that you are running as an administrator.During development it might sometimes be useful to comment out the
OLEPUBLICon the server to avoid having to run as Adminstrator - just remember to add it back in when you're ready to deploy your application.
To compile chose the Win32 executable/COM Server (exe):
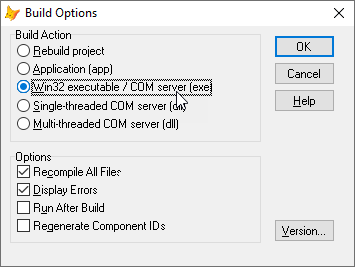
or use
BUILD EXE wcDemo from wcDemo RECOMPILE

* Alternately you can use `build.prg` in your project folder
DO build.prg
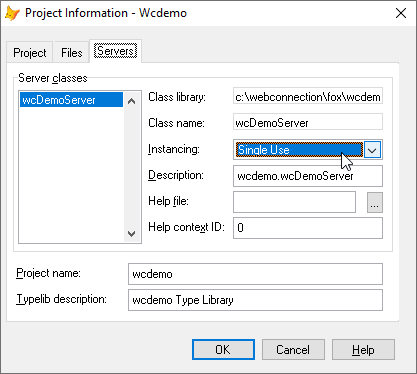
Make sure the COM server is compiled as a Single Use COM Server which is the default for an EXE server.
Automatic Project Configuration
When you work in the FoxPro development environment your COM server is automatically registered when you compile your project. Just remember you need Administrator rights inside the FoxPro IDE for this to work.
On a deployed server, the easiest way to register your COM server is as part of your application's Server Configuration Script generated with your project, which includes COM server registration.
From the FoxPro IDE (assuming your EXE exists and you're running as Admin):
do yourProject_serverconfig.prg
or running your deployed EXE:
yourProject.exe CONFIG
Make sure you have checked and tested this setup before running it on a production server.
Manual COM Configuration
If you want to do COM configuration manually for the first installation you need to:
- Compile the project into an EXE
- Copy the EXE to the server (could be part of an install)
- Copy Web Connection dependent DLLs to the server
- Register the COM object (
myapp.exe /regserver) - Test the Server
- Optionally Configure the COM object for DCOM permissions
We already talked about compiling and registering the server above so we won't repeat it here.
Register your COM Server
In order to use a COM object on the server it has to be registered on the server in the registry. To do this you need to use the FoxPro DCOM configuration /regserver command on your EXE:
MyApp.exe /regserver
The auto CONFIG operation will run this command automatically during setup, but if you manually configure you have to make sure you register the server explicitly!
If the server is not registered you're going to see an error of:
Invalid COM Server ProgId: MyApp.MyAppServer
If you see this it means one of two things:
- The server isn't registered
- Your application doesn't have permissions to access the registry
For the former, see the following section Test your COM server via Powershell and make sure it works outside of IIS.
The latter issue is often caused by not setting the Application Pool's Identity to an account that has the proper permissions to access the registry. Specifically if the default identity of ApplicationPool Identity account is left, that account has no rights to access the registry. Choose SYSTEM or NETWORK SERVICE instead or a local or Domain account that has appropriate rights.
DCOM Configuration is required for Non-SYSTEM and Non-Admin Accounts
If you are planning on using a custom account or
NETWORK SERVICEyou will need to explicitly configure either the machine or the individual server with DCOMCNFG.SYSTEMor any local machine Administrator accounts do not require custom configuration, but any other accounts do.For more info on how to configure DCOM Configuration see the DCOM Configuration topic.
Copy the Web Connection Dependent DLLs
Web Connection requires a few of support DLLs in order to run and you need to ensure that those DLLs are accessible to your COM server. When the COM server launches its root path becomes the path where the EXE lives and by default the Web Connection DLLs don't exist there and the server won't look in the Web Connection install folder for them because it doesn't know where that folder lives. On a live server too you need to ensure that those files exist.
At minimum you'll need the following dll dependencies in your deploy folder:
- wwipstuff.dll
- wwdotnetbridge.dll
- newtonsoft.json.dll
There are additional dll files for specialty tasks. Basically all the DLLs out of the install directory can be copies.
You can use the build script in the project root folder build.ps1 to copy the required files into the .\Dist folder, or - maybe more easily for local testing you can simply do from a Command Prompt in the Deploy folder of your project:
copy c:\wconnect\*.dll .\
Update your DLLs with Web Connection Versions
When Web Connection is updated the DLLs often are updated as well. While there rarely are breaking changes, it's always a good idea to keep your Web Connection version in sync between the FoxPro source version and the binaries that ship with each new release. The westwind DLLs are all versioned to match the latest Web Connection version.
Testing your COM Server
Ok so now your server should be registered and ready to use.
You can now test it easily either in FoxPro or using a simple PowerShell script you can run from Windows.
If you have the FoxPro IDE installed try the following from your FoxPro Command Window:
loServer=CREATEOBJECT("yourProject.YourProjectServer")
? loServer.ProcessHit("query_string=wwMaint~FastHit")
If you don't have the FoxPro IDE installed on a production machine you can create test using Powershell which should print some HTML to the Console:
# instantiate the server
$server =  new-object -comObject 'yourProject.yourProjectServer'

# prints a simple HTML page HTTP Response (ie. it works!)
$server.ProcessHit("query_string=wwMaint~FastHit")

# or point at a valid physical page url
# $server.ProcessHit("&PHYSICAL_PATH=c:\webconnection\web\wconnect\TestPage.wwd")

# release the server (optional)
[System.Runtime.Interopservices.Marshal]::ReleaseComObject($server) | Out-Null
Enabling COM Operation on your Web Site
Once the COM server is configured you need to enable loading of the COM server. You do this via the server configuration in web.config for .NET or wc.ini for ISAPI.
You can do this on the Web Connection Module Administration page.
Go to:
http://localhost/wconnect/admin/admin.aspx
where /wconnect or the root site is your virtual directory of your application. Then click Web Connection Module Adminstration and scroll down to the Server Administration -> Messaging Mechanism and switch it to COM. It should look like this:

The link toggles between File and COM modes.
This switch corresponds to the MessagingMechanism setting in web.config in .NET mode, or Mechanism in ISAPI mode.
Once you've switched to COM, servers either start up automatically when you hit the server with a request, or you can explicitly load the servers using the Load Servers link on the same page. Once loaded you should see the loaded servers in the server list at the top of the page.
Here's more info on the configuration settings in the configuration files.
.NET Handler (web.config)
The .NET handler configures COM as part of the web.config settings in the webConnectionConfiguration> section:
<webConnectionConfiguration>
    <add key="MessagingMechanism" value="Com" />
    <add key="ComServerProgId" value="wcDemo.wcDemoServer" />
    <add key="ServerCount" value="2" />
    <add key="ComServerLoadingMode" value="LoadBased" />
</webConnectionConfiguration>
Most importantly make sure the MessagingMechanism is set to Com which enables COM operation. This value can also be toggled from the .NET Handler Status page.
Specify the ComServerProgId and ServerCount to indicate which server to load and how many instances to fire up (up 16). The ComServerLoadingMode determines how servers are loaded up either in LoadBased which loads servers based on the first COM server available or RoundRobin which always rotates servers through the entire list of servers.
ISAPI Module (wc.ini)
The ISAPI Module configures COM servers through the wc.ini file in the [AutomationServers] section:
[Main]
Mechanism=Automation

[Automation Servers]
;*** Severloading - 0 - First available   1 - Forced Round Robin
ServerLoading=1

Server1=wcDemo.wcDemoServer
Server2=wcDemo.wcDemoServer
;Server3=wcDemo.wcDemoServer
;Server4=wcDemo.wcDemoServer
Like the web.config settings first need to set the Mechanism in the [Main] section to Automation.
Then you specify the server to load by using Server1,Server2 and so to provide the ProgId. In the sample above 2 servers are loaded. You can load up to 16 servers this way.
The ServerLoading flag determines how the servers are loaded up with by the first available server, or by round robin mode which rotates through all the servers.
See also
Step 4 - Configure COM settings
Comment or report problem with topic