 Step 3 - Adding our own Request Method
The TestPage request lives in the WebProcess class which handles the request routing to the method for us based on the TestPage.wp Url.
WebProcess.prg is called from WebDemoMain.prg and is loaded via a small loader stub that creates the WebProcess class. This class then kicks of a state machine that fires through a series of operations that eventually routes the request to the method that maps the URL: In this example Testpage.wp maps to the TestPage() method in the class.
************************************************************************
* PROCEDURE WebProcess
****************************
LPARAMETER loServer
LOCAL loProcess
PRIVATE Request, Response, Server, Session, Process
STORE .null. TO Request, Response, Server, Session, Process

#INCLUDE WCONNECT.H

loProcess=CREATEOBJECT("WebProcess",loServer)
loProcess.lShowRequestData = loServer.lShowRequestData

IF VARTYPE(loProcess)#"O"
   * **All we can do is return...
   WAIT WINDOW NOWAIT "Unable to create Process object..."
   RETURN .F.
ENDIF

*** Call the Process Method that handles the request
loProcess.Process()

loProcess.Dispose()
RETURN

*************************************************************
DEFINE CLASS WebProcess AS WWC_PROCESS
*************************************************************

* ... other configuration code omitted

*********************************************************************
FUNCTION TestPage()
************************

THIS.StandardPage("Hello World from the WebProcess Process",;
                  "If you got here, everything should be working fine.<p>" + ;
                  "Time: <b>" + TIME()+ "</b>")

ENDFUNC
* EOF WebProcess::TestPage

ENDDEFINE
To see this work, change the message text of the .StandardPage() and restart the server to see the updated text.
Adding a new Request Handler Method
Any public method in this class is accessible as <methodName>.wp. So adding a new Http Endpoint is as easy as adding a new method to the class.
Let's create a CustomerList.wp request, that displays a customer list. To demonstrate that a new method works first lets do the simplest thing possible by writing out a plain text HTML string:
************************************************************************
*  CustomerList
****************************************
FUNCTION CustomerList()

Response.ContentType = "text/html"  && Optional if you need to send some else
Response.Write("<html><body>" +;
               "<h1>Hello World. Time is: " + TIME() + "</h1>" +;
               "</body></html>")
ENDFUNC
Use Live Reload and an External Editor for Auto Reloading Edits
To make small code edits like the one above, it's a big benefit to take a minute and explore using the Live Reload functionality that's built into Web Connection and that is enabled by default in a new project.
Anytime you make a Web or FoxPro Code change Web Connection automatically refreshes the browser and for FoxPro changes restarts the FoxPro server. For this to work best you need to keep the application running and use an external editor rather than the FoxPro editor. Visual Studio Code is a free, small and light weight editor that makes this easy.
For more detailed info how to make the most of these features please check out this topic and then return here:
Use Live Reload and External Editor to speed Html and Code Edits
Test the Link the Browser
Once the new CustomerList() Process method has been added and the server has been configured and re-launched, you can now test the link:
To test the link go to (using default settings):
IIS:
http://localhost/WebDemo/CustomerList.wp
IIS Express:
http://localhost:7000/CustomerList.wp
Web Connection Web Server
http://localhost:5200/CustomerList.wp
Use Launch() (or the appropriate version thereof) to launch both the Web server and the FoxPro server if it's not already running.
Yay it works - we've just created our first database access request.
Updating the CustomerList Request
Now let's add our customer list to this code by reading data from a table and creating an HTML display using some of the basic output helper functions in Web Connection:
************************************************************************
*  CustomerList
****************************************
FUNCTION CustomerList()

* Make sure Customers.dbf path is in Fox PATH (see below)

SELECT company, LastName, FirstName, Phone, Entered ;
   FROM Customers ;
   ORDER BY Company ;
   INTO CURSOR TQuery

* **Helper to generate templated HTML Header
Response.Write(this.PageHeaderTemplate("Customer List"))

Response.Write("<h3 ><i class='fa fa-list'></i> Customer List</h3>")
Response.Write("<hr/>")

lcHtml = HtmlDataGrid("TQUery")
Response.Write(lcHtml)

* **Helper to generate templated HTML Footer
Response.Write(this.PageFooterTemplate())

ENDFUNC
When you hit the URL (IIS with a virtual path here) you should see:
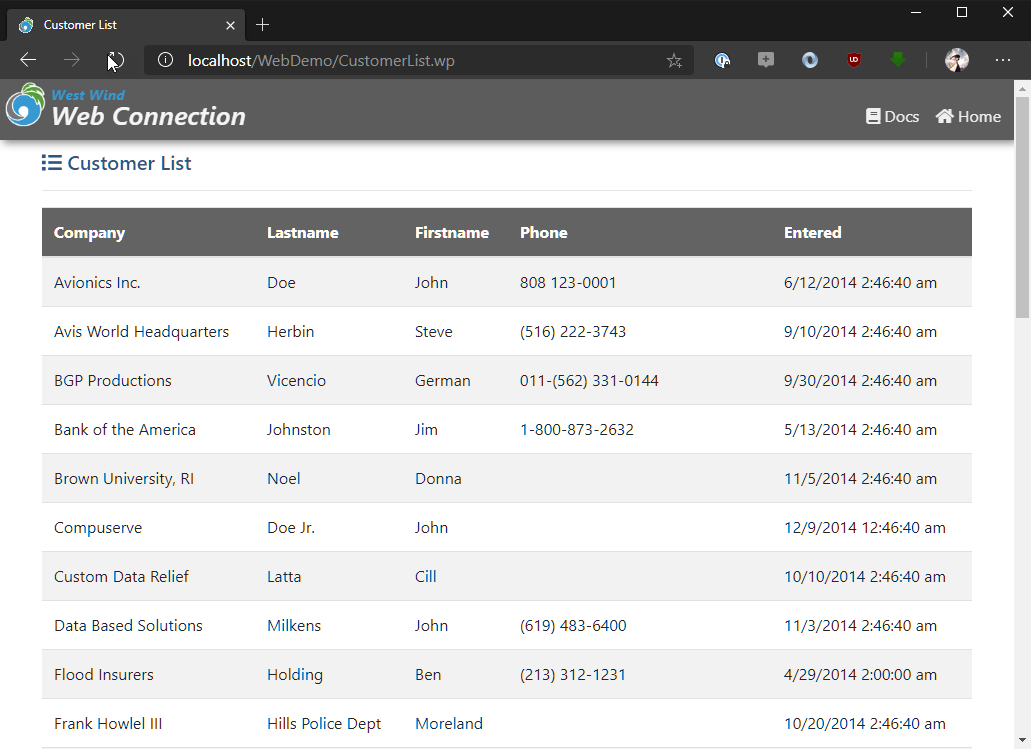
and you should see that simple message.
Demo Alert: For Demonstration Purposes Only
This code uses some of the built-in HTML writer classes that can make short work of creating output quickly via code. At the core of this approach is basic, manually generated
Response.Write()HTML output which is very low level.While this works great for quickies and samples, generally this is not a recommended approach as it's tedious to write and hard to maintain and update. The recommendation for HTML output is to use MVC style Scripts/Templates along with Html Helper components to generate HTML - shown in later topics. In this style you mix HTML and FoxPro expressions and code to generate output that is dynamically generated and can be updated on the server without recompilation.
The reason we show raw HTML output here now is to get you familiar with how Web Connection works on a basic level, before jumping into higher level abstractions. Low level HTML output has its place in data-driven, code generation solutions and low level protocol handlers, but for most HTML applications MVC Scripting is the better choice for HTML output generation.
In Step 6 we show how to use MVC Scripts to generate output.
Non-HTML Output
Note you don't have to only output HTML either - you can send some thing else like JSON:
************************************************************************
*  CustomerListJson
****************************************
FUNCTION CustomerListJson()

Response.ContentType = "application/json"  && Optional if you need to send some else
Response.Write('[' + ;
    '{ "name": "Rick", "company": "West Wind" },' +;
    '{ "name": "Kevin", "company": "Oak Leaf" },'  +;
']')
ENDFUNC
You can now navigate to http://localhost:5200/CustomerListJson.wp to retrieve the JSON output.
Use a JSON Viewer in your Browser
If you're planning on returning JSON data and view it in your browser you should install a JSON viewer in your browser. Without a JSON viewer JSON data tends to display as a garbled mess at best or display with errors as browsers natively don't know how to display JSON content.
A popular choice is JSON-View which works any Chromium based browser (Chrome, Edge, Brave, Vivaldi etc.) and FireFox.
You can return any kind of content, including binary data like PDF files, Zip Archives and images and files in a similar fashion by writing out the raw data to Response.Write().
Making sure the Data can be found - Configuration in Server OnLoad
The code above uses a local FoxPro table to show the Customer data. In order to be able to access you need to point at the data and make it available - preferably by using SET PATH to add the data path to the application.
The sample data is available in the Web Connection installation in:
\wconnect\samples\wwdemo
Alternately you can copy the customer.dbf/fpt/cdx file from that location and copy it to a local folder in <projectFolder>\Deploy\Data. I'll use the latter to create a self contained demo.
To configure the data path you can set it in the server startup in WebDemoServer::OnLoad():
* in WebDemoMain.prg
PROTECTED FUNCTION OnLoad

*** Add any of YOUR data paths and code
*** SET DEFAULT is at EXE/Start path by default

* SET PATH TO "\wconnect\samples\wwdemo" ADDITIVE   && optional - use original path
SET PATH TO ".\Data" ADDITIVE

*** Add any SET CLASSLIB or SET PROCEDURE code here

ENDFUNC
* OnLoad
OnLoad() is the main application 'initialization' function that fires exactly once on startup, when the first request comes in from the Web Server. You can use this method for any application level configuration:
SET PATHSET PROCEDUREandSET CLASSLIB- Any other Environment settings your app needs
- Initialize and load SQL Connections
Examing the Code
Let's look a little closer at what that code does. We start with a plain VFP SQL query that generates a cursor. Next we start to build an HTML document, in this case using a helper function that generates an HTML header for us:
Response.Write(this.PageHeaderTemplate("Customer List"))
The wwProcess::PageHeaderTemplate() method uses an on disk template that you can modify and that contains the HTML header, and in this case the banner layout on top.
Next some raw HTML is sent to display into the 'content area'. The page header template displays the page 'chrome' that includes the HTML header, banner, menu and toolbar, which all are part of the customizable template. The template used is in Views/_PageHeaderTemplate.html.
Next we use a function the wwHtmlHelpers Library which includes an HtmlDataGrid() function. This function takes a cursor and turns it into a formatted HTML table. HtmlTable supports optional parameters for a configuration object that you can use to configure how the grid is configured, but here I'm just using the default rendering which simply renders a table. We'll look at more control later in this tutorial.
Finally I use the PageFooterTemplate() method to render the footer for the page which again is loaded from pre-defined project templates this time in Views/_PageFooterTemplate.html
Header, Footer and Page Templates
The header, footer and page templates are loaded from files located in the
Web/Viewsfolder. These files contain plain HTML and can be modified in the external files. These files are also used for Web Connection system rendering in admin pages, and you can modify these stock templates yourself to change the branding and styling to fit your application.There's no requirement to use these templates - they are a convenience feature that is available because Web Connection internally requires them for its administration pages.
Code Based Rendering is not Optimal!
I want to stress that the code used above is just one very simple way you can generate HTML from data. This is a quick and dirty way to throw data up on the screen. Although it works just fine, code based HTML generation is not very flexible and there are better ways to create more maintainable code that puts the HTML to render into external, HTML editor editable files. We'll at HTML templates and scripts later in this walk through. e pages.

Comment or report problem with topic