 Step 2 - Testing the installation
Once the project's been created you can start running the application right away. The first thing you need to do is start the Web Connection server. The server is a FoxPro program you can run.
There are two ways to launch the Web Connection Server:
- Running
Launch.prg - Directly starting with
DO WebDemoMain.prg
Launch.prg
New projects get a new Launch.prg that is meant to make it easy to start your application and bring up a Web Browser on the default page.
To use the Web Server you configured in the NewProject Wizard run:
DO Launch

*** Or maybe easier:
Launch()
The default non-parameter version of launch() uses the Web server you chose during project configuration, or you can explicitly specifically specify what server to use:
Launch("IISEXPRESS")
Launch("IIS")
Launch("WebConnectionWebServer")  && or "DotNet"
Launch("None")                    && Launches just Fox server - same as `<yourApp>Main.prg`
Note: Full IIS only works if you configured IIS in the new Project Wizard or manually. You can re-configure IIS after the fact by running
do <yourApp>_ServerConfig.prg.
Behind the scenes this does the following:
- Launches the FoxPro Server with
DO WebDemoMain.prg - If running IIS Express launches IIS Express in the Web Folder on port
7001 - Navigates to
http://localhost/webdemo/(IIS) orhttp://localhost:7001(IIS Express) - You can optionally change the port in the generated
launch.prg
Once the browser is up and running you can also run only the server without launching a server or browser:
Launch("NONE")
which launches just the FoxPro server and the configuration without launching the Web Server or Browser.
Tip: Create FoxPro Intellisense Launch Shortcuts in _FoxCode
You can
USE (_FoxCode)and add a shortcut for the above commands you freqently use. I havelaunchforlaunch(),lifor IIS Express,lnforlaunch("none")andlwforlaunch("WebConnectionWebServer")which is much quicker than typing out the full commands with parenthesis and quotes. You can find a_FoxCodeExport.dbffile with useful Intellisense shortcuts you can add to your_FoxCodetable.
DO <yourApp>Main.prg
If you rather do all this manually, or once you've launched the application and you're making changes, you can also directly load the Web Connection server without all the other configuration and startup options. To do this:
*** Raw launch
DO WebDemoMain.prg

*** Using Launch to just start the Server - loads environment
Launch("NONE")  && or "SERVER"
Each new project creates a <projectName>Main.prg which is the startup for the FoxPro Web Connection server, that you can run. If you compile the project this file is also the main entry point for the application in which case you can just run do <projectName>.exe (DO WebDemo).
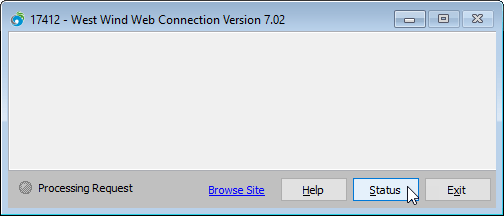
This launches the Web Connection server - which is just a FoxPro application. The application is now ready to respond to requests.
Here's what you should see:
Now switch over to the Web browser default page that was opened for you and hit the Hello World Test Page link (http://localhost/webdemo):
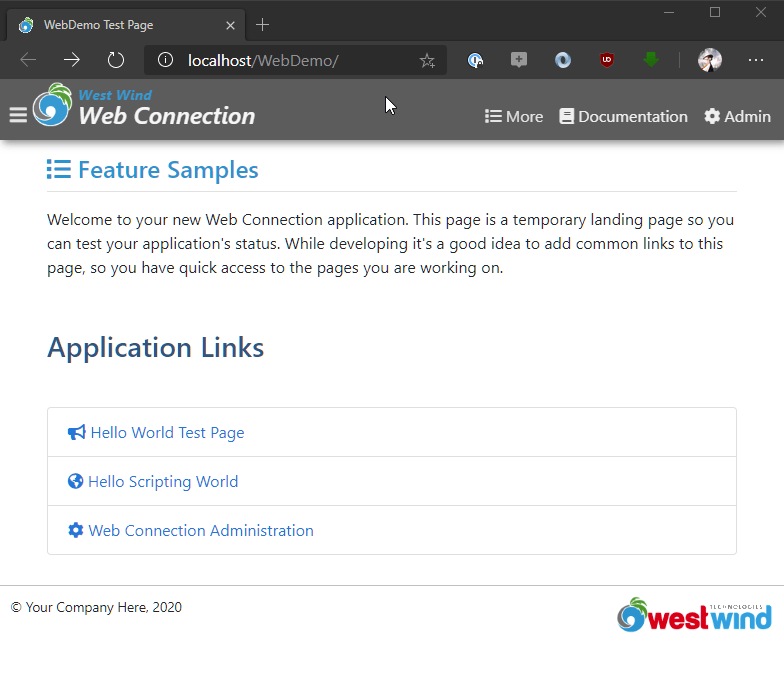
The Hello World request is nothing more than a ping to ensure that the server application is working and serving requests:

And voila, you have just fired your first Web Connection request.
What's running?
Let's take a brief look at what's actually happening in this simple request. At the core the New Project Wizard created two PRG files that make up the core of your Web Connection application:
WebDemoMain.prg
This is the server start-up file, that holds a subclass of the wwServer class. This code contains server bootstrapping and server configuration code that let's customize how Web connection runs and what libraries it should load and so on. You typically set configuration settings here when you start a project, and then only occasionally add some small tweaks to this PRG file. This is the PRG you execute to start the Web server application.WebProcess.prg
This program file contains a small stub class loader and the Process class that actually processes incoming requests.
The process class has public methods that correspond to an Http/Web endpoint each - mapped to a 'page' request that maps a filename to the method. Each method handles exactly one Url request by routing a file name to this method, so http://localhost:7000/CustomerList.wp maps to a CustomerList method in the class for example.
You can create a new endpoint simply by creating a new method. Each method has access to the Request and Response objects. Response captures user input, Web Server information using the and state data, and Response returns Http output back to the client.
The actual code that executes and returns the Test Page output is very simple as you might expect. It's a method in the WebProcess class and it looks like this:
FUNCTION TestPage()

THIS.StandardPage("Hello World from the WebProcess process",;
                  "<p>If you got here, then your Web Connection Server is working." + ;
                  "<br />You've been served by FoxPro and Web Connection." +;
                  "<p>Server Time: <b>" + TIME()+ "</b></p>")

ENDFUNC
* EOF WebProcess::TestPage
StandardPage is a helper method that creates a self contained HTML page based on a default template. You only pass in some header text and an HTML body and it will render the page for you, using the formatted template (which you can modify). To make a change write out some dynamic value using FoxPro.
Maybe add the FoxPro Version() string after the time value for example.
wwProcess::StandardPage is a high level method of the wwProcess class which is the base handler class upon which your class is based. But StandarPage is just one of many ways to render output. At the lowest level there's the Response object which lets you render raw strings into the HTTP output stream at a low level.
To demonstrate, we could rewrite the method completely using raw code:
FUNCTION TestPage

TEXT TO lcHtml TextMerge NOSHOW
<html>
<head>
</head>
<body>
   <h1>Hello World from FoxPro</h1>
   <hr/>
   Hello world from FoxPro. Time is: << TIME() >>
   <hr/>
   <div>FoxPro version: <%= Version() %>
</body>
</html
ENDTEXT

*** Not necessary here - for demonstration only
Response.ContentType = "text/html"
Response.Write(lcHtml)
If you want to try it, make the code change and simply re-run DO WebDemoMain and you should see your change immediately. You can do all the things you do in FoxPro code: Make changes, access databases, call UDF() etc. You can also set break points and step your code as Web requests come in.
This is as low level as it gets and it gives you total control over how to send output. There are a number of other ways to generate output and we'll cover those in the next steps.
Note that you don't have to write the entire content out in one go either - you can use multiple Response.Write() commands:
FUNCTION TestPage

Response.Write("<html><body>")
Response.Write("<h1>Hello World " + Time() + "</h1>")
Response.Write("<body></html>")
which is perfectly valid as well. We'll look at other more high level approaches to generating HTML output later in this tutorial.
Server Status
If you look back at the server window in FoxPro, you should see a request be written out to the server window as it's fired. The request shows the name of the script that executes and how long it took to process in seconds.
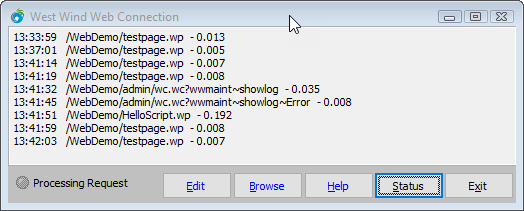
You can also click on the Status button to bring up the Web Connection Status form which shows some basic configuration setting for the server.
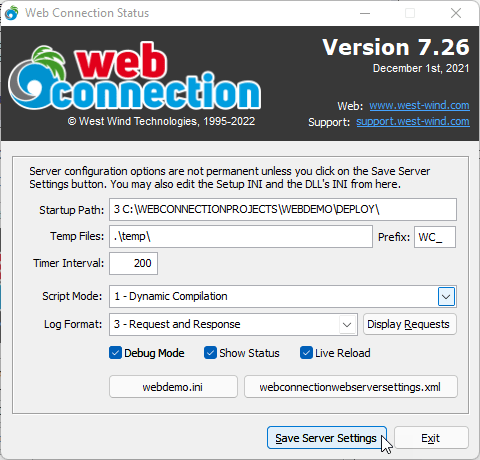
The settings in this window should look familiar - the settings match the settings I made in the first step when running the New Project Wizard. The most important values are the Startup directory which should be the current directory, the temp directory and the template setting, which are used for the file based messaging that we are currently using to run our server.
You can change and save the values for these settings here or in a configuration file - WebDemo.ini - that hold these values.
Logging and Reviewing Requests
Note that you can capture recent request data via the logging. This captures request input and response output depending on the log format selected. For development it's useful to set logging to 3 - Request and Response to capture all request input and output for review.
You can view the requests in the Captured Request Viewer that lets you review the most recent requests:

Turn off Request and Response Logging in Production
While it's useful during development to capture both request and response data for requests, it can accumulate a lot of data very quickly. For production sites either turn off logging altogether, or choose minimal request logging unless you have a problem that you need to debug.

Comment or report problem with topic