 Step 1 - Creating a new project
The first step to create a brand new application is by creating a new project for your application. To do so start the West Wind Management Console from the VFP command window:
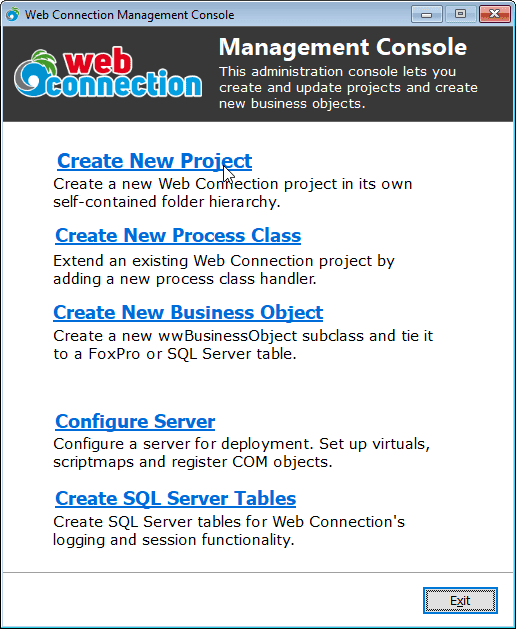
Click on the Create New Project button to create a new Visual FoxPro project that includes the base Web Connection framework classes and the startup code.
Step 1
Start by naming the project and the main process class. The project name should be the filename of the project you want to create. Use a single string value without spaces for this setting. In this case I'll create a project named WebDemo and a process class named WebProcess.
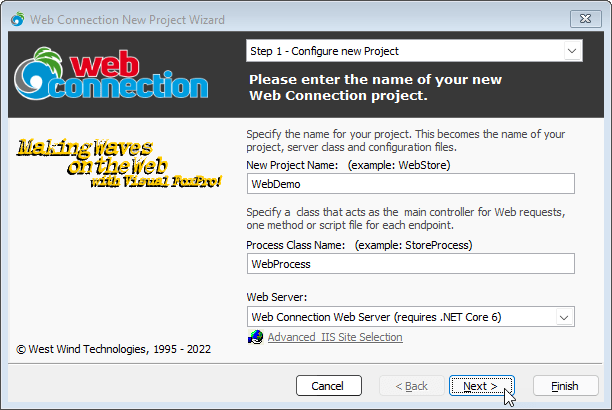
A Process is the actual request handler class, where you will write your logic to handle Web
requests. A single project can contain several Process classes. WebProcess contains methods for each of the Web operations we want to handle. To make it real obvious which pieces I'm talking about in this demo I'll name the project WebDemo and the process WebProcess.
Web Server
Web Connection works with several different Web servers:
- Full IIS (used for production, optionally for dev) (requires system activation, admin rights)
- IIS Express (dev only) (requires install)
- Web Connection Web Server (dev, optionally for production) (requires .NET Core Runtime install)
- Apache for Windows (deprecated - not recommended)
Before you can use any of these servers make sure the server or required components are installed and configured per instructions above.
For local development we recommend you use either IIS Express or the Web Connection .NET Core based Web Server for deployed applications you'll almost always use IIS.
Switching Web Servers
Note you can always switch between Web Servers when running your applications using
launch("<webServerType>"). For IIS Express or the Web Connection Web Server - assuming the pre-requisites are installed - Web Server configurations are completely portable, so they just work.For IIS explicit Web Server configuration is required to configure IIS for the Web site. You can run
DO <yourApp>_ServerConfig.prgto configure IIS for the current project assuming IIS is installed and configured (more info).
Step 2
Step 2 of the Wizard lets you specify the location of the project and how to reference it from the Web.
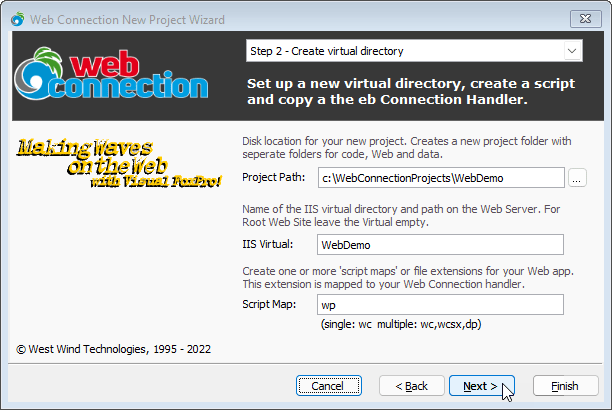
Project Folder Path
Specifies the root folder for your Web Connection project. It's the base folder of a hierarchy of folders that make up your project. By default the folder points c:\WebConnectionProjects\<YourProjectName>.
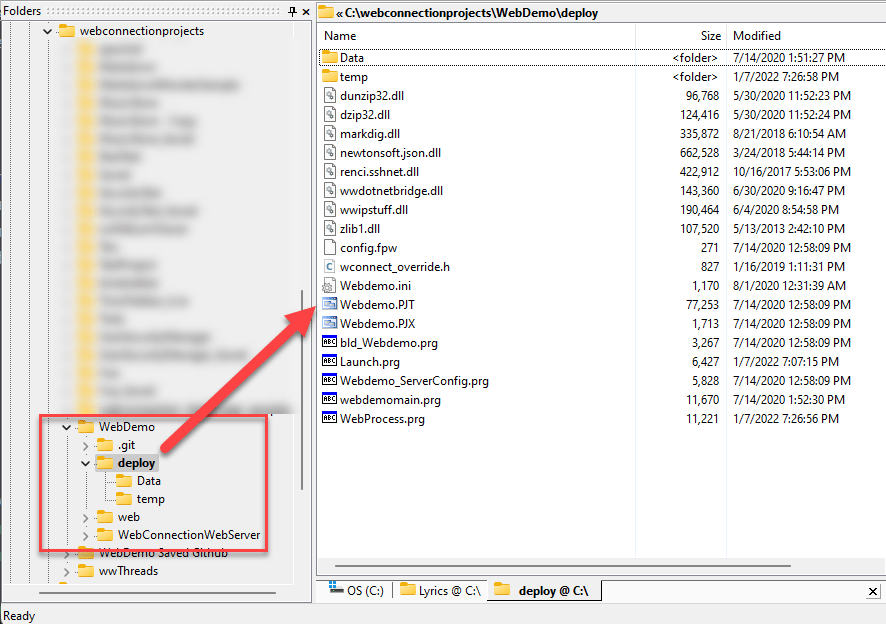
Web Connection projects are fully self-contained with all installed files contained in a well-known folder structure that separates your code and your Web assets. Underneath the base project folder you have two sub folders:
Deploy (code and executables)
This is a your code and executable folder from which the application is run and started. It's the FoxPro application 'root' folder where the project file and startup code files live. Typically you'll store your application code in this folder or sub folders thereof. For compiled and deployed applications this folder holds your startupEXE, any support (dll) binaries, application configuration files and any local application data that isn't shared.This folder also contains a
\Tempsubfolder where Web Connection manages messaging files for File Based Operation.Web (html, images, css, js etc.)
This is where all your Web files go: Html, CSS, JS and any Web Connection Templates and Scripts. This folder also holds the Web Connection binary connectors (.NET, .NET Core and ISAPI) and the Web app configuration (web.config).
Here's what the generated project structure looks like in Explorer:
Web Connection Folder Location
The project layout does not include Web Connection, but rather it references Web Connection via
SET PATHset inconfig.fpwand whenLaunch.prgruns. The project generates aLaunch.prgfile that adds the Web Connection folders to your current path.If you run your application and framework file errors appear, you can change the paths in
Launch.prgof your project to point to the right locations forlcWcPath,lcWebPathandlcDotnetServerPath.
IIS Virtual Path
This IIS specific, optional value specifies the virtual subfolder an IIS Web runs under. A virtual Web site URL looks like this:
http://localhost/webdemo
where webdemo is the virtual folder below the Web root. You can leave the value blank to specify that you want to use the root Web site on IIS:
http://localhost
Virtual paths on IIS are useful to allow you run multiple 'virtual' Web sites off a single Web site hosted on port 80, without explicitly setting up custom host headers for domain routing in IIS.
Using virtuals is common for local development with IIS, while running with a root Web site in production.
IIS Express and Web Connection Web Server don't use Virtual Paths
If you opt to use the local IIS Express or Web Connection Web Server instead of IIS, the path to your site will always be a root path like
http://localhost:7000and the virtual path specified is ignored.
Script Maps for Request Routing
Script maps are extensions (like wp above) that map URLs to the new Process class we are creating. Whatever file extension you specify, is mapped to the WebProcess class we created in the previous step. So. if I map wp as shown in the figure, TestPage.wp, CustomerList.wp and Login.wp all map to the appropriate method on the WebProcess class.
Typically each application you create uses its own custom script that identifies your process class but you can map multiple script maps to specific application using a comma delimited list (ie. wp,wpx,md).
Note that several default script maps for .wc, .wcs and .md are automatically configured for your application. These script mappings are stored in the web.config file and you can remove or add additional scriptmaps there later.
Finish
When you click the Finish button on the final page console it creates your new project for you. When it's done it'll pop up the project Web page and opens Visual FoxPro ready for you to run your project.
The console performs these steps:
- Creates the Project Folder structure and copies all files
- Creates a Web Connection Application Pool (if it doesn't exist) (IIS only)
- Creates a virtual directory (IIS only)
- Creates the Scriptmaps in
web.configandwebconnectionconfiguration.xml - Sets the disk permissions
- Matches both Web Connection Web and Server configuration settings
- Creates a FoxPro Project (not supported in the shareware version)

Comment or report problem with topic