 Using the Databinding Controls
 Using the Databinding Controls
The databinding controls are easy to use and don't require any special setup on your part other than making sure that the wwWebDataControls.dll assembly is referenced in your project and that you add the appropriate namespace to the page's code.
using Westwind.Web.Controls;
and if you use VS.Net or WebMatrix that you register the controls on the controls toolbar.
The controls provide single field binding (called simple databinding in .Net) and can bind to just about any simple datatype field. Realistically this means, you can bind to data from a dataset/datatable/dataview/datarow and to any non-static property of any object that lives on a Web Form. List based binding on controls like the DropDownList and ListBox continue to work as you would expect.
If you want the full benefit of databinding that provides bind back error handling and automatic error display that can tie in with your wwBusiness object you also want to subclass your form from wwWebForm, but this is purely optional.
To demonstrate how the controls work lets create a very simple data entry form that shows and saves a few fields from an inventory table. We'll use the wwBusiness object to load some data and then display and edit and save this data back to the database.
We'll create a form that looks something like this:
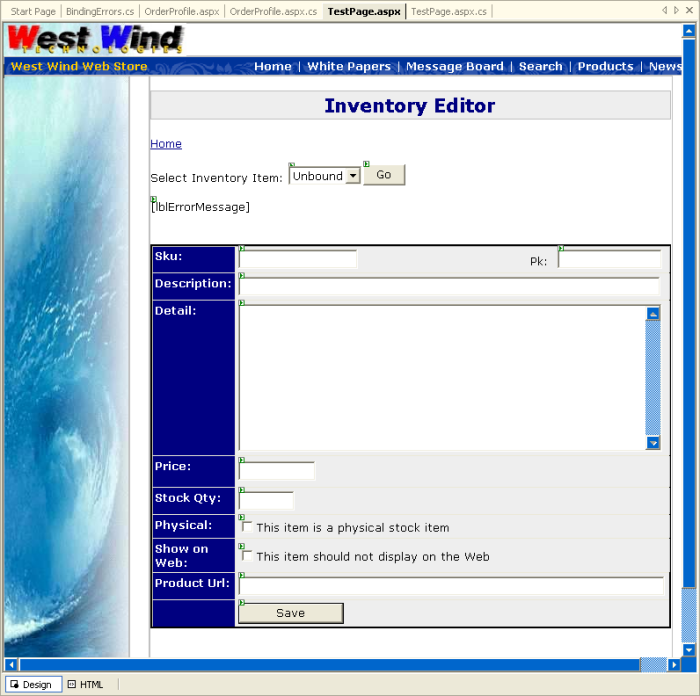
This form is based on a Web Store template, but we're really just interested in the data controls. Start by creating the form and set the page layout to FlowLayout and set Enableviewstate to false - we won't need the overhead of viewstate for this form.
The first thing you'll want to do is add the wwWebDropDownList lstSearchSku. Actually this control will not use any simple databinding features, but it does - unlike the ASP.Net default control - remember the selected value when you post the form back. If this is the first control you add onto the form the following will be added.
The control registration for the form:
<%@ Register TagPrefix="ww" Namespace="Westwind.Web.Controls" Assembly="wwWebDataControls" %>this gets added when you drop the first control from the toolbar. If you do everything manually via code you can just add this by hand.
And then there's the actual control that gets added to the form:
<ww:wwwebdropdownlist id="lstSearchSku" runat="server"
      datavaluefield="Sku" datatextfield="Descript"></ww:wwwebdropdownlist>
As you can see this is pointing at our custom control and includes the base databinding information to have the list display data from an Item table - sku as the data field and Descript as the display field. This is just standard .Net databinding which is activated with this code in Page_load using a business object that loads the data into a dataset:
Item = new busItem();
Item.GetItemList(null);

this.lstSearchSku.DataSource = Item.DataSet.Tables[0].DefaultView;
this.lstSearchSku.DataBind();
In addition make sure that you add the Westwind.Web.Controls; namespace and that you subclass the form from wwWebForm. You'll also want to add a reference to the business object (or if you're not using business objects, the DataSet/Table/Row) to the Page object.
The highlights of this should look like this:
... // standard Web namespace refs

using Westwind.Web.Controls;

namespace Westwind.WebStore
{
	/// <summary>
	/// Summary description for TestPage.
	/// </summary>
	public class TestPage : wwWebForm
	{
		protected System.Web.UI.WebControls.Button btnSearch;
		protected System.Web.UI.WebControls.Label lblErrorMessage;
		protected System.Web.UI.WebControls.DropDownList txtSearchSku;
		protected Westwind.Web.Controls.wwWebTextBox txtSku;
		protected Westwind.Web.Controls.wwWebTextBox txtDescript;
		protected Westwind.Web.Controls.wwWebTextBox txtlDescript;
		protected Westwind.Web.Controls.wwWebTextBox txtPrice;
		protected Westwind.Web.Controls.wwWebTextBox Wwwebtextbox1;
		protected Westwind.Web.Controls.wwWebCheckBox txtPhysical;
		protected Westwind.Web.Controls.wwWebCheckBox txtNoWeb;
		protected Westwind.Web.Controls.wwWebTextBox WwWebTextBox2;
		protected Westwind.Web.Controls.wwWebDropDownList lstSearchSku;
		protected System.Web.UI.WebControls.Button btnSubmit;

		protected busItem Item;

		private void Page_Load(object sender, System.EventArgs e)
		{
			Item = new busItem();
			Item.GetItemList(null);

			// *** Databind the listbox each time
			this.lstSearchSku.DataSource = Item.DataSet.Tables[0].DefaultView;
			this.lstSearchSku.DataBind();
		}
}
Next add a Label control onto the form called lblErrorMessage. This can be a standard textbox or a databound one, but since this control doesn't bind there's no need for the databinding features. Go ahead and run the form at this point to test that the listbox loads correctly with the item data.
You should get the dropdown to fill up with data and when you click on the GO buttong the form should reload and remember its previous Selected Value if any.
Starting our databinding
Up to this point we haven't really done any databinding. Let's add the text boxes that display the data. I'll do this one at a time so I can demonstrate binding to different types of data sources. Let's start with the most common one I use which is binding to a DataRow.First thing we need to do is handle the Go button which will load an Inventory item by loading a datatable that contains a single record of the item in question. The code for this looks like this:
private void btnSearch_Click(object sender, System.EventArgs e)
{
	if ( Item.GetItemBySku( this.lstSearchSku.SelectedValue ) )
		this.BindData();
		// if you have other databinding you can also call this.DataBind()
	else
		this.lblErrorMessage.Text = "Couldn't load Item.";

}
Bind all the wwWebDataControls on a form
The call to the form's BindData() method causes all the controls on the form that implement IwwWebDataControl to be bound. If you don't use a subclass of wwWebForm you can call the static wwWebDataHelper.BindData() method instead like this:wwWebDataHelper.FormBindData(this);Binding to a DataRow
At this point we need to go back to the HTML form and add a text box control and name it name it txtSku. Drop the control, and then go to the property sheet and change the binding source to Item.DataRow which means we are binding to the first datarow in the Table that was retrieved by GetItemBySku().Note:
Databinding goes against members of the current Page which is the root. So if you have a bus object as a member of the Page called Item the DataSource would be Item not this.Item.
Set the bindingSourceMember property to "Sku", which is the field in the table to bind to. If you look in the property sheet you'll find it like this:
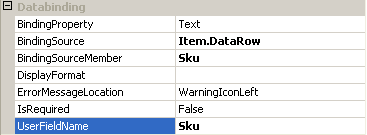
The code to do this is:
<ww:wwwebtextbox id="txtSku" runat="server" width="136px" size="20"
                            <<b>>bindingsource="Item.DataRow"
                            bindingsourcemember="Sku"<</b>>>
You can set a few other properties as well such as DisplayFormat, BindingProperty (which is the property of the control we bind to - usually Text but could also be Checked or SelectedValue on other controls), IsRequired (which displays an error if a field is left blank).
Now re-run the form. Select an item in the list and click the Go button you should now see your item databound. Easy as pie, right?
Binding to a DataSet
Now lets do the Description field and bind it to a DataSet. When you bind to a DataSet, these controls make some assumptions. Namely that you want to bind to the first table and the first row in the dataset. So now set:DataSource: Item.DataSet
DataSourceMember: wws_items.Descript
The datasource should be obvious - in this case I'm binding to the internal DataSet object of the bus object. The DataSourceMember in this case is in Tablename.Field format. This is the same syntax that the standard ASP.Net one way binding performs.
Indexed Properties
You can also bind to a DataTable in much the same way. Just note that these controls cannot attach to any properties that are indexed (ie. DataSet.Tables[0] doesn't work). Instead you have to move a reference to the indexed property to a form property and then bind to that. For example, say you don't use a business object that conveniently exposes a DataRow object:// *** assume you fill a DS here.
DA.Fill(ds,"Table")
// *** doesn't work
this.txtSku.DataSource = ds.Table["Table"].Rows[0];
// *** Instead use
this.CurrentRow = ds.Table["Table"].Rows[0];
this.txtSku.DataSource = "CurrentRow";This indexing limitation appies to any indexers in the expression, so above both Table and the Row are indexed and wouldn't work if they are part of the DataSource.
Ok, now go ahead and hook up any additional fields in the same fashion. For the text fields set the TextBox to multiline mode. Test again and make sure everything works.
Binding Errors
It's likely that you will make a mistake or two as you add these controls and set their controlsource to match the database fields. When you do notice that the field values display an error value of:*** Binding Error
Which makes it easy to spot problems. These errors generally will occur if you used an invalid property name or field, or an invalid binding source or if you use a BindingSourceMember that can't be bound because it doesn't parse properly into a string. You can also get this error if you used an invalid format string for the type that you are trying to bind.
I'll come back to Unbinding errors in a moment.
Typed Binding and Format Strings
The controls automatically handle conversion of typed data to string using the standard IFormatProvider interface. So numeric and date values generally display according to the current culture running on the server. You can apply specific IFormatProvider format strings ({0:f2} for 2 decimals for example or {0:d} for short date syntax etc.) to any field and the data will pick up the format and display accordingly.When providing format strings we highly suggest formats that will also parse back into the original type.
Property Binding
For the sake of this article let's add a new property decimal TestNumber and set the value to some decimal number like 100.22. Now let's add a textbox to the form and call it txtNumber. You can now bind this property like this:DataSource: this
DataSourceMember: TestNumber
Compile and run the form again and voila you're bound to that property. You can bind to any object and any simple data type of the object in this fashion. It also works the same way if you have say an address object and you want to bind to a Street member which you would do with:
DataSource: this.Address
DataSourceMember: Street
Unbinding Data
Binding data is nice but unbinding is much better, since that's something that ASP.net doesn't support automatically. With these controls unbinding is a snap. The key to unbinding is that you need to make sure that the datasources are available: A business object is loaded and on the right record to be updated, a DataSet/Table/Row is loaded and in the correct state.If you're using wwWebForm then you can simply call:
this.UnbindData();or if you didn't you can call:
BindingErrors Errors = wwWebDataHelper.FormUnbindData(this);Unbinding and Errors
Both do essentially the same thing. If you use the wwWebForm the BindingErrors are actually stored on a form level property - BindingErrrors where you can retrieve them. If BindingErrors == null no errors occurred during the unbind process, otherwise unbinding errors occurred.If errors occurred and you want to display you can:
- Simply redisplay the form
This will cause the error to be displayed with an icon next to it. You can choose whether errors display and where by setting the ErrorMessageLocation property of the control. - Display the errors as a string or HTML
You can call the BindingErrors.ToHtml() or ToString() methods to retrieve the error information and show that for example by binding it to an Error control.
So what's an un-binding error? In most cases this means a value in a control can't be parsed back into the underlying data source, which in most cases means a data conversion error. Or if you set the IsRequired property to true on the control and leave the field blank you also get a binding error.
Then add the following code to the Save Button on the form:
private void btnSubmit_Click(object sender, System.EventArgs e)
{
	int Pk = 0;
	try
	{
		Pk = Int32.Parse( this.txtPk.Text ) ;
	}
	catch
	{
		this.lblErrorMessage.Text = "Invalid Pk";
		return;
	}

	this.Item.Load(Pk);

	this.UnbindData();

	if (this.bindingErrors != null)
	{
		this.lblErrorMessage.Text = this.bindingErrors.ToHtml();
		return;
	}

	if ( this.Item.Save() )
		this.lblErrorMessage.Text = "Item Saved";
	else
		this.lblErrorMessage.Text = "Item failed to save: " + this.Item.ErrorMessage;
}
This code takes an input PK (which is stored on teh form as a ReadOnly or hidden field txtPk) and then loads up a business object with the selected record. In this case our binding is to a DataRow. The single call to UnbindData() causes the data to be written back to the DataRow or whatever we are bound to.
Now if errors exist we assign the errors to the ErrorMessage label and simply return to let the controls display the errors.
To check this out let's load up our form. Set the Description field so that IsRequired is true and set the ErrorMessageLocation to Text and Icon below. Now run the form, select an item, click Go. And now clear out the description and go down to the Price field and put in a non-numeric value. You should get a form that looks like this:
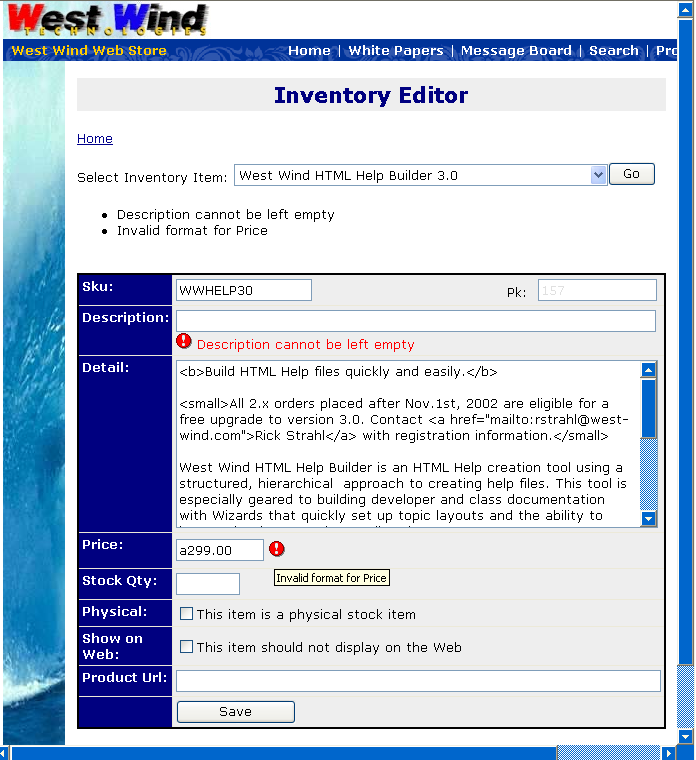
As you can see we have two databinding errors on the form. The Description which was caused by the empty IsRequired violation and the Price which is invalid because an invalid character is in the data. Note that the description uses the WarningLabel and Icon below because we overrode the default which is just the icon beside as is the case with the price error.
All of this happens without having to write any additional code. All you need is databinding controls, optionally an error label that can display a summary of errors. You will need the Warning Icon in the images directory off the Web Virtual root - if you plan on showing icons, which add a touch of professionalism to the error display.
Note that if you want to use standard ASP.Net Validation controls - you can easily use those as well as you always could before, since these controls are after all subclasses of the original controls.
Adding Business Rule errors
The errors that are automatically handled are only binding errors and RequiredField errors. While these are common, the more important errors usually are handled by the business objects on the server. Generally you have business rules in the Validate() method of the business object that do something like this:public override bool Validate()
{
if ( wwUtils.Empty((string) DataRow["Sku"]) )
this.ValidationErrors.Add("Sku must be filled in.","txtSku");
else
{
// *** Check to see if it exists
if (this.DataRow.RowState == DataRowState.Added &&
this.Execute("select sku from " + this.Tablename + " where sku='" + (string) DataRow["Sku"] +"'","Temp") > 0)
this.ValidationErrors.Add("Invalid Sku - this Sku exists already. Please pick another.","txtSku");
}
if ( wwUtils.Empty((string) DataRow["lDescript"]) || ((string) DataRow["lDescript"]).Length < 40)
<<b>>this.ValidationErrors.Add("Long Description must be at least 40 characters long","txtlDescript");<</b>>
if (this.ValidationErrors.Count > 0)
return false;
return true;
}The key is the call to the ValidationErrors.Add() method which adds an error to the ValidationErrors collection of the business object. Note the second parameter - txtlDescript - which is a best guess at what the UI layer will name the control that this data field is bound to.
Note also that the business object may duplicate some of the rules that the client checks because the business rules universally needs to validate regardless of client code. For now let's work with the Description requirement of at least 40 characters.
Ok, now let's change the previous code in the ASP.Net handler around a little bit to be like this:
private void btnSubmit_Click(object sender, System.EventArgs e)
{
	int Pk = 0;
	try
	{
		Pk = Int32.Parse( this.txtPk.Text ) ;
	}
	catch
	{
		this.lblErrorMessage.Text = "Invalid Pk";
		return;
	}

	this.Item.Load(Pk);

	this.UnbindData();

	bool HaveBindingErrors = false;

	if (this.bindingErrors != null)
		HaveBindingErrors = true;

	bool HaveValidationErrors = !Item.Validate();
	if (HaveValidationErrors)
		this.AddValidationErrorsToBindingErrors(this.Item.ValidationErrors);

	if (HaveValidationErrors || HaveBindingErrors)
		this.lblErrorMessage.Text = this.bindingErrors.ToHtml();
	else
	{

		if ( this.Item.Save() )
			this.lblErrorMessage.Text = "Item Saved";
		else
			this.lblErrorMessage.Text = "Item failed to save: " + this.Item.ErrorMessage;
	}
}
You'll notice that now we're calling the Validate() method of the business object which will capture any business object errors and pass them on. If any ValidationErrors exist a call to the wwWebForm's AddValidationErrorsToBindingErrors causes the business object errors to be added to the binding errors which essentially sets the control's that match the control id - txtlDescript in this case - and sets its bindingErrorMessage to the message of the validation error. With this we now get to display binding errors as well as business object errors.
Our form now looks like this when we leave descript, lDescript and Price blank:
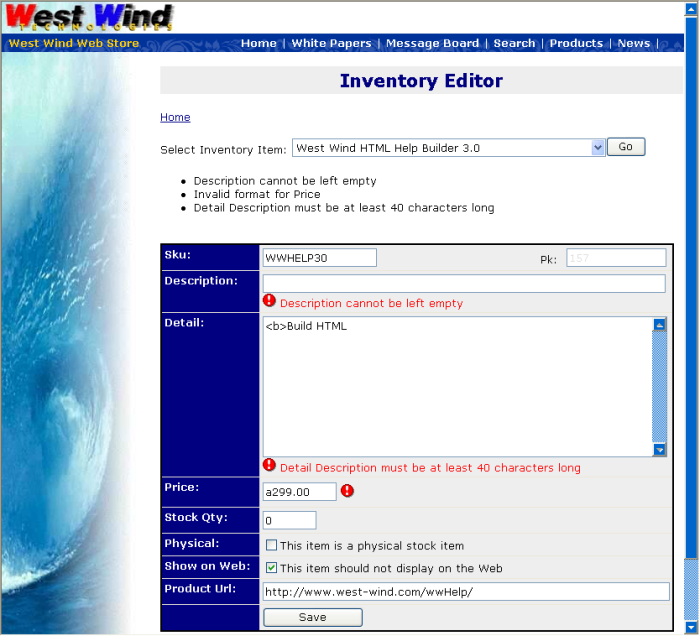
As you can see we now get the error message from the business object validation message displayed back to us when we don't fill in the data correctly.
Summary
This databinding mechanism is simple and powerful and it reduces the amount of code you have to write to next to nothing for binding and unbinding data. You simply set properties and if an error occurs instead of crashing the controls display an error message which makes it usually easy to fix the problem by correcting the binding properties.

Comment or report problem with topic