
An introduction to jQuery
by Rick Strahl |
|
Selector |
Example |
Description |
|
Element |
$("td") |
Select an
HTML element tag |
|
#id |
$("#divMessage") |
Selects an
element by its id |
|
.cssclass |
$(".gridalternate") |
Selects a CSS
style |
|
selector,selector |
$("input:button,input:text") |
Multiple
comma separated selectors can be combined into a single
selection. |
|
ancestor
descendant |
$("#divMessage
a") |
A space
between selectors/elements/tags finds nested elements. This
syntax is similar to Css ancestor descendant syntax. |
|
parent >
child |
$("p > b") |
Matches all
immediate children of an element or selector expression that
match the right element/selector. |
|
prev ~
siblings |
$("#row_11:nth-child(2)~td") |
Matches the
next siblings at the sample level as the preceeding
expression. Example, matches 3-nth columns of a table row.
Best used as a find() or filter() against an existing jQuery
instance. |
|
prev +
nextsibling
+ nextsibling |
$("#tdMoneyCol+td") |
Matches the
following sibling. Works best with find() or filter()
against an existing jQuery object. |
|
:filter |
$("input:button") |
: applies
filters to the query. jQuery support CSS 3 filters plus a
number of custom filters.
Examples: :not,:button,:visible,:hidden,:checked,:first,nth-child(1),:has,:is,:contains,:parent |
|
[@attribute] |
$("p[class=gridalternate] |
Selects an
attribute of an element
$= endswith
*= contains |
Selectors can get quite sophisticated. Lets say
you want to look for any cells in a table that start have an ID that
starts with the value Pk:
$("#gdEntries>tbody>tr>td[id^=Pk]").width(30);
Cool eh? You get a lot of control over exactly picking up elements you are looking for.
Let’s look at a simple, concrete example of an ASP.NET page and use jQuery on the client side to fix up the page to highlight some of jQuery’s features. The following page contains a GridView to display a plain table loaded from data. I’m going to add jQuery and a bit of code to manipulate the page. You can follow along if you like by downloading the code accompanying this article. Here’s the abbreviated ASP.NET page I’ll work with (a plain HTML is also provided in the sample download):
Simple ASP.NET markup used for these examples
<html xmlns="http://www.w3.org/1999/xhtml">
<head runat="server">
<title>jQuery 101</title>
<link
href="Standard.css"
rel="stylesheet"
type="text/css" />
<link
href="jQuery101.css"
rel="stylesheet"
type="text/css" />
<script
src="scripts/jquery.js"
type="text/javascript"></script>
</head>
<body>
…
<asp:GridView
ID="gdEntries"
runat="server"
AutoGenerateColumns="false"
cssClass="blackborder"
CellPadding="4">
<HeaderStyle
CssClass="gridheader"
/>
<PagerStyle CssClass="gridpager"
HorizontalAlign="Right"/>
<RowStyle CssClass="griddatarow"
/>
<Columns>
<asp:BoundField
DataField="TimeIn"
HeaderText="Time in"
DataFormatString="{0:MMM
dd hh:mm tt}"
ItemStyle-CssClass="timeinField"/>
<asp:TemplateField
ItemStyle-CssClass="descriptionField">
<ItemTemplate>
<div
id="entrytitle"><%#
Eval("Title")
%></div>
<div
id="entrydescription"><%#
Eval("Description"))
%></div>
</ItemTemplate>
</asp:TemplateField>
<asp:BoundField
DataField="ItemTotal"
HeaderText="Total"
/>
</Columns>
</asp:GridView>
</form>
</body>
</html>
There’s only minimal formatting applied to the grid and if you run the page with the jQuery code commented out you get a very plain, black and white grid display.
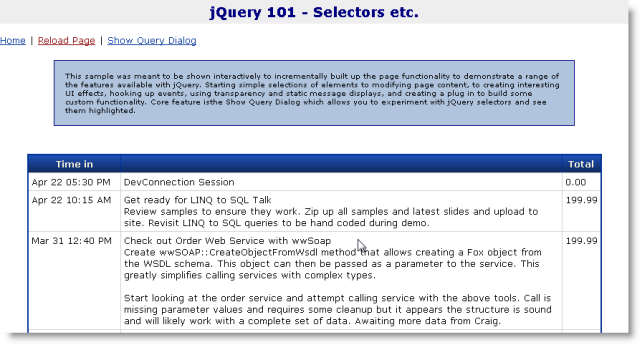
Figure 1: The original plain page to work from
So let’s use jQuery to demonstrate how we can select elements and make the table look a little nicer and add some interactivity. Let’s starte by applying an alternating row effect to the table rows.
Let’s add a script tag to the bottom page just above the </form> tag like this:
<script type="text/javascript">
$(document).ready( function() {
$("#gdEntries
			tbody tr:even")
.addClass("gridalternate")
.css("border","solid
1px lightgrey");
});
</script>
Which gives you
alternate row striping of rows:
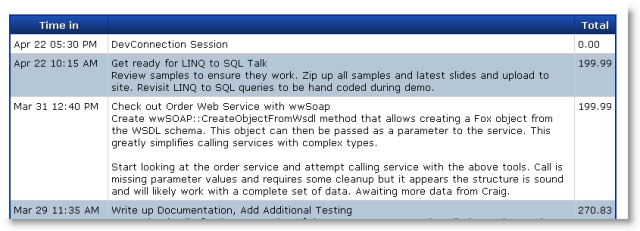
Figure 2 – Alternating stripes applied with selectors and .addClass()
Let’s examine what makes this very simple jQuery command work.
Take a look back at the script block on the
bottom of the page and notice the
$ symbol in the script
block, which is an alias to the
jQuery object. $ is just a
shortcut for the jQuery object and the two can be used
interchangeably. So above I could have used
jQuery(document) or
jQuery("#gdEntries") just as easily as $(document)
or $("#gdEntries"). The jQuery object takes a selector
as a parameter. Typically selectors are expressed as strings, but
you can also pass DOM elements or another jQuery object.
For example $(document) passes a
document DOM element and
results in a single element wrapped set that contains the document
object. $("#gdEntries") selects the gdEntries table on
the page where # is the ID identifier just as in CSS.
Notice the use of the $(document).ready()
handler. .ready() is a jQuery
event handler and your first exposure to how to handle events
with jQuery. This particular event handler lets you know when the
Document is ready to be accessed
and scripts have completed loading. This ensures that your
code can access all DOM elements and script code reliably. A
.ready() handler can be placed anywhere on the page
and you can even have multiple ready handlers in the page.
Although a .ready() handler is optional and not always required, for consistency and reliability’s sake it’s best to always wrap any script ‘startup code’ into a .ready() handler to ensure reliable operation on all browsers.
The handler is implemented using an anonymous
function which means the handler is declared right inline of the
.ready() function call ($(document).ready( function {…}).
This is a common practice with jQuery because inline functions are
an easy way to write and read the short handler code that is common
in JavaScript code. There are other advantages to inline functions,
but for now just note that inline anonymous functions are a common
way to write event handlers, so you’ll see more of them shortly. You
could also pass a function pointer instead: The following is just as
valid $(document).ready(onLoaded) where onLoaded is a
function defined in script code externally.
Let’s come back to the grid example code that
performs the selection of the rows in the example. $("#gdEntries
tbody tr:even") selects all the even rows in the grid view’s
table output. In plain English the
selector means: select
the gdEntries element (#) and find any child tbody elements
(space=child) find any tr elements below it (space=child) and then
return a filtered set(:expression=filters) that includes only the
even elements.
The result of the selector is a wrapped set of all even rows in the table. The .addClass("gridalternate") call then applies the .gridalternate CSS style to the each matched element which gives it its new highlighted appearance. Finally the .css function applies some custom styling to each matched element. Both .addClass() and .css apply their operations against all the matched elements at once.
If you’re following along in the sample, you’re probably noticing that while the above works to highlight even rows, there’s also a funky side effect in the table: If you look at the pager – which ASP.NET renders as a table – you’ll find that its alternating rows have also been marked up with the .gridalternate class. The problem is that ASP.NET’s GridView rendering is, uhm rather imprecise. It doesn’t render proper tbody and tfoot tags to delineate table headers and footers properly and so our selector query is too broad as the selector also matches the child elements of the selected rows which includes the child Pager table in the footer.
There are a number of ways to fix the selector to make this work properly. First we can apply a filter to the selection by excluding certain elements.
$("#gdEntries tbody
tr")
.not(":first,:last")
.filter(":even")
.addClass("gridalternate")
.css("border","solid 1px lightgrey");
So instead of filtering on all odd rows we’ll
filter the rows and omit the first and last rows (the header and the
footer). We then filter then list and grab only the odd items out of
that set. Another even easier way is to use only direct children
using the > operator rather than spaces which select all children:
$("#gdEntries>tbody>tr:even")
Another common way to filter elements that’s efficient and offers the developer the most control is via CSS class assignments to elements that are to be matched. You can use either real CSS style classes or ‘marker’ classes that can identify elements.
Take another look at the way the GridView’s rows are rendered:
<RowStyle
CssClass="griddatarow"
/>
This adds a class=”griddatarow” to each row rendered in the HTML. There’s no griddatarow CSS class, but jQuery can still match on it in the selector expression. So the following works:
$("#gdEntries tr.griddatarow:odd")
Or even as simple as:
$(".griddatarow:odd")
The latter works, but the first is preferable even if it is more verbose. It’s best to be as specific as possible in order to optimize selection for jQuery in the document. The former finds the gdEntries table and only searches for children in it, while the latter has to parse the entire document. The fewer elements matched by the first selector filters the less elements jQuery has to iterate over. Be precise if possible.
For kicks let’s say you wanted to select the second cell of the third row in the grid:
$("#gdEntries>tbody>tr:nth-child(3)>td:nth-child(2)")
.addClass("gridalternate");
Or maybe all second columns?
$("#gdEntries>tbody>tr>td:nth-child(2)")
.addClass("gridalternate")
Easy! Think about how cool this is: If you had to do this manually
via script code this would be a fairly complex task. Selectors make
it very easy to get access to just about any element or any sets of
elements in the page and this feature is key.
The result of $("#gdEntries>tbody>tr:even") is a jQuery object which is an array like structure that has a length property and an array containing each of the matched elements. You can reference the DOM elements in the wrapped set directly:
var
res = $("#gdEntries>tbody>tr:even");
var
len = res.length;
// match count. 0
= no matches
var
el = res[0];
// first element
el = res.get(0);
// same but 'official' syntax
The jQuery constructor always returns an object result, so even if the selector finds no matches an object is always returned and you can check the .length property to determine if the selection returned matches.
Once you have a set of matches you iterate manually with a for loop or use the .each() wrapped set function to iterate over the list. What’s nice about .each() is that it assigns the this pointer to the selected element so you can do this:
$("#gdEntries tbody tr:even").each(
function(index) {
alert(this.id +
" at index: " + index);
});
Manual iteration is useful at times, but more commonly you'll use one or more jQuery’s over 100 operational functions to operate on the resulting wrapped set’s elements. Both the .addClass() and .css() functions we saw above are applied against all the elements matched by the jQuery selector created with the jQuery() or $() function – in this case each of the rows selected. You can find all the jQuery functions on the API reference page or if you’re into terse lookup sheets you can check out this jQuery cheat sheet you can print out.
jQuery lets you use a fluent interface for most
function calls which means that you can chain many jQuery function
calls together in single command. We’ve already seen examples of
this earlier:
$("#gdEntries tbody
tr")
.not(":first,:last")
.filter(":odd")
.addClass("gridalternate")
.css("border","solid 1px lightgrey");
This syntax chaining works because most jQuery functions return a matched set as a result. For example, .addClass, .css both return the original matches they acted on. Other functions like .not and .filter are actually filter functions – they modify the original matched set and return a new filtered matched set instead. There’s also an .end() function that is used to remove any filters and return to the original matched set specified at the beginning of the chain.
Chaining is a great way to keep code compact, but it’s optional. If you prefer you can also write more traditional code like this:
var matches = $("#gdEntries>tbody>tr>td:nth-child(2)");
matches.addClass("gridheader");
matches.removeClass("gridhighlight");
Chained statements can sometimes be difficult to debug so this
explicit method is easier to step through with a debugger and see
the individual results, then one huge chained statement.
Not all jQuery functions can are chainable. Some operations result in non-matched sets. For example functions like .val(), .text(), .html() return string values, .width() and .height() return numbers, .position() returns a position object. If you look at the jQuery function list though it should be pretty clear what the result types of most functions are. Typically functions that you would expect to return a void result return a matched set. Any functions that return ‘data’ or ‘values’ don’t return a matched set.
Event handling is one of the nicest aspects of jQuery because it makes the process easy and consistent across browsers. jQuery provides the high level .bind() and .unbind() functions to generically attach and detach event handlers on matched sets. In addition most of the common events like click, key and mouse events have dedicated handler functions like .click(), .mousedown(), change() and .keydown(). jQuery event handlers simply take a function as a parameter and jQuery tracks these handlers so that they can also be unbound later. It can’t be much easier than this. In addition there’s .one() which fires an event exactly once then disconnects the handler and .toggle() which toggle between alternating clicks, and .trigger() which can trigger events on elements.
jQuery also provides a common model for event
handlers:
Let’s build on top of the earlier grid example by highlighting grid rows when you hover over them regardless of browser. The following block of code uses jQuery's .hover() event function which fires as an element is hovered over. .hover takes both an entry and exit event function handler as parameters.
Let’s change the previous command to:
$("#gdEntries>tbody>tr")
.not(":first,:last")
.hover(
function() {
$(this).addClass("gridhighlight");
}, function()
{
$(this).removeClass("gridhighlight");
})
.filter(":even")
.addClass("gridalternate");
Note that I re-arranged the original query a little so that I can apply the hover behavior to all rows and then filter the list afterwards to include only the even rows and apply the alternating style to those.
The .hover() function is an example of a jQuery event handler and it happens to be a special one because unlike most it takes two callback functions as parameters. The first for the mouseenter and the second for the mouseout operation. jQuery handles .hover() smartly detecting only ‘real’ mouseout events when leaving the container unlike the mouseout event which also fires when entering child elements. In other words, jQuery provides the hover behavior you would expect by abstracting mousenter and mouseout.
If you run the page now you should get an orange highlight for each row that the mouse hovers over now.
Now let’s also handle clicks on the row and pop up a dialog that shows the value of the selected third column, which can be easily done with the following .click() handler:
$("#gdEntries>tbody>tr")
.not(":first,:last")
.hover(
function()
{
$(this).addClass("gridhighlight");
},
function()
{
$(this).removeClass("gridhighlight");
})
.click(
function(e) {
alert("Amount: " + $(this).find("td:nth-child(3)").text());
})
.filter(":even")
.addClass("gridalternate");
This code hooks up a click handler to every row
in the matched set and responds to a click. Event handlers are
always called in the context of the element that caused the event –
in this case the row and so
this points at the row DOM element. You can turn this into a
jQuery object $(this) and then apply further filtering
to this single element to find the third child cell and display the
contents of this cell.
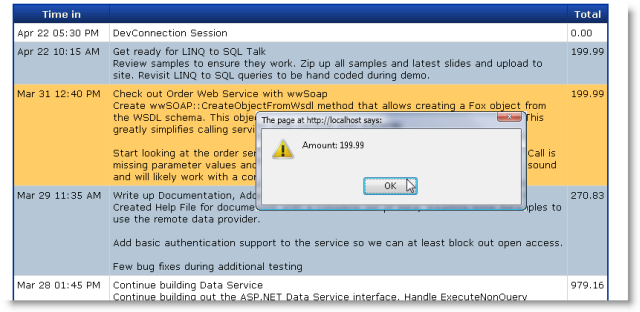
Figure 3 – The grid with hovering and click event handling added.
Displaying the amount is not all that useful though. A more common scenario for this type of setup is for navigation where you click or perform some AJAX request based on the row selection. Unfortunately the ASP.NET Gridview doesn’t provide any sort of id or context on the client side so it’s not easy to take a context based action. If you want to navigate or post back data in some sort of useful context we have to take matters into our own hands. It’s pretty easy to fake context though knowing that you can use jQuery to easily access document content. So, we can embed an id value into the generated content of one of the cells. The grid already has a template column so I’ll change it to:
<asp:TemplateField
ItemStyle-CssClass="descriptionField">
<ItemTemplate>
<div
style="display:none"><%#
Eval("pk")
%></div>
<div
id="entrytitle"><%#
Eval("Title")
%></div>
<div
id="entrydescription"><%#
Eval("Description"))
%></div>
</ItemTemplate>
</asp:TemplateField>
Which embeds the pk into the generated output.
You can then handle the .click() event by retrieving that PK value
in the 2nd column and looking at the first <div> tag and
getting its text:
.click(
function(e) {
var pk = $(this).find("td:nth-child(2)
div:first-child").text();
window.location =
"someotherpage.aspx?id="
+ pk;
})
Using jQuery and its flexible selector syntax it becomes possible to use HTML and the DOM as data storage by allowing you to store state content in the HTML and get at it via selection as in this example. And it makes it possible even to use an inflexible component like the GridView and make it more dynamic. Approaches like this can completely change the way you think about the purpose of client UI and interactivity. For example, you can do in place editing of content in the browser and then pick up that content later to post to the server via AJAX or even a Postback. The possibilities are endless.
jQuery objects can also be created directly by simply passing an HTML string as the parameter to the jQuery object. To create Html and add it to the document is as easy as:
$("<div id='_statusbar' class='statusbar'></div>")
.appendTo(document.body)
Html can be injected anywhere in the document with .appendTo() or .prependTo() which inserts into the child items of the selector element(s). .append(), prepend() inserts to the current selected element instead.
You can also .clone() existing nodes easily. Try this on the example above:
$("#gdEntries").clone()
.appendTo(document.body)
.attr("id","gdEntries2");
And you’ll see the entire GridView duplicated in the page. Not terribly useful, but there are a number of situations where cloning is very useful. For example, you can use cloning() for a sort of templating mechanism. To insert a new row with new content in the table above you can use code like this:
var row = $("#gdEntries>tbody>tr:nth-child(2)").clone();
row.find("td:first")
.text(new
Date().formatDate("MMM dd - hh:mmt"));
row.find("td:nth-child(2)")
.html("<b>"
+ new Date().formatDate("hh:mm:ss") +
"</b><br />More text second item here");
row.find("td:last")
.text(
199.99.formatNumber("c"));
row.insertBefore("#gdEntries>tbody>tr:nth-child(2)")
.show();
(note the format functions are a few helper functions that can be found ww.jquery.js provided with the source download). The nice thing with this approach is that you don’t have to create HTML on the client – you’re only injecting data and maybe minimal markup rather than HTML strings because you are cloning an existing node and only ‘filling in the blanks’.
Content doesn’t have to pre-exist either. You can load ‘template’ content from non-visible HTML elements on the page or embedded inside of scriptblock for example to clone or create a new jQuery object from. This example is simplistic because I’m injecting static content, but you could retrieve content from an AJAX callback or captured form input fields and load that into the cloned ‘template’.
Templating is a powerful topic and I’ll come back to it later in Part 2 when we look at a couple of different templating tools you can use in combination with jQuery (if you’re eager to check it out now look at jTemplates or John Resig’s cool Micro-Template engine).
One nice touch of jQuery is that it includes a few simple yet very effective effects methods. For example, if I wanted to add a little pizzaz to those new elements added in the last example, instead of calling .show() I could fade in the elements with simple code like this:
row.insertBefore("#gdEntries>tbody>tr:nth-child(2)")
.css("background",
"paleyellow")
.hide()
.fadeIn(1000);
The .fadeIn() and .fadeOut() functions do exactly as their name implies and provide a very easy way to give a visual clue that something is updating on the page. Other methods include .slideUp() and .slideDown() which slide content from the top or bottom to the current absolute position again with speed indicators. For lower level animation there’s the .animate() function which allows you animate numeric CSS properties to a new value over a timeout period to provide custom animations. In addition there are a host of animation plug-ins available that can provide all sorts of fade and transitions effects if you’re into the pompous kinds of effects. It’s pretty impressive what you can do with very little effort, but even the basic built-in function do a lot to liven up a Web page. Just remember to keep it simple and not just add noise to the page.
jQuery can also help to create utilitarian UI features. Let’s add a pop up window to the example, and allow dynamically typing selectors into it that select and highlight matched elements in the page. The end result should look something as shown in Figure 4.
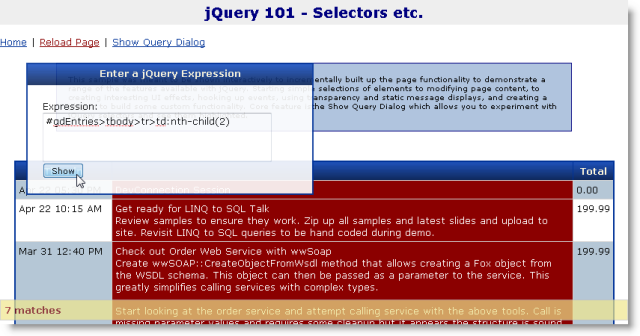
Figure 4 – Displaying a dynamic pop up window with some effects.
The dialog is popped up by clicking on the Show Query Dialog window, which ‘slides in’ the dialog and displays with a slightly transparent background ontop of the content. You can then type a jQuery selector and basically query the document. When you click show the selected elements are highlighted in dark red in the document, then removed after a few seconds.
The dialog is stored on the page as a simple
<div> tag element that’s styled and it looks like this:
<div
id="divjQueryDialog"
class="blackborder"
>
<div
class="gridheader">Enter a jQuery Expression</div>
<div
class="containercontent">
Expression:
<span
id="lblExpressonMsg"
class="errormessage"></span><br
/>
<textarea
id="txtExpression"
style="width:
300px;
height:
60px;"></textarea>
<input
type="button"
id="btnExpression"
value="Show"/>
</div>
</div>
There’s also some styling for the dialog that
makes it transparent, initially hidden and absolutely positioned on
the page:
#divjQueryDialog
{
width:
380px;
position:
absolute;
left:
100px;
top:
70px;
display:
none;
}
The code that makes the panel visible applies opacity and handles the matching and selection is relatively simple too:
Code to pop up a jQuery Selector test window
function showQueryDialog()
{
var dialog = $("#divjQueryDialog");
dialog.hide()
.slideDown("slow")
.css("opacity",.90);
$("#btnExpression").bind("click",
function(event)
{
// Grab the selector entered as text
var exp = $("#txtExpression").val();
// Execute the selector through jQuery
var matches = $(exp);
// *** check result
var len = matches.length;
if ( len < 1)
{
$("#lblExpressionMsg").text("No matching
elements");
showStatus("No
matches",3000,true);
return;
}
showStatus( len.toString() +
" matches",3000,true);
// No errors clear error message
$("#lblExpressionMsg").text("");
// Highlight all matches
matches.addClass("selectionhighlight");
// Set up timer to remove the highlight
setTimeout(function()
{
$(exp).removeClass("selectionhighlight");
},5000);
// Unbind event and hide dialog
$("#btnExpression").unbind("click");
dialog.slideUp();
});
}
The code initially makes the div visible and applies opacity. It then hooks up a click handler to the button and an anonymous function to handle the processing of the click. That code captures the input text and then uses jQuery to ‘evaluate’ the selector applying a special class to the matched set. A timeout is also set up the removes the highlight class after 5 seconds.
I mentioned nesting anonymous functions earlier and the above code shows another example – the code above is quite asynchronous, yet it is written in a single block of code that keeps context. The inner click handler has access to dialog without having to reselect it. This is due to the way JavaScript handles closures or function blocks that are nested within each other which can see private variables defined higher up in the function definition stack – even if the code is asynchronous. In this example this is trivial but if the out code (or ‘class’) contained more state it’s quite convenient to have the state passed to the handler merely by virtue of being declared inside of the parent closure. This type of coding can often be easier to read as it keeps relative logic together in one place.
A couple of other things to highlight here:
Notice the code to make the dialog transparent:
dialog.hide()
.slideDown("slow")
.css("opacity",.90);
jQuery is smart about how it handles certain CSS tags like opacity that browsers handle differently. Internet Explorer doesn’t support opacity (because it’s not officially part of the CSS 2.1 standard), but jQuery automatically does the right thing applying a filter for Internet Explorer. Similar rules are applied for other CSS properties and certain functions. For example, .text() retrieves text consistently, .scrollLeft/Top retrieves scroll position safely. So jQuery acts as a normalizer between different browser implementations.
One last enhancement: If you want to make the window draggable so you can move it around the page this is also easy to using the draggable plug-in from jQuery UI. To use this plug-in download jQuery UI dump the library into your scripts folder (relevant portions provided in the sample). Then add:
<script src="scripts/ui.core.js"
type="text/javascript"></script>
<script src="scripts/ui.draggable.js" type="text/javascript"></script>
To the page and simply add:
var dialog = $("#divjQueryDialog");
dialog.draggable();
That’s it. You’ve just made your ‘window’ a lot more window-like with a single line of code through this simple plug-in. There are a number of options you can apply to draggable – for example to set the drag handle to the window’s header you can use:
dialog.draggable({ handle: $("div.gridheader") });
which makes only the header initiate a drag operation which is a
more natural drag behavior
for a window.
Plug-ins are one of the main reasons that jQuery has become so popular. Part of the reason for this is that jQuery has a super simple API for plug-ins. There is a jQuery.fn property which hosts any operational functions that can operate on the matched set. By simply implementing a new function on jQuery.fn you effectively create a new matched set method. Here’s a very simple pulse plug-in that pulses an element by fading it out partially and then fading back to full visibility:
$.fn.pulse =
function(time)
{
if (!time)
time = 2000;
// this == jQuery object that contains selections
this.fadeTo(time,0.30,
function()
{
$(this).fadeTo(time,1);
});
return
this;
}
To use this plug-in you can now simply use jQuery and use the pulse function on it for the matched set of elements. For example, earlier we added a new item to the grid – you can pulse this item maybe instead of fading it in:
row.insertBefore("#gdEntries>tbody>tr:nth-child(2)")
.css("background",
"paleyellow")
.pulse(2000);
When you run this now you should see the new row pulse for 2 seconds as it is added. This plug-in also works against many matched elements:
$("#gdEntries>tbody>tr")
.filter(":even")
.addClass("gridalternate");
.pulse(1000);
which pulses only the even rows.
A plug-in receives a this pointer that is the jQuery matched set. So you can apply further functionality to this matched set in the plug-in code. If the plug-in doesn’t return a distinct result value you should always pass the jQuery result set back as a return value so that the function is chainable for additional jQuery functions.
$("#gdEntries>tbody>tr")
.filter(":even")
.addClass("gridalternate");
.pulse(1000)
.addClass("small");
The above is an overly simplistic plug in. More commonly you need a little bit of set up data for a plug-in as well as needing to loop through elements. Here’s another plug in that centers any elements in the browser window or inside of another element:
A
jQuery centerInClient Plug that centers content in the Window
$.fn.centerInClient
= function(options) {
var opt = {
container: window,
// selector of element to center in
completed:
null
};
$.extend(opt, options);
return
this.each(function(i) {
var el = $(this);
var jWin = $(opt.container);
var isWin =
opt.container == window;
// have to make absolute
el.css("position",
"absolute");
// height is off a bit so fudge it
var heightFudge = 2.2;
var x = (isWin ?
jWin.width() :
jWin.outerWidth()) / 2 - el.outerWidth() / 2;
var y = (isWin ?
jWin.height() :
jWin.outerHeight()) / heightFudge - el.outerHeight() / 2;
el.css({ left: x + jWin.scrollLeft(),
top: y + jWin.scrollTop() });
var zi = el.css("zIndex");
if (!zi || zi ==
"auto")
el.css("zIndex",
1);
// if specified make callback and pass element
if (opt.completed)
opt.completed(this);
});
}
This plug-in includes a couple of common patterns. First it has a
set of option parameters that can be passed in as an object map (ie.
{container: "#divContainer"} ). Notice that opt is defined as a
private variable and then extended with the option parameter object.
$.extend() is a wonderful utility function that extends an object
with the content of another object and that makes parameter
processing easy for the user, by only requiring to pass parameters
she’s interested in. Most plug-ins accept options parameters in this
fashion and it’s a good idea to implement this in your own plug-ins.
The next common plug-in pattern is to
return this.each( function() {…}); which ensures the jQuery
matched set is returned .The .each function iterates through each of
the matched DOM elements individually and lets you operate against
each of them one at a time. Inside of the .each() function handler
the this
pointer is always the DOM element iterated over. You can use $(this)
to get a jQuery instance for that element which is typically what you want to
manipulate the element.
Because it’s so easy to create plug-ins I’ve ended up creating quite a few plug-ins myself both for my own and shared use. The simple plug-in model is a genius concept: It allows for jQuery to stay small with only a core set of features while still exposing all of the functionality that the core library has to any extensions. It’s a model more API vendors should embrace and execute as nicely as jQuery has.
When you’re using jQuery inside of Visual Studio 2008 you can get fairly full featured Intellisense support for jQuery, but it requires that you install a couple of updates and a support file. First off Intellisense with jQuery only works in Visual Studio 2008 SP1. Prior versions of VS were unable to parse the jQuery script file at all so there was no Intellisense except for the static functions. SP1 allows parsing of the script file, but you still need to mark up the jQuery script file in order to get useful Intellisense. To remedy this situation Microsoft recently released a a jQuery Intellisense file that provides detailed documentation for jQuery plus a hotfix specific to Javascript Intellisense that can automatically utilize this Intellisense file as long as you follow a specific naming convention.
The way this works is that you can download the jQuery Intellisense file and name it with the same name as the script with a –vsdoc.js postfix like jQuery-vsdoc.js. Place this file in the same folder as the jQuery.js script file. If you then reference jQuery.js via <script> tag, ScriptManager or script reference tags (/// <reference path="~/scripts/jquery.js" />) Visual Studio looks at the –vsdoc.js file to get Intellisense information. With the file in place you get full Intellisense all the way down the jQuery callchain as well as for custom plug-ins (although there it stops unless you mark the plug-ins with VS style help comments). The Intellisense script file is basically a marked up version of jQuery that is full of Visual Studio style help comments and the hotfix provides the mechanism for Intellisense to link this –vsdoc.js file without having to include and hide the Intellisense script file. For more information check out my blog entry on this subject.
If all of this sounds like a glowing commercial of a tool, you can be assured that I'm just a happy user who's stumbled onto this library some time ago and fell in love with it the first time I used it. I tend to be very critical of the tools I use, but I have yet to have any serious complaints about jQuery. This library just works for me and it works the way I like to work.
But the library is not "the perfect tool" and doesn't solve every JavaScript and DOM problem for you, but in my time of over a year with jQuery I haven't run into a showstopper problem. You may still need a set of a few helper functions to help with non-DOM related functionality. For example, I still use my old JavaScript library for a number of UI and JavaScript utility functionality like date and number formatting, providing windowing support and a host of other features. Bottom line: You'll probably still have a utility library with helper functions to provide a few custom routines especially when it comes to formatting and manipulating the standard JavaScript types which jQuery doesn't cover.
The biggest concern that you might run into is versioning or possible interference with other libraries. Although jQuery supports a simple mechanism for isolating its own jQuery namespace (either via closure wrapping or using the $.noConflict() function), you may still run into issues with other libraries that also expose the $() function. There's also the issue of versioning of the jQuery library itself which is rev'd frequently. If you use the library names as downloaded (which include the version numbers) you'll end up renaming files and references frequently as the library is updated. If you use a fixed name you may run into version issues.
But all of this is minor and even expected. To be honest I'm grasping to find fault with jQuery for balance here because my editor mentioned I should mention downsides. A quick search around the Web seems to confirm my feelings though – there’s not a lot of negative content that digs up dirt on jQuery. But you can judge for yourself by trying it out and my bet is you'll dig it because it's quick to pick up and highly practical.
In this article I’ve introduced jQuery’s core functionality for DOM manipulation and JavaScript extensions. I’ve focused on the client side functionality without any thought given to the server side because ultimately this is what jQuery excels at most.
In the next installment I’ll look at jQuery’s AJAX functionality and how you can use ASP.NET as a backend to receive these AJAX calls in a variety of ways from plain Page callbacks, to REST calls to using WCF. I’ll also look at integration on how to create ASP.NET controls that use jQuery or jQuery plug-ins in combination with server side components and how to manage jQuery scripts in general in your ASP.NET applicications.
Until then check out jQuery for yourself and get excited about the possibilities it offers for improving your client side Web development. You won’t be disappointed.

Sample Download:
Talk Back
Web Sites
Printable Cheat Sheets
Books

