 West Wind Web Toolkit for ASP.NET
 Using the AutoComplete Control
West Wind Web Toolkit for ASP.NET
Using the AutoComplete Control
Using the AutoComplete Control
West Wind Web Toolkit for ASP.NET
Using the AutoComplete Control
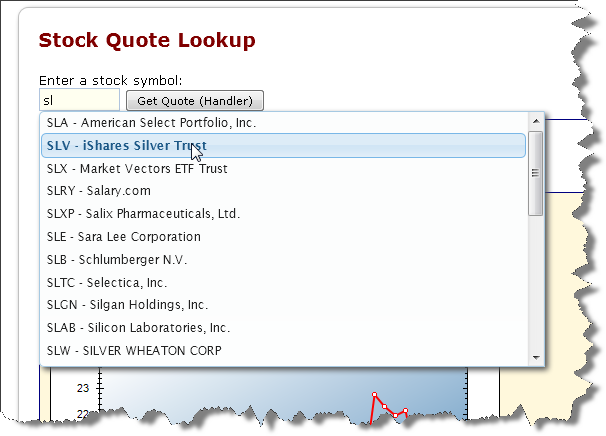
For this example lets create a simple form that includes a textbox and a button to do an autocomplete lookup on stock symbols. Here's what the form should look like with the AutoComplete functionality enabled:
Let's start with the handler to return Stock Symbol names based on the search term entered. In this example I use a CallbackHandler subclass to implement our AutoCompleteHandler that returns JSON data:
    public class AutoCompleteHandler : CallbackHandler
    {
        /// <summary>
        ///  For jquery.ui AutoComplete Plug in which returns
        ///  an array of label/value objects
        /// </summary>
        /// <returns></returns>
        [CallbackMethod]
        public Array GetStockLookup()
        {
            HttpRequest Request = HttpContext.Current.Request;

            // From Autocomplete plug-in
            string partial = Request.QueryString["term"] as string;

            int maxItems = 50;

            busPortfolioItem stocks = new busPortfolioItem();

            // filter symbols to search term - note that you must returns label/value, but you can
            // add additional properties which are accessible in the item on the client
            var symbolList = stocks.GetSymbolList(partial)
                                  .Select(stock => new { label = stock.Symbol + " -  " +  stock.Company,
                                                         value = stock.Symbol })
                                  .Take(maxItems);

            return symbolList.ToArray();
        }
   }
A CallbackHandler subclass serves as an AJAX or REST service where each method of the class acts as an endpoint and can return data as JSON (or XML) data. Here the GetStockLookup() method receives no parameters since the request the plug-in Issues is a plain GET operation with a query string parameter. The AutoCompletePlugin passes a 'term' parameter on the query string and our handler picks this up using using Request.QueryString["Term"].
To test operation we can type the following into a browser (or Fiddler):
http://localhost/samples/AutoCompleteHandler.ashx?Method=GetStockLookup&term=ms
and we should get a JSON array of stock symbols with name/value fields that match all symbols that start with or contain the string 'ms'.
The relevant client HTML is shown here:
<div class="contentcontainer"  runat="server" id="PageContent">
        <h2>Stock Quote Lookup</h2>

        <div class="labelheader" style="margin-top: 20px;">Enter a stock symbol:</div>

        <ww:AutoComplete runat="server" ID="txtSymbol"
                            style="width: 75px;"
                            ServerUrl="AutoCompleteHandler.ashx?Method=GetStockLookup"
        />

        <input type="button" id="btnGetQuote" value="Get Quote"  />
And that's all there's to it. You don't need to write any code whatsoever to get the selection from the auto complete list into the textbox.
Note the AutoComplete control in the page - it handles embedding the relevant script handlers, loading of jQuery, jQuery ui and styles and also default selection and assignment of the selection to the textbox.
When I run the form and start typing the list pops up and I can select an item and the textbox is populated with the 'value' field from the returned object list.
Easy, right?
Change the control declaration to this:
<ww:AutoComplete runat="server" ID="txtSymbol"
                    style="width: 75px;"
                    ServerUrl="AutoCompleteHandler.ashx?Method=GetStockLookup"
       OnClientSelection="onAutoCompleteSelection"
/>
The selection handler receives two parameters: The element it was applied against and the a jQuery ui object which in turn contains an item element. The item in this case is the selected object from the array of objects sent down from the server - a StockSymbol object with label and value properties.
There are a couple of ways to make assignments. If you just want to customize the value that gets popped into the textbox you can use the following:
function onAutoCompleteSelection(el, ui) {
            ui.item.value = ui.item.value + " (" + ui.item.lastQuotePrice + ")";
        }
By explicitly setting ui.item.value to a new value you can override the default value that gets put into the control. If you want more control and you want to actually change the value plus write out additional information into the page you can use more explicit code like the following.
function onAutoCompleteSelection(el, ui) {
            $$("txtSymbol).val(ui.item.value);

            // update other elements from item
            $("#divCompanyName").text(ui.item.company);
            $("#divLastQuotePrice").text(ui.item.lastQuotePrice);

            // return false to keep the default assignment from occurring
            return false;
        }
This latter approach gives you full control over the result handler.
To this we can change the server tag and remove the ServerUrl. It now looks like this:
<ww:AutoComplete runat="server" ID="txtSymbol"
                    style="width: 75px;"
       OnClientSelection="onAutoCompleteSelection"
/>
Then we can hook up an event handler in the OnInit of the page's CodeBehind to handle the data generation. The code is identical to what went in the handler, but it now lives in the Page:
protected override void OnInit(EventArgs e)
{
    // hook up event to fire when AutoComplete handler is fired
    txtSymbol.CallbackHandler += AutoCompleteDataHandler;
}

object AutoCompleteDataHandler(string term)
{
    // From Autocomplete plug-in
    string partial = term;
    //Request.QueryString["term"] as string;

    int maxItems = 50;

    busPortfolioItem stocks = new busPortfolioItem();

    // filter symbols to search term - note that you must returns label/value, but you can
    // add additional properties which are accessible in the item on the client
    var symbolList = stocks.GetSymbolList(partial)
                            .Select(stock => new
                            {
                                label = stock.Symbol + " -  " + stock.Company,
                                value = stock.Symbol
                            })
                            .Take(maxItems);

    return symbolList.ToArray();
}
Other than that the code now works exactly like the last example, except that the code now all lives in the page. The server URL used points back at the current page with some additional parameters:
http://localhost/WestWindWebToolkitWeb/Ajax/AutoComplete.aspx?Method=AutoCompleteCallbackHandler
&CallbackTarget=txtSymbol_Callback&term=ms
The choice is your's to make.
