 Placing the order - OrderForm.aspx
 Placing the order - OrderForm.aspx
Now it's time to collect some money for the hard work you've been putting in <g>. Well, maybe not - they have to come first. But here's how it works at least.
Once you've collected the customer information we now need the final information - the payment and a few optional other informational items like where they heard about you and possibly promotional or referral codes. Referral codes are useful to let you tag orders - for example, I use a Referral code for any Reseller vendors and let the back end app track these code so they know to automatically apply a reseller discount for example.
Ok here is what the order form looks like:
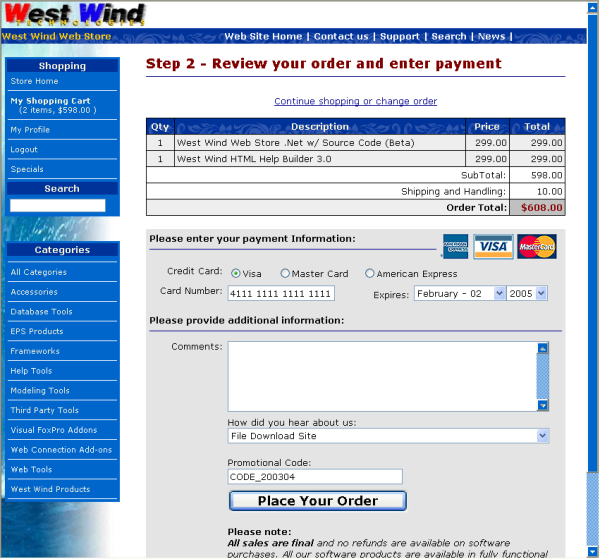
The top part of the form reviews the order details that the user is agreeing to along with an option to go back to make any changes to the order. If the user exits here she goes back to the shopping area and has to come through the profile form again. However, the OrderProfile information was previously saved in the last step so all the information is already filled in and can just be confirmed.
Note that the order portion uses the same Invoice.HtmlLineItems() method we looked at before in the Shopping cart, but it looks a little different. Here you can't edit the item and the form here displays Shipping and also Tax information (if applicable).
Like the OrderProfile form the OrderForm page uses simple databinding to hook up the display logic. On this page however DataBinding is one way - specifically on the way for unbinding the data when saving. The form is always displayed empty on entry. And the other information is all user supplied, so we don't bind on the way in - only on the way out. Here's the code for the inbound code:
private void Page_Load(object sender, System.EventArgs e)
{
	this.Invoice = WebStoreFactory.GetbusInvoice();
	this.Invoice.TemporaryLineItems = true;

	InvPk = Session["InvPk"];
	if (InvPk == null)
	{
		// *** No iterms in cart - shouldn't be here...
		Response.Redirect("Shoppingcart.aspx");
		return;
	}
	CustPk = Session["CustPk"];
	if (CustPk == null)
	{
		this.ShowError("<hr>Error loading customer. Most likely Cookies are disabled on your browser. Please make sure Cookies are enabled...");
		return;
	}

	// *** create a new invoice object
	if (!Invoice.New(true,(int) CustPk))
	{
		this.ShowError("<hr>Error loading shopping cart invoice...");
		return;
	}

	DataRowContainers.wws_invoiceRow rowInv = Invoice.GetTypedDataRow(false);

	rowInv.Pk = (int) InvPk;
	rowInv.Custpk  = (int) CustPk;

	if(!Invoice.LoadLineItems((int) InvPk))
	{
		this.lblHtmlInvoice.Text = "<hr>Error loading shopping cart invoice...";
		this.txtCC.Text = "";
		return;
	}

	// *** Retrieve the Shipping Info values
	Invoice.ShipInfo = (ShippingInfo) Session["ShippingInfo"];
	Invoice.ShipInfo.UseInvoiceFields = false;  // force ShipInfo structure for Totals

	// *** Total out and display the invoice
	Invoice.InvoiceTotal();
	this.lblHtmlInvoice.Text = Invoice.HtmlLineItems(0,true);
}
This simple code simply loads up the invoice as we currently have it. It's still using a temporary invoice because at this point our lineitems are still in the temporary lineitems table. This code should look very familiar - it's very similar to the display code of the shopping cart.
If you look at the form in design mode you will find that there are a few items on this form that are not visible when you first come to this page:
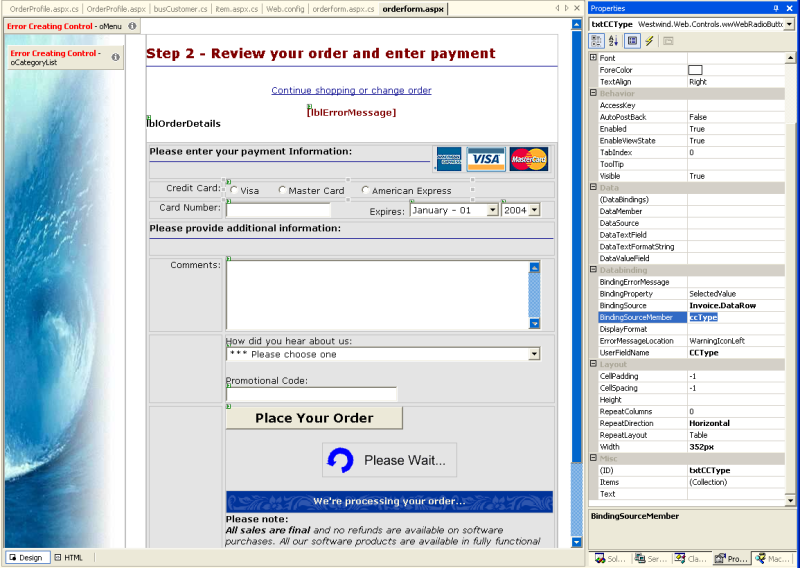
On the bottom of the form we have a couple of controls - an image and a block of text that are used to let the user know that the order is processing which can take a few seconds if you're doing online Credit Card Processing. The page contains some JavaScript code that hides the Submit button and displays these items once the button has been pressed. The code is attached to the Form tags OnSubmit event like this:
<form id="frmOrderForm" runat="server" onsubmit="this.btnSubmit.style.display='none';document.getElementById('WaitNote').style.display='inline';return true;">This code simply hides the button and shows the other block of code (WaitNode) by making it visible.
DataBinding
If you look closely you can see that the Credit Cart Type radio button directly binds to Invoice.DataRow and the CCType field. All fields on this form are bound to data items on the Invoice business object. The only exception is the expiration date which is captured as two individual form variables and put back together into a single string by the submit code.Let's take a look at the submit code, which utilizes the business object for all the hard work.
private void btnSubmit_Click(object sender, System.EventArgs e)
{
	// *** Unbind the form and display any errors related to the binding
	this.UnbindData();
	if (this.bindingErrors != null)
	{
		this.ShowError( this.bindingErrors.ToHtml());
		return;
	}

	DataRowContainers.wws_invoiceRow rowInv = this.Invoice.GetTypedDataRow(false);

	rowInv.Ccexp = Request.Form["txtCCMonth"] + "/" + Request.Form["txtCCYear"];
	rowInv.ShipDisks = Invoice.ShipInfo.ShipToCustomer;

	if (Invoice.ShipInfo.ShippingMethod != "--")
		rowInv.Shipby = Invoice.ShipInfo.ShippingMethod;

	// *** Load up the Shipping Address captured previously
	object Temp = Session["ShippingAddressPk"];
	if (Temp != null)
	{
		busShippingAddress ShipAddress = WebStoreFactory.GetbusShippingAddress();
		if ( ShipAddress.Load( (int) Temp ) )
			this.Invoice.UpdateShippingAddress(ShipAddress);  // Copy to Invoice
	}

	if (!this.Invoice.Validate())
	{
		this.AddValidationErrorsToBindingErrors(this.Invoice.ValidationErrors);
		this.ShowError(this.Invoice.ValidationErrors.ToHtml());
		return;
	}

	// *** Optional Credit Card Processing
	// *** the method decides whether CC processing actually takes place
	if ( !this.ProcessCreditCard() )
	{
		string Error = Invoice.ErrorMessage;
		int lnAt = Error.IndexOf(";");
		if (lnAt > 0)
			Error = Error.Substring(0,lnAt);

		this.ShowError("Credit Card Processing failed: " + Error);
		return;
	}

	// *** Save the invoice by copynig the Temporary LineItems to the real lineitems
	if (!this.Invoice.Save(true))
	{
		this.ShowError(this.Invoice.ErrorMessage);
		return;
	}

	// *** Clear out the Invoice Session PK so this invoice is 'history'
	Session.Remove("ShoppingCartItems");
	Session.Remove("ShoppingCartSubTotal");
	Session.Remove("ShippingAddressPk");

	// *** Clear out expired Temporary lineitems
	busTLineItem LineItems = WebStoreFactory.GetbusTLineItem();
	LineItems.ClearExpiredLineItems(7200); // 2 hours

	// *** Show the confirmation page - don't transfer so they can refresh without error
	Response.Redirect("Confirmation.aspx");
}
The code starts by unbinding the form variables and checking for binding errors. Next a few specific fixups for UI specific entry like the Credit Card expiration date are filled on the business object. Then the Invoice is checked for validity using the Invoice's Validate() method. This method performs a few simple checks like checking the credit card's expiration date and a Mod10 check on the Credit Card.
At this point we know that the input to the invoice is all good. We've captured and validated the Customer information on the previous form so we need to do nothing else with that. Same goes for the Shipping information. The LineItems still sit in the Temporary LineItems table.
At this point we can process the credit cards in real time if you like. If live card processing is enabled (in the Configuration section of the site) the users credit card will be processed while he waits using the code in the ProcessCreditCard() method of the form.
bool ProcessCreditCard()
{
	// *** See if we're On to do online processing
	// *** This logic checks to see whether items  are shippable without manual validation
	// *** If all are then the order is processed online. Otherwise it's simply submitted
	// *** and processed offline later.
	if (!App.Configuration.ccProcessCardsOnline)
		return true;

	// *** Check to see if this order can be processed without
	// *** manual confirmation (such as upgrades etc.)
	// *** YOU MAY WANT TO REMOVE THIS LINE IF YOU ALWAYS PROCESS CARDS
	if ( !Invoice.CanAutoProcessCreditCards() )
		return true;

	// *** Process the actual card for this invoice
	if (!Invoice.ProcessCreditCard() )
	{
		// *** Let the Page handle the error
		// *** Invoice.ErrorMessage has parsed error info
		return false;
	}

	// *** Confirm the order items
	this.Invoice.SendEmailConfirmation();

	return true;
}
This method starts by checking whether processing is enabled and if it is goes ahead and submits the card to the processor by calling the Invoice.ProcessCreditCard() method. This method uses the App.Configuration object to retrieve information you have configured about the processor. Invoice.ProcessCreditCard delegates to the right processor class and returns a true or false result and sets the CCResult, CCResultX and CCError fields of the current Invoice record. If an error occurred the Invoice.ErrorMessage property contains the parsed error message from the processor.
If the card was processed successfully Email confirmations are sent off to the customer immediately. SendEmailConfirmation() goes through the invoice and looks at each item and sends a confirmation with the text from the Item's RegText field (which should contain the download and unlock information for software for example).
Remember: Online Credit Card processing is optional and you can control what happens when an order was processed completely. Online processing usually makes sense only if you plan on immediately sending a confirmation. Otherwise you can choose to process credit cards at a later point or using the offline application.
Ok, once this processing has occurred only one thing remains - save the actual order and clean up. Assuming the processing succeeded or you decided to not process cards online you can now call the Invoice.Save() method to write actual invoice to disk.
if (!this.Invoice.Save(true))Note that we pass a parameter of true to the Invoice, specifying that we need to update our invoice from the temporary lineitems. What happens in this case is that we copy the items from the temporary lineitems table to the 'real' lineitems table.
A method on the LineItems object takes care of this in the Invoice.Save() method:
this.LineItems.SaveFromTemporaryLineItems(this.Pk);which calls this code:
public bool SaveFromTemporaryLineItems(int InvPk)
{
	busTLineItem TLineItem= WebStoreFactory.GetbusTLineItem();
	busLineItem LineItem = WebStoreFactory.GetbusLineItem();

	if (TLineItem.LoadLineItems(InvPk) < 0)
	{
		this.SetError(TLineItem.ErrorMessage);
		return false;
	}

	if  (!LineItem.GetBlankRecord())
	{
		this.SetError(LineItem.ErrorMessage);
		return false;
	}

	foreach(DataRow oTRow in TLineItem.DataSet.Tables["wws_tlineitems_list"].Rows)
	{
		if (!LineItem.New())
			break;

		DataRow oRow = LineItem.DataRow;

		// *** Copy the item info from the TItem to the 'real' item
		Westwind.Tools.wwDataUtils.CopyDataRow(oTRow,oRow);

		oRow["InvPk"] = InvPk;

		if (!LineItem.Save())
			break;
	}

	// *** Get rid of the temporary lineitems
	this.ExecuteNonQuery("delete from wws_TLineItems where InvPk=" + InvPk.ToString());

	return true;
}
This code basically loads up the temporary lineitems then runs through each runs through each of the temporary lineitems and calls the generic wwUtils.CopyDataRow() method which runs through all the target fields and tries to copy fields of the same name out of the source. This method is very useful for copying data that is not quite equal (something that the ADO.Net row methods can't do).
Each item is copied and the new lineitem is saved to disk with the Save() method. When everything's been copied the final code deletes all the temporary lineitems.
Done! Our order is finally safe and written to disk...
All that's left now is to clean up:
// *** Clear out the Invoice Session PK so this invoice is 'history'
Session.Remove("ShoppingCartItems");
Session.Remove("ShoppingCartSubTotal");
Session.Remove("ShippingAddressPk");
// *** Clear out expired Temporary lineitems
busTLineItem LineItems = WebStoreFactory.GetbusTLineItem();
LineItems.ClearExpiredLineItems(7200); // 2 hours
// *** Show the confirmation page - don't transfer so they can refresh without error
Response.Redirect("Confirmation.aspx");

Comment or report problem with topic