 Step 4 - Adding Inventory Items
 Step 4 - Adding Inventory Items
In this step we'll start adding a few inventory items to our store. This store MauiTouch sells a few artistic items so in this case there are going to be items like paintings and photos.
For best impact, you should also have images of your items to sell. These images should be fairly small (no more than 300 pixels wide) and should be stored with a descriptive name or better yet the SKU plus the image extension. Using the SKU is useful in case you need to automate management of images in the future.
The first thing you'll do is display a list of inventory items which at this point is blank:
![]()
Click on the Add Item button to create a new item which brings up a form with a lot of information presented in a tabbed interface
new form

This lengthy form contains all information about the Inventory item. Most options should be self explanatory but here's a list of what each field means:
Tabbed Interface:
This form uses a tabbed interface for its many configuration options. Changing tabs does not cause the form to save or submit the data to the server - all the pages are treated as a single page and submitted only when you press the Save button on the bottom. If errors occur, the problem fields may be hidden on one of the tabbed pages.
SKU
This is the primary Item identifier used to ID an item. Think of the SKU as the Product ID, although it is not the PK which is a seperate field. The PK or the true unique id for this item is displayed to the right of the SKU and is displayed mainly for informational purposes for developers.
Description
The description is the simple, one line description for the item. This is what's displayed by default in item lists and line item displays. This field can be 50 characters long.
Long Description
This can be a long description for the item and is free form. This field can also contain HTML markup that is simply displayed on the Web. As such you can use HTML tables, embed images etc. - anything HTML can do.
Note that this is 'smart' HTML markup - any linebreaks in the text are automatically converted into the proper <br> or <p> tags. So if you type plain paragraphed text such as in the sample above it will usually display just fine. When adding HTML text be aware that any line breaks in the HTML may cause extra <br> or <p> tags to be inserted which can lead to unexpected spacing in cut and pasted HTML content.
Abstract
An abstract is a short description for the item that is displayed in the Inventory display list. This abstract can be used in other places as well to quickly display more information for an item a customer has purchased.
You can automatically generate an abstract with the Create... button which takes the first few paragraphs of the Long Description. Alternately you can type in text in this field as well. The Create All... button allows you to create automatic abstracts for all items in the database that do not already have an abstract.
Manufacturer
This is the company that makes or sells this product. Can be used in reports to isolate sales by company for example. Not used in the online store at this time, but the data is available with the Item data. It is used in the offline app for report grouping.
Categories
This is one or more categories that this item is listed in. The list must be separated by line breaks and the values must correspond to the categories you defined in the previous step.
Sort Order
The Sort order determines in which order items are displayed in lists like the Category Item list. Items with higher numbers float to the top of any list. Any values with 0 are sorted alphabetically. Use this to prioritize your items.

Price, Special Price and Cost
These are the regular sales price, a special price when the item is on sale, and the cost of the item respectively. Only the first value is really used at this time, but you could for example show items that are temporarily reduced in price show both the full and reduced price for improved handling.
Is this a physical item
A physical item is an item that tracks stock quantities. As an item is sold the stock goes down and if an item is out of stock it can't be purchased. Many businesses especially those selling software or services don't have real inventory and in that case you can uncheck this option.
Stock, Items on Order, Expected On
These relate to the current stock level and the items that are on order with an expected arrival date. The latter two values must be manually set and are mainly informational - they're not currently used in the store.
Weight
This is the weight of the item if it is physical and must be shipped. Weight is used to calculate shipping rates. The base store ships with real simple shipping rules, but you can customize these shipping rules to whatever needs you may have by customizing the shipping rules.

Hide this item on the Web
In some applications you may have an inventory database that includes markup items, or service items that are not to be shown on the Web but you still want to have them in the database. For these you can optionally hide an item from the Web. Also useful if you run out of an item or a service item goes past a certain date or you have items that are 'on again, off again' available.
Image to Display
This option allows you to specify an image name or path that points at the /itemimages Web directory. Simply specify an image name that exists in this directory to have it automatically displayed. Images should be no more than 300 pixels wide (200 or less is better). Generally we suggest you use the SKU plus the image extension (.gif, .jpg etc) as the image name for consistency, but the name is really up to you.
You can copy images directly into the ItemImages directory or you can use the Upload Image option which looks like this:

Product Url
This is a URL to the main info page for this product where the customer can find more complete information. This causes a 'More Info' Url to be added to the end of the product description.
Redirection URL
You can use this URL to automatically redirect an item link to another by specifying another URL. This is useful if you have old item numbers and want those to be pointing at newer versions (for example, WWHELP25 and WWHELP30 should now go to WWHELP40 in the store). This relieves you from having to chase down links from your main Web site that might point at the old items.
Specials Display
Specials are the specials that display on the Home page if you use the SpecialsListing.ascx control. Specials assigned a SortOrder value other than 0 automatically show up in the listing with the SortOrder determining which items displays first.
The Special Header Text and Detail text are similar to the Abstract, but they are to be customized for display on the front page - often times this stuff will be overhyped text about a new item being released etc. so the text here will not be product specific but often news specific. You can also specify a specials price if you want to run a promotion on the item. Currently the store does nothing with this price but the field is here for you to implement this functionality.

Registration Password and Registration Text
If you are working with Software Registrations it's useful to automatically confirm orders when they are completed. The registration password and text can be used to provide download information and unpacking passwords for software. This information is used when you confirm an order from the offline application or the invoice display form.
Email To
Optionally if you sell software for a third party you can have a confirmation sent to the third party contact with this email address. This contact is emailed an XML version of the full invoice which can be imported into other order systems or read directly for order processing.
Commission Paid
This is the total value that is to be paid to a third party for an item. If you sell items on commission sales a typical percentage will be 20-30% which means the commision paid will be 70-80%. The value is entered as a decimal value - ie. 0.70, .80. This information can be used for commission payment reports.

Product Type
A product type can be used to allow special items to appear on a form. For example an item might be a conference item and be of type conf. The user can then create custom HTML input fields that start with 'conf' (such as confAttendee, confMealType etc), which are captured as special fields into the XML Properties field.
XML Properties
Custom XML field that allows storage of custom properties. Used by the business object's GetProperty/SetProperty methods you can store custom data in this field. It's also used for custom types which can capture additional user input based on a form variable prefix.
Phew - a lot of information. But realistically you only need a few thing filled out mainly on the first two pages.
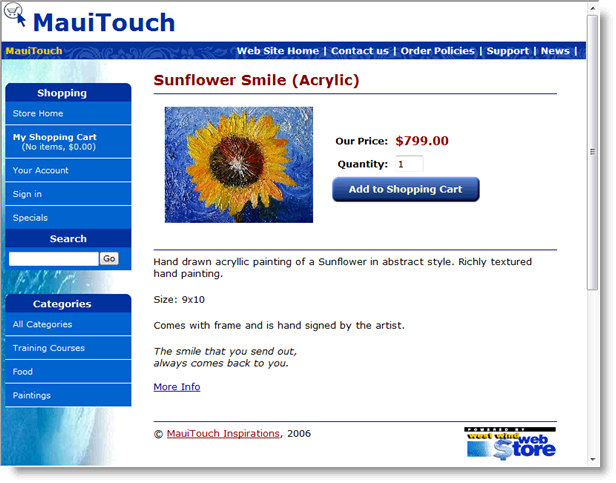
Ok... so for our MauiTouch Web store you can see the settings I've made for the store in the image. I've added a painting to the store, specified a sales price and weight, added it to the Paintings category and attached the picSunflower image. The image was captured from a digital camera, resized to 250 pixel width with PaintShop and then simply stored into the ItemImages directory as picSunflower.jpg.
Click Save Item to write the changes to the database and we now have our first item ready to view.
As a shortcut you can now view this item at:
http://localhost/webstore/item.aspx?sku=PICSUNFLOWER
which will get you:
But let's not get too far ahead but look at Step 5 - Check out the Web Store.
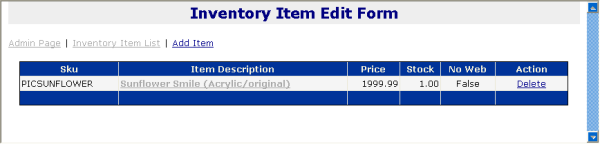
If you go back to the Admin page now (http://localhost/webstore/admin/) and click on the Inventory Item list you should now see the new item in there as well:

Comment or report problem with topic