 Running the configuration application
 Running the configuration application
Before getting started please make sure that IIS is installed and ASP.NET registered on the server. You can check this by quickly creating a HelloWorld.ASPX page and accessing this page through the Web Browser.
If IIS works and ASP.NET is not working it is likely not registered. To fix this do the following:
- Make sure that the .NET Framework is installed
- Run ASPNET_IISREG.EXE -i in the .NET Framework directory
Once you're sure that your Web Server is configured, the first step after the files have been unzipped or copied to the specified directories is to run the _WebStoreConfig.exe application. This little app configures the virtual directory for the Web Store:
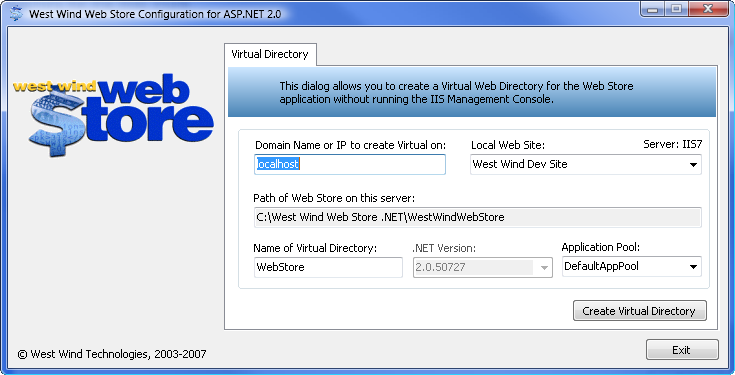
In most cases you can just run with the defaults unless you specifically need to change them - most likely if you're setting more than one store.
Start by picking the domain for the Web Server (usually localhost or 127.0.0.1) and the Web Site to install the new virtual on. The Web Site is usually the default Web Site, which should be selected at startup.
The path of the Web Store defaults to the current directory and the name of the Virtual directory (i.e. this becomes http://localhost/WebStore/ for example) to WebStore. You can change the name as you see fit, but if you follow through this guide be aware that you need to adjust the URL paths accordingly.
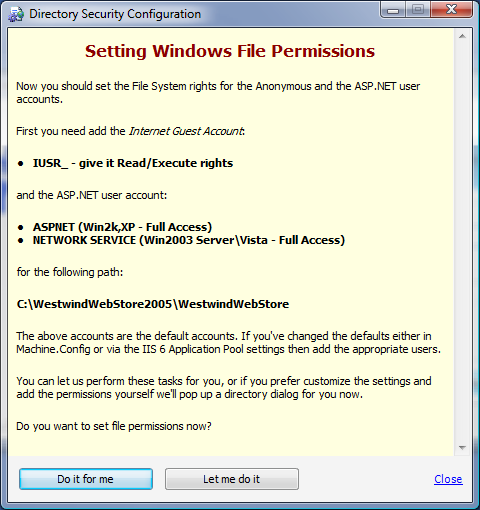
Important: Security Permissions Configuration for Web access
You will also need to configure the security of the Web directory in order to allow read/execute access to the Internet Guest Account (IUSR_<MachineName>), and give full access to the account the application is running under (ASPNET (iis5) or NETWORK SERVICE (iis6)).To help you with this task we can perform these settings for you from the dialog that pops up after the Virtual directory has been created. You can also choose to do it manually.
To set permissions manually, run Windows Explorer and go to the installation directory and select the wwWebStore directory. Right Click and select Properties, then click on the Security tab:
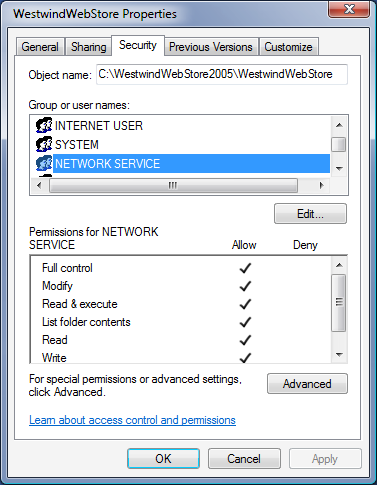
Add the Internet Guest Account with read/execute permissions, and depending on your Operating System the NETWORK SERVICE (Windows 2003) or ASPNET (Windows 2000 or XP) account to the permissions. If you are using a Web Hosting Service this account might be different and should be provided for you as part of your configuration information.
For the latter account add full access to the rights - this is the account the Web application runs under and this option allows the application to have full access to this directory tree so configuration information can read and written and the XML log file can be written to.
Also set permissions on the Admin directory by removing the Internet Guest Account (IUSR_) and allow access only to Administrative or specific accounts that have access to the admin features.
Here's a summary:
| Windows XP/2000/NT | Windows Server 2003 | |
|---|---|---|
| IUSR_MachineName Read and Execute Rights |
IUSR_MachineName Read and Execute Rights |
|
| ASPNET Full Rights |
NETWORK SERVICE Full Rights |
|
| Admin Directory Permissions | ||
| Remove IUSR_MachineName account to force authentication | ||
Once these steps are complete you can now use the Administration interface of the Web Site to configure your Web Store application. The link to do so is:

Comment or report problem with topic