 Creating a User Control
The WebControl Framework supports visually designed User Controls. User Controls are similar to full pages in behavior but are essentially a page fragment that can be embedded into another page or another control making it possible to build highly reusable components visually and embed them into many pages. The idea is that a UserControl provides the ability to visually design a page fragment and embed it into another page or control.
There are two steps to using User Controls
- Creating the User Control in s separate ASCX file
- Embedding the User Control into a host page
The process is straight forward, but User Controls have a few special rules that must be observed when they are embedded into pages. Specifically you need to specify the classname, source file and script location explicitly when embedding the control into a parent page. User Controls also act like 'real' user controls which means they load as a library and so cannot be unloaded. This means changes to the user control require stopping and restarting of the application.
Creating a User Control
Creating a user control is very similar to creating a Page. You bascially drop controls onto a page and hook up event logic to various operations and events. To create a control you can use the Visual Studio New Web Connection Control template from the Add New Item shortcut menu in the VS.NET project.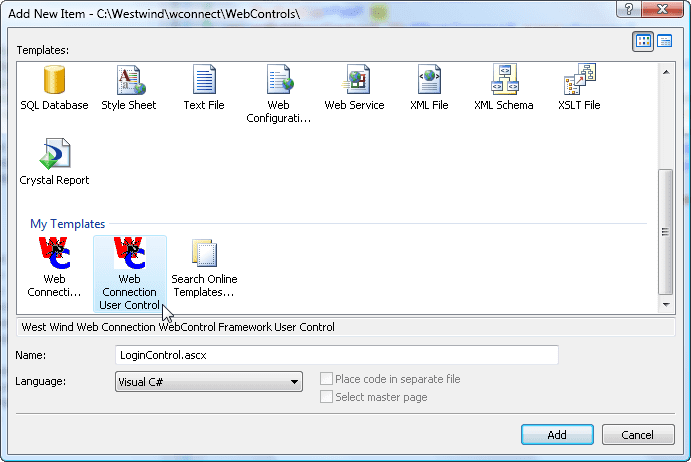
Once the control template has been created set the ControlClass and GeneratedSourceFile properties to give it classname and the locatino of the PRG file where the class is created. The following creates a small custom Login form and demonstrates a simple layout for a user control:
<%@ Control Language="C#" ClassName="LoginControl" %>
<%@ Register Assembly="WebConnectionWebControls"
    Namespace="Westwind.WebConnection.WebControls"
    TagPrefix="ww" %>
<ww:wwWebUserControl ID="TestControl" runat="server"
                     ControlClass="LoginControl"
                     GeneratedSourceFile="WebControls\LoginControl_control.prg" />
<div style="background:silver;width:300;border-width:2px">
        <ww:wwWebLabel ID="lblLoginName" runat="server">Login Nam"e:</ww:wwWebLabel><br />
        <ww:wwWebTextBox ID="txtLoginName" runat="server" Height="22px" Width="196px"></ww:wwWebTextBox><br />
        <ww:wwWebLabel ID="WwWebLabel1" runat="server">Password:</ww:wwWebLabel><br />
        <ww:wwWebTextBox ID="txtLoginPassword" runat="server" Height="22px" Width="196px"></ww:wwWebTextBox>
        <ww:wwWebButton ID="btnSecurityLogin" runat="server" Text="Login" Width="80" Click="btnSecurityLogin_Click" />
        <hr />
        <ww:wwWebLabel runat='server' ID="lblMessage" ></ww:wwWebLabel>
        <br />
</div>
The <%@ %> tags are required for VS.NET rendering only and are ignored by the parser. Just make sure that the WebConnectionControls are referenced so you can use any Web Connection controls with your user control. As with pages you need to tell Web Connection what the name of the generated class will be (ControlClass) and where the class is to be generated as a PRG file (GenerateSourceFile). The path specified is relative to the current directory.
Controls can be visually designed just like pages, so you can drag and drop controls from the Toolbox onto the page and set properties with the Property Sheet or you can just use the HTML markup editor and Intellisense.
Generating the Control Class as a PRG File
Once you've laid out your control you will need to generate it. There are two ways to do this - just like with pages:
- Manually parse and compile the page
- Let the control be parsed automatically when the page that houses it is run
The former involves running WebPageParser.prg:
DO WebPageParser with "c:\westwind\wconnect\webControls\LoginControl.ascx",2You point the parser at the physical path of the ASCX control file and pass 2 as the second parameter which tells the parser to parse control as opposed to a page. This command causes the control to be parsed and the ControlClass specified to be generated in the path relative path specified GeneratedSourceFile. Remember that GeneratedSourceFile is a RELATIVE path to the current directory! You'll want to ensure you always generate from the same location.
The other alternative is easier - you automatically parse the control when the page executes. But before we can do this, we need to drop a control on a Page first.
Referencing the User Control and the Page
User Controls act very much like small self contained pages in that you can use the same controls inside the user control and handle the same events like OnInit, OnLoad, OnPreRender and even events from controls defined in the control.If you need to reference the control or the control's properties from within one of the controls you need to use THIS.ParentControl (ie. the control your working in, one level back to the user control) to reference it. For example, assume you have SubTitle property on the user control and you want to display this value as an expression you have to use code like this:
<%= this.ParentControl.SubTitle %>The same applies if you were to use a control source that binds to a user control property:
<ww:wwWebTextBox runat='"Server" id="txtTitle" ControlSource="this.ParentControl.SubTitle" />
User Controls and Custom Properties
User controls are classes and so you can add custom properties in your code behind for the control. So imagine for a minute that you have a couple of properties attached to your CodeBehind control:#INCLUDE WCONNECT.H
SET PROCEDURE TO logincontrol_control.prg ADDITIVE
RETURN
**************************************************************
DEFINE CLASS LoginControl as WWC_WEBUSERCONTROL
***************************************
*** Your Implementation Control Class - put your code here
*** This class acts as base class to the generated page below
**************************************************************
Username = ""
Password = ""
FUNCTION OnLoad()
DODEFAULT()
ENDFUNC
FUNCTION OnPreRender()
IF !THIS.IsPostBack()
this.txtUserName.Text = this.Username
this.txtPassword.Text = this.Password
ENDIF
ENDFUNC
FUNCTION btnSecurityLogin_Click()
this.lblMessage.Text = "Logged in"
ENDFUNC
ENDDEFINE
*# --- BEGIN GENERATED CODE BOUNDARY --- #*
*******************************************************
*** Generated by WebPageParser.prg
*** on: 07/28/2007 09:19:43 PM
***
*** Do not modify manually - class will be overwritten
*******************************************************
DEFINE CLASS LoginControl_WCSX AS LoginControl
Id = [TestControl]
*** ... generated class code omittedThese properties can then automatically be assigned in the controls' markup:
<uc1:LoginControl ID="LoginForm" runat="server"
            ControlClass="LoginControl"
            SourceFile="webcontrols\LoginControl_Control.prg"
            ScriptFile="./LoginControl.ascx"
            Username="Rick" Password="SuperSecret"
      />
If you want Intellisense to work for these custom controls you can add some .NET code into the page to define those properties. Using C# and Server markup you can add the following before the wwWebUserControl definition in the page:
script runat="server">
public string Username
{
    get { return _Username; }
    set { _Username = value; }
}
string _Username = "";
public string Password
{
    get { return _Password; }
    set { _Password = value; }
}
string _Password = "";
</script>
This is purely optional and only required for Intellisense to work on the control when dropped onto a page but it's a nice touch if you use the control in multiple places.

Comment or report problem with topic