 Step 1 - Setting up a business object
In this example we use the wwBusinessObject class to create a customer editing solution similar to the one demonstrated in the Core Step by Step walk-through. Instead of direct data access we'll use the wwBusinessObject class to create a class and manage all data access through this business layer. This example then also uses scripts to handle displaying of data more efficiently than the Core Step by Step walk through.
Creating a Business Object
Let's start by creating a new business object for the customers that we used in the Core Step By Step example. A business object is meant to represent a logical abstraction of thing you work with in an application. It could be a customer or an invoice. Often business objects map one to one to a table, but in some cases like an invoice the business object might manage multiple tables such as invoice header, lineitems and the customer the order applies to.
For this example, we use a simple one to one mapping for a customer object that maps to the customers table.
To create a new business object you create a new object and inherit from the wwBusinessObject class (contained in wwBusinessObject.prg). A real easy way to create a new business object is to use the wwBusiness Object Wizard from the Console. application.
To use it type:
DO CONSOLE
and select the Create New Business Object option.
Console has to be run from the Web Connection Install Folder
The Console application has to be run from the Web Connection install folder as it depends on various related template files so either CD into the folder or start another Web Connection instance from the installation folder.
Once you run the wizard you see a form that lets you select a class name and file location, as well as a table to map to. Here's what this looks like for our customers table:
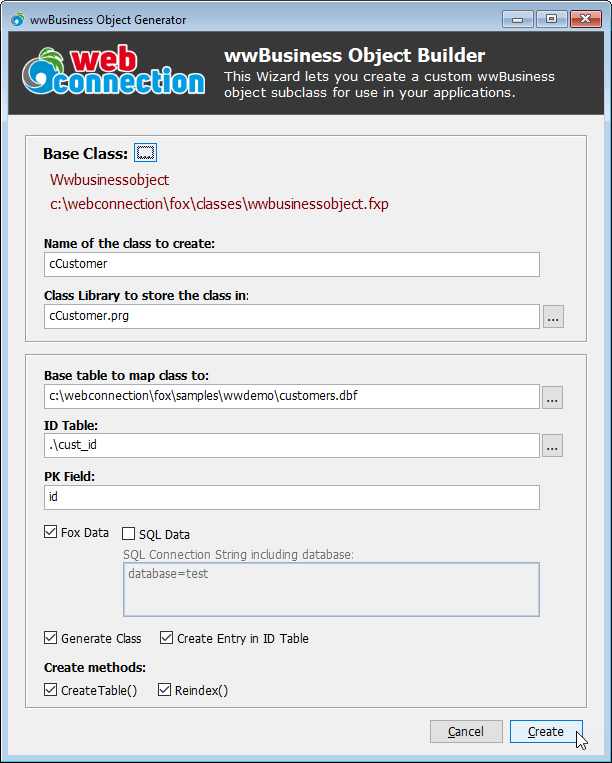
On this form you specify the class to inherit from - typically the core wwBusinessObject class or a subclass that you create yourself - and specify a name and location where to create the new class. wwBusinessObject is a PRG class and the generated class will be cCustomer.prg.
You then specify the table to map which is customers.dbf in the Webdemo folder. Note that you can and if at all possible should use a relative path or no path if you know that the table will be accessible via relative path or the FoxPro path. I prefer to not use any path and ensure that the data path is in FoxPro's SET PATH list.
You also need to specify an ID table that is used to generate new IDs when a new instance is created. wwBusinessObject by default expects an integer PK and this ID table holds IDs for each table that are locked and incremented to get new IDs. In addition, the business checks ID values based on the PK field you specify on the form, searching for the new value in the PK field.
In this example, the customer table actually contains a string PK which is generated using a simple string function so we won't actually use the PK generation and instead override the CreateNewId() method.
Click the Create button and a new business object is created for you. After generation is complete go back to your projects folder.
What's generated
The Wizard creates a new subclass of wwBusinessObject and sets up defaults based on the input you provided. Here's what the generated class looks like (truncated for brevity):
DO wwBusinessObject
SET PROCEDURE TO ccustomer.prg ADDITIVE

*************************************************************
DEFINE CLASS cCustomer AS wwbusinessobject
*************************************************************

cAlias = "customers"
cDataPath = ""
cDataPath = "c:\webconnection\fox\samples\wwdemo\"

cPkField = "id"
cIdTable = ".\cust_id"

*** Sql Connection String
cConnectString = "database=test"

*** 0 - fox 2 - Sql 4-Web
nDataMode = 0

#IF .F.
LOCAL THIS as ccustomer of ccustomer.prg
#ENDIF


*************************************************************
FUNCTION CreateTable(lcFileName)
*************************************************************
LOCAL lxFields

IF EMPTY(lcFileName)
   lcFileName = THIS.cDataPath + THIS.cFileName
ENDIF

IF THIS.nDataMode = 0

*** Generated on: 03/11/2020
DIMENSION lxFields[ 15,4]

lxFields[  1,1]='ID'
lxFields[  1,2]='C'
lxFields[  1,3]= 11
lxFields[  1,4]=  0
lxFields[  2,1]='FIRSTNAME'
lxFields[  2,2]='V'
lxFields[  2,3]= 30
lxFields[  2,4]=  0
...
lxFields[ 15,1]='PK'
lxFields[ 15,2]='I'
lxFields[ 15,3]=  4
lxFields[ 15,4]=  0

CREATE TABLE (lcFileName) FROM ARRAY lxFields
USE

ENDIF

ENDFUNC
* CreateTable

*************************************************************
FUNCTION Reindex()
*************************************************************
IF THIS.nDataMode = 0
   IF !OpenExclusive(THIS.cDataPath + THIS.cFileName,THIS.cAlias)
      THIS.SetError("Unable to open Customer file due to exclusive use.")
      RETURN .F.
   ENDIF

   DELETE TAG ALL
   PACK

   INDEX ON upper(company) TAG names
   INDEX ON id TAG id

   USE
ENDIF
ENDFUNC
* Reindex

ENDDEFINE
* cCustomer
The class is just a straight subclass with some property values assigned and the CreateTable() and Reindex() implemented.
Making a few changes to the Generated Class
Typically after the class has been generated I like to make at least one minor change.
Data Path
The Wizard generates the class with the full path you specified for the selected file in cDataPath. This works as the file is found, but a hardcoded path is never a good idea in code. So I recommend that you change cDataPath to a relative path (ie. .\Samples\wwdemo) or leave the path off altogether and work on the assumption that FoxPro's SET PATH includes the data path.
So in the WebDemoServer::Load() method you can add:
*** Add Data Path
SET PATH TO ".\Samples\wwDemo" ADDITIVE
I strongly recommend this approach latter approach as it's the most portable. With that set you can remove the cDataPath altogether.
cAlias = "customers"
cDataPath = ""
cFileName = "customers"
You can use the same approach with all other business objects that likely use the same datapath - just clear out the cDataPath.
Override CreateNewId()
In this example, the Customers table does not include a numeric primary key and so the default behavior of generating a new numeric PK is not needed. Rather we can simply override the CreateNewId() method and generate the string ID and return the new value instead.
FUNCTION CreateNewId()
RETURN SYS(2015)
ENDFUNC
Overly simplistic but it works for this demo.
Id Generation
By default
wwBusinessObjectgenerates integer ids using an ID table (in FoxPro and SQL using a Stored Procedure). The ID table holds entries for each table and an ID counter that's counted up everytime an ID is generated. If that doesn't work for you, you can always override theCreateNewId()method to generate your own ID.
Using the new Business Object
Once you've created the business object you can start using it by querying and updating data. You can also create the table if it doesn't exist using the CreateTable() method (FoxPro only).
To start you'll need to load the business object:
DO cCustomer && Load dependencies if not loaded
This loads wwBusinessObject and its dependencies and your cCustomer class so it's accessible, so you then can create an instance:
loCust = CREATEOBJECT("cCustomer")
You can put the call to
DO cCustomerintoWebDemoMain::Load()so you only load the libraries once. This is the preferred way to declare all your dependencies on startup so that they are in one place.
Simple Querying data
First, lets just check out how the business object works by trying some simple querying:
loCust = CREATEOBJECT("cCustomer")
loCust.Query()

BROWSE
This retrieves the entire contents of the table in a cursor for display. If you want to filter the query or retrieve only a few fields you can do something like this:
? loCust.Query("SELECT company,FirstName,LastName where company < 'D'")
The function returns a count of records returned and if an error occurs you can check the lError and cErrorMsg properties.
The query method should not include an INTO statement as it determines the cursor name to dump the data into. Since wwBusinessObject can work with data sources other than FoxPro data, the INTO clause is not valid with other backends like SQL Server.
Instead you can optionally specify the cursor name with the second parameter:
loCust.Query("SELECT company,FirstName WHERE company < 'D' ORDER BY company","TCustomers")
Note: if you use
INTO TCustomersthat will also work - the query parser looks for the INTO and if it finds it doesn't generate a cursor name into the query string. But if you useINTO TCustomersthe query won't be portable to SQL Server. For better compatibility, use thelcCursorparameter.
If the lcCursor parameter is omitted the default cursor name is TQuery.
You can also return results in a variety of formats such as JSON, XML, Collection and more by using the 3rd parameter.
*** JSON
DO wwJsonSerializer   && required for Json
lnCount = loCust.Query("SELECT company,FirstName WHERE company < 'D' ORDER BY company","TCustomers",51)
? loCust.vResult  && JSON

*** Collection
lnCount = loCust.Query("SELECT company,FirstName WHERE company < 'D' ORDER BY company","TCustomers",64)
loCustomers = loCust.vResult   && Collection of objects
? loCustomers.Count
? loCustomers[1].Company

*** or use ConvertData on the currently active cursor
loCust.ConvertData(6,"CustomerList","Customers","Customer")
? loCust.vResult   && XML
CRUD Operations
In addition the business object supports basic CRUD operations against data. You can easily load, edit, add and save data all without ever using manual data access code using the business object:
loBus = CREATEOBJECT("cCustomer")

*** Load a customer by ID
? loBus.Load("_4FG12Y7UD")   && .T. or .F.

*** Access oData object for primary object
? loBus.oData.Company
? loBus.oData.Entered

*** Update a value
loBus.oData.Entered = DATETIME() - 365

*** Validate and Save Customer
IF loBus.Validate()
  ? loBus.Save()    && .T. or .F.
ENDIF

*** Create a new Customer
loBus.New()
? loBus.oData.Id   && Id is generated by loBus.NewId()

loBus.oData.Company = "Oak Leaf Enterprises"
loBus.oData.LastName = "Markus"
loBus.oData.FirstName = "Egger"
loBus.oData.Entered = DATETIME()

IF loBus.Validate()
   ? loBus.Save()
ENDIF

*** New ID generated
lcId = loBus.oData.Id

CLOSE DATA

*** new bus object
loBus = CREATEOBJECT("cCustomer")
? loBus.Delete(lcId)  && .T. or .F.
While the above code assumes a one to one mapping between table and object, you can also work with complex objects like say an invoice that contains an invoice header, line items and a customer reference. The business object would then override the Load and Save operations to load, manage and save the related data.
We'll see more of the CRUD operations later in this tutorial.
Next let's create a new Web Connection Process Class in our WebDemo server.

Comment or report problem with topic